Managing your APIs Last updated 17-Dec-2024
Creating and importing APIs
Introduction
API consumers call or subscribe to Gateway APIs to retrieve data, functionality, etc., exposed by backend APIs. DSAPI supports two types of Gateway APIs: v2 and v4. These are based on the DSAPI v2 API definition and DSAPI v4 API definition, respectively.
Future efforts and innovation will focus on the v4 API definition, but v2 API documentation will be available while the v2 API definition is supported.
v4 API creation concepts
The critical v4 API creation concepts are entrypoints, endpoints, and backend exposure methods.
Entrypoints and endpoints
When creating v4 APIs, you will need to define your Gateway entrypoints and endpoints. These are:
- Gateway entrypoints: The protocol and configuration by which the API consumer accesses the Gateway API. This essentially defines how the backend API is exposed through the Gateway.
- Gateway endpoints: The protocol and configuration by which the Gateway API will fetch data from, or post data to, the backend API.
For example, if you wanted to make a Kafka topic consumable over WebSockets, you would choose the WebSockets entrypoint and Kafka endpoint. If you wanted to expose a backend REST API as a Gateway REST API (i.e., a "pure" REST API use case), your entrypoint would be your context path (the URL location of your Gateway API) and the endpoint would be your target URL (the URL for the backend resource that you want to expose).
Backend exposure methods
When creating Gateway APIs in DSAPI, you need to define the "type" or method of exposing your backend resources: Proxy upstream protocol or Introspect messages from event-driven backend. The architecture that you choose impacts which entrypoints and endpoints are available:
Proxy upstream protocol
- Entrypoints: Context path that supports REST, GraphQL, gRPC, and WebSocket Gateway APIs (policies cannot be applied at the WebSocket message-level using this exposure method)
- Endpoints: REST, SOAP, WebSocket Server, gRPC, GraphQL
Introspect messages
- Entrypoints: HTTP GET, HTTP POST, WebSocket, Webhook, Server-sent events
- Endpoints: Kafka (including Confluent-managed Kafka), Solace (contact us for the required Solace-specific plugin), MQTT
When choosing the message-based architecture, you can combine any supported entrypoint with any supported endpoint. For example, you could expose a Kafka topic as a REST API using HTTP GET, as a WebSocket API, as an SSE API, etc.
Proxy vs message APIs
In addition to message introspection, DSAPI offers both HTTP and TCP proxy support. The high-level characteristics of these APIs are summarized below:
HTTP proxy
- Traditional proxy APIs
- Use synchronous HTTP requests
- Support transformation to enable traffic shaping, analytics, and the application of policies
TCP proxy
- Can proxy any backend protocol that accepts TCP socket connections and can send data over the wire
- Raw TCP packets are transmitted in their native protocol format without transformation or introspection
- Traffic shaping is unavailable
- The types of policies and analytics that can be performed in the control plane are limited
Message introspection"
- Protocol mediation is performed on incoming data streams
- Payloads are reformulated to be consumable by HTTP
- Support transformation and introspection to enable traffic shaping, analytics, and the application of policies
Supported API styles, event brokers, and communication patterns
DSAPI's v4 API definition offers support for a variety of API styles, event brokers, and communication patterns, as detailed below:
| Style/broker/pattern | What DSAPI can do |
|---|---|
| REST API |
|
| SOAP API | Expose backend SOAP web services as Gateway REST APIs |
| WebSocket APIs |
|
| Webhook | DSAPI can expose Kafka, Confluent, Solace, and MQTT backend data sources over a Webhook callback URL. This allows your API consumers to subscribe to a Gateway Webhook API and then retrieve events and messages from these backend data sources in real-time via the Webhook subscription. |
| Server-sent events (SSE) | DSAPI can expose Kafka, Confluent, Solace, and MQTT backend data sources over an SSE API. This allows your API consumers to subscribe to a Gateway SSE API and then retrieve events and messages from these backend data sources in real-time via the SSE API. |
| Kafka |
The DSAPI Gateway can establish a persistent connection with a backend Kafka topic as a data source, allowing the Gateway to expose messages streamed from the Kafka topic to consumers via:
|
| Confluent |
The DSAPI Gateway can establish a persistent connection with a backend Confluent resource as a data source, allowing the Gateway to expose messages streamed from the Confluent resource to consumers via:
|
| Solace |
The DSAPI Gateway can establish a persistent connection with a backend Solace resource as a data source, allowing the Gateway to expose messages streamed from Solace to consumers via:
|
| MQTT |
The DSAPI Gateway can establish a persistent connection with a backend MQTT broker (as long as that MQTT broker is running MQTT 5) as a data source, allowing the Gateway to expose messages streamed from the MQTT broker to consumers via:
|
Limitations
v4 APIs currently do not support DSAPI Debug mode
v2 API creation concepts
The v2 API definition hinges on the following:
- Endpoints refer to the final backend target or data source of a request
- There is no concept of entrypoints
Because there is no decoupling of entrypoints and endpoints, v2 APIs do not support protocol mediation between event brokers and messaging services. When creating v2 APIs, you are limited to proxying backend APIs that communicate over HTTP by exposing Gateway APIs that communicate over HTTP. Policy enforcement at the request/response levels is fully supported, but there is no support for message-level policies.
Importing APIs to the DSAPI Gateway
Introduction
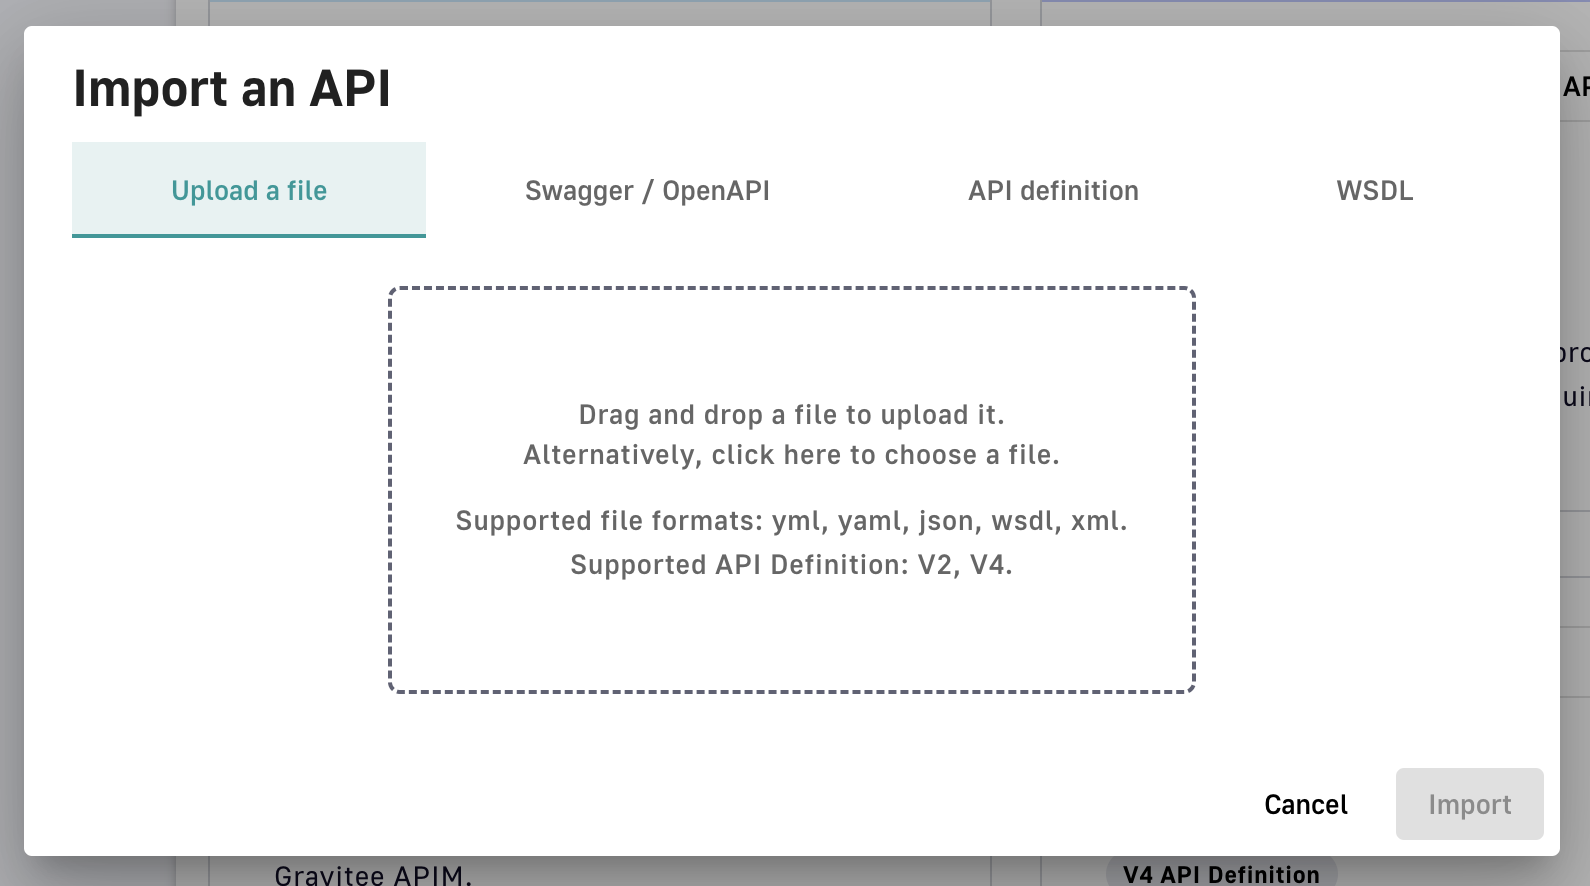
DSAPI supports importing APIs as:
- Files (YML, YAML, JSON, WSDL, XML)
- Swagger/OpenAPI spec (URL)
- API definition (URL)
- WSDL (URL)
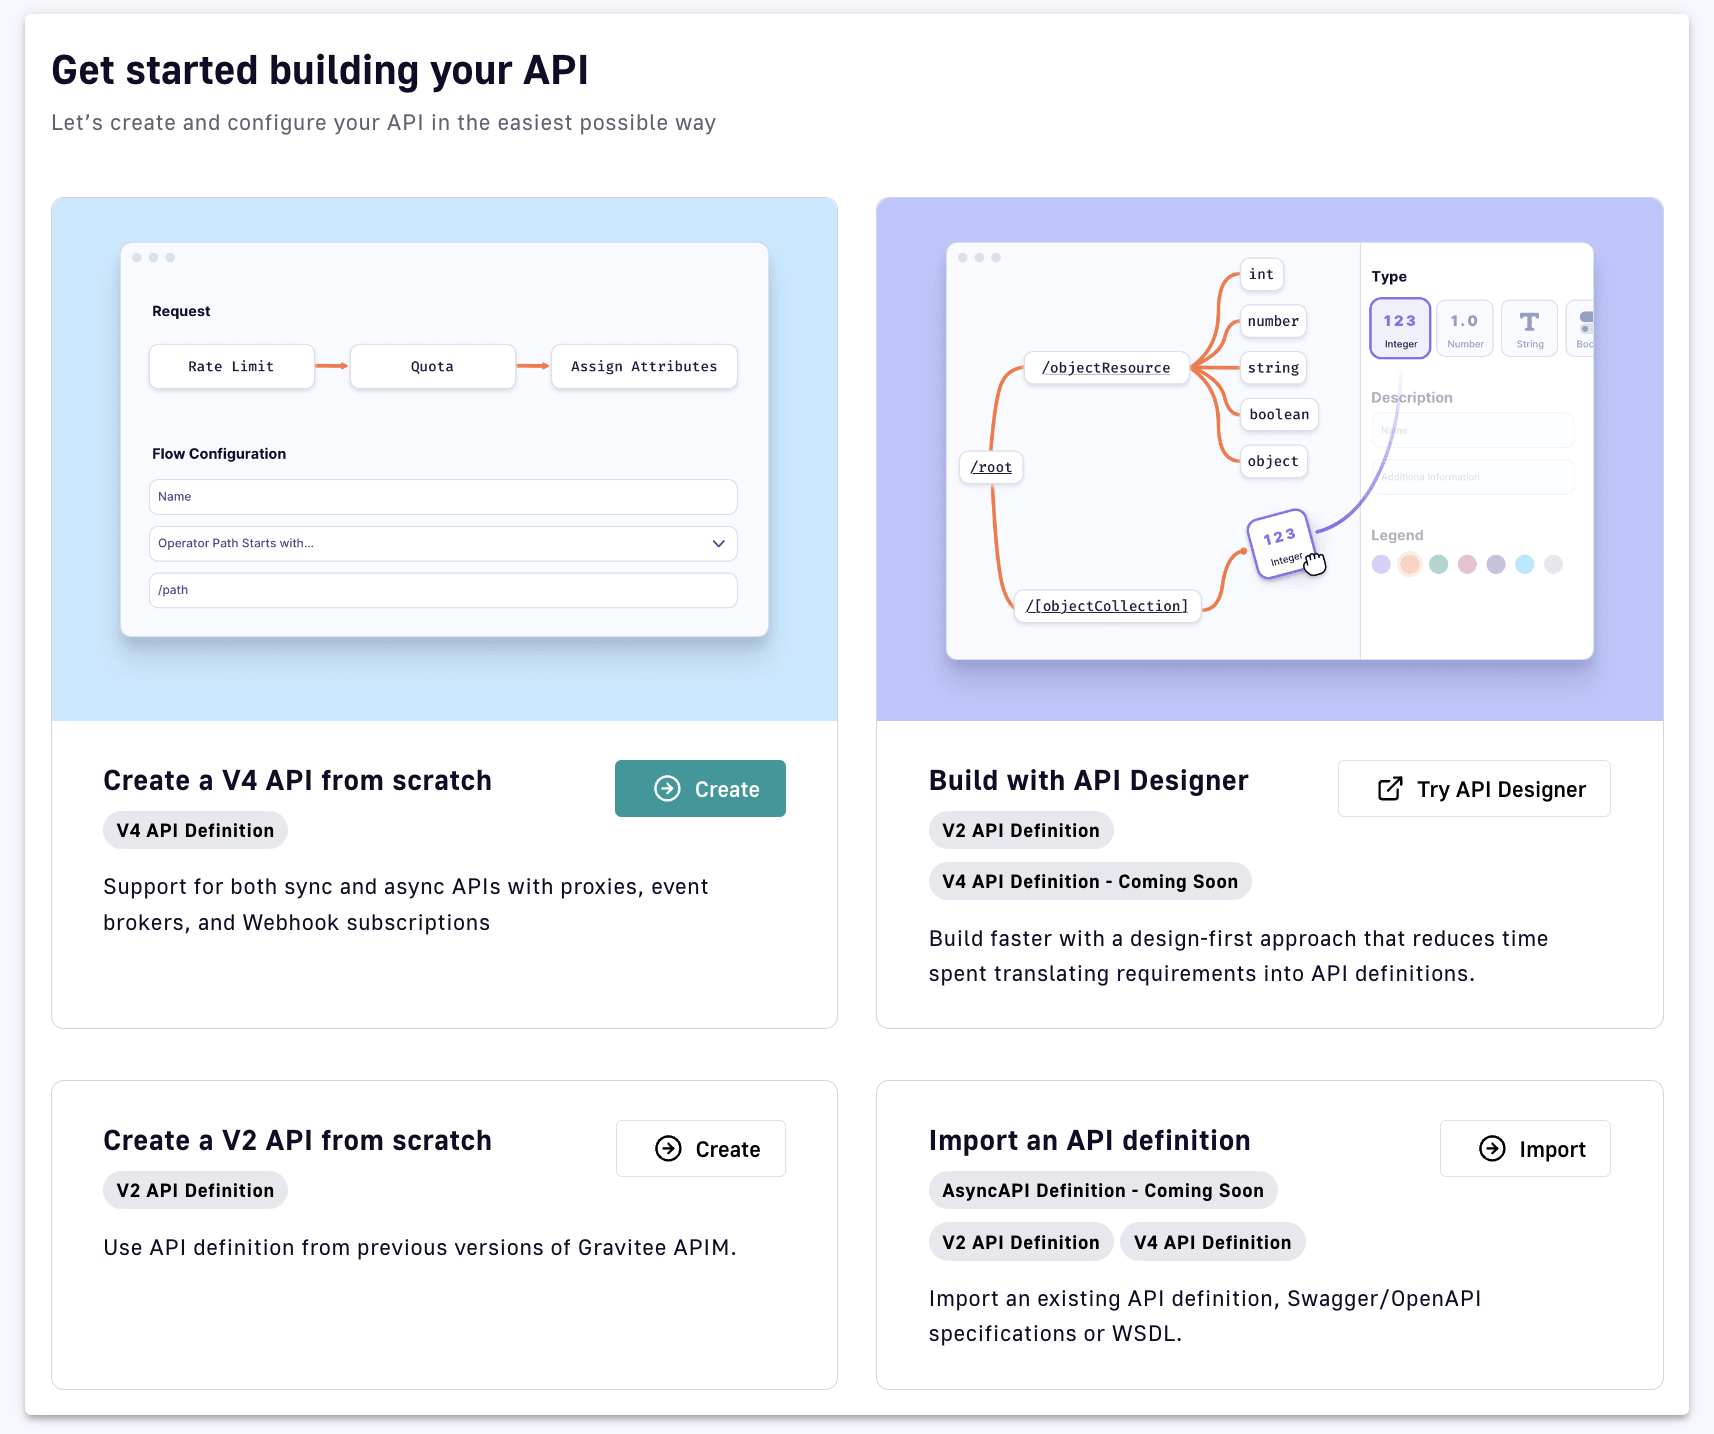
Import your API
To import your API:
- Log in to your API Console
- Select APIs from the left nav
- Select + Add API
- In the Import an API definition tile, click Import
- Choose and configure an import option:
- Upload a file: Import a YML, YAML, JSON, WSDL, or XML file
- Swagger / OpenAPI:
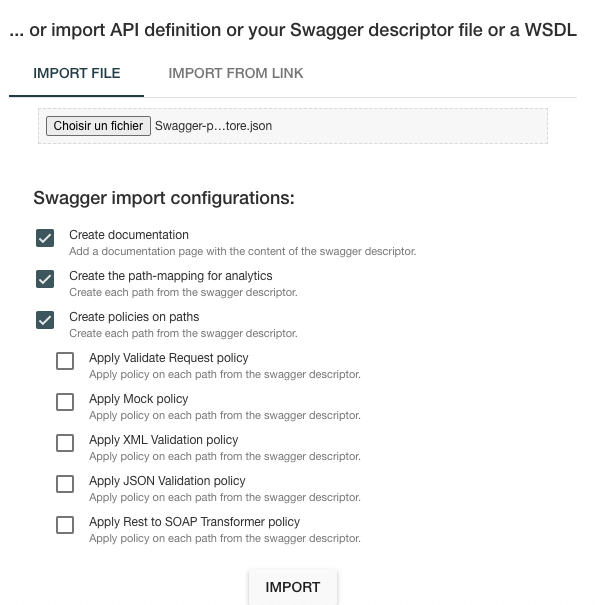
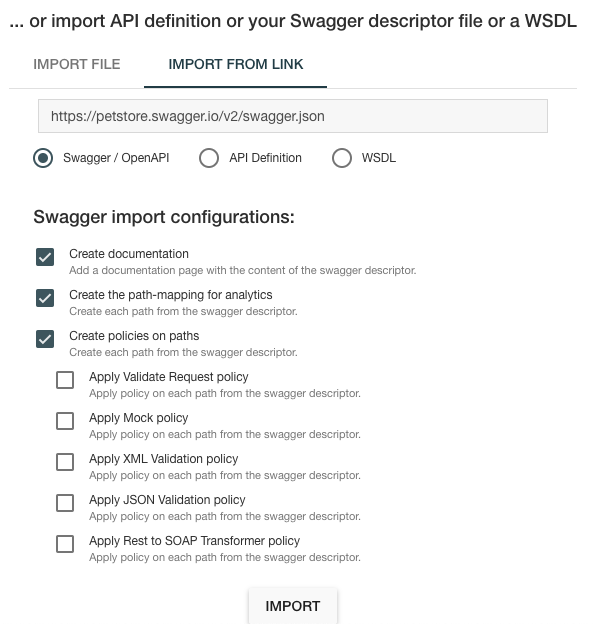
- Provide a Swagger descriptor URL
- Create documentation: Overwrites existing documentation or create it if it does not exist
- Create the path mapping for analytics: Overwrites all of the path-mappings
- Create policies on paths: Overwrites all of the policies. Policies that you can create upon import include JSON Validation, Mock, Request Validation, REST to SOAP, and XML Validation
- API definition: Provide a URL that links to your API definition
- WSDL:
- Provide a WSDL descriptor URL
- Create documentation: Overwrites existing documentation or create it if it does not exist
- Create the path mapping for analytics: Overwrites all of the path-mappings
- Create policies on paths: Overwrites all of the policies. Policies that you can create upon import include JSON Validation, Mock, Request Validation, REST to SOAP, and XML Validation
- Click Import
Once you've imported your API, it will be created as a private API and you will be brought to the API menu and details page.
Importing an OpenAPI Specification
Overview
A powerful APIM feature is the ability to import an OpenAPI specification to create an API. When you import an existing specification, you do not have to manually populate all of the required fields.
Import an API
To import an API from OpenAPI:
- If the OpenAPI specification is a file, select IMPORT FILE and browse your file system
- If the OpenAPI specification is a link, select IMPORT FROM LINK, choose Swagger / OpenAPI, and enter the definition URL
Context-path resolution
| Spec version | Definition | Example | Context-path |
|---|---|---|---|
| Swagger (V2) | basePath field, if it exists. |
|
/v2 |
If not, lowercase trimmed info.title. |
|
/swaggerpetstore | |
| OpenAPI (V3) | Path of the first |
|
/v1 |
If not, lowercase trimmed info.title. |
|
/swaggerpetstore |
Vendor Extensions
You can use a vendor extension to add more information about your API to an OpenAPI specification.
To learn how some policies can be defined in the OpenAPI spec as a vendor extension, see Policies on path.
Considerations
- Categories must contain either a key or an ID.
- Only existing categories are imported.
- Import will fail if
virtualHostsare already in use by other APIs. - If set,
virtualHostswill overridecontextPath. - Groups must contain group names. Only existing groups are imported.
metadata.formatis case-sensitive. Possible values are:- STRING
- NUMERIC
- BOOLEAN
- DATE
- URL
- Picture only accepts Data-URI format. Please see the example below.
Example configuration
openapi: "3.0.0"
        info:
          version: 1.2.3
          title: DSAPI Echo API
          license:
            name: MIT
        servers:
          - url: https://demo.DSAPI.io/gateway/echo
        x-DSAPIio-definition:
          categories:
            - supplier
            - product
          virtualHosts:
            - host: api.DSAPI.io
              path: /echo
              overrideEntrypoint: true
          groups:
            - myGroupName
          labels:
            - echo
            - api
          metadata:
            - name: relatedLink
              value: http://external.link
              format: URL
          picture: data:image/gif;base64,R0lGODlhAQABAIAAAAAAAP///yH5BAEAAAAALAAAAAABAAEAAAIBRAA7
          properties:
            - key: customHttpHeader
              value: X-MYCOMPANY-ID
          tags:
            - DMZ
            - partner
            - internal
          visibility: PRIVATE
        paths:
        ...
Policies on path
When importing an OpenAPI definition, you can select the option Create policies on path to specify that all routes declared in the OpenAPI specification will be automatically created in APIM. To verify, navigate to the policy management view.
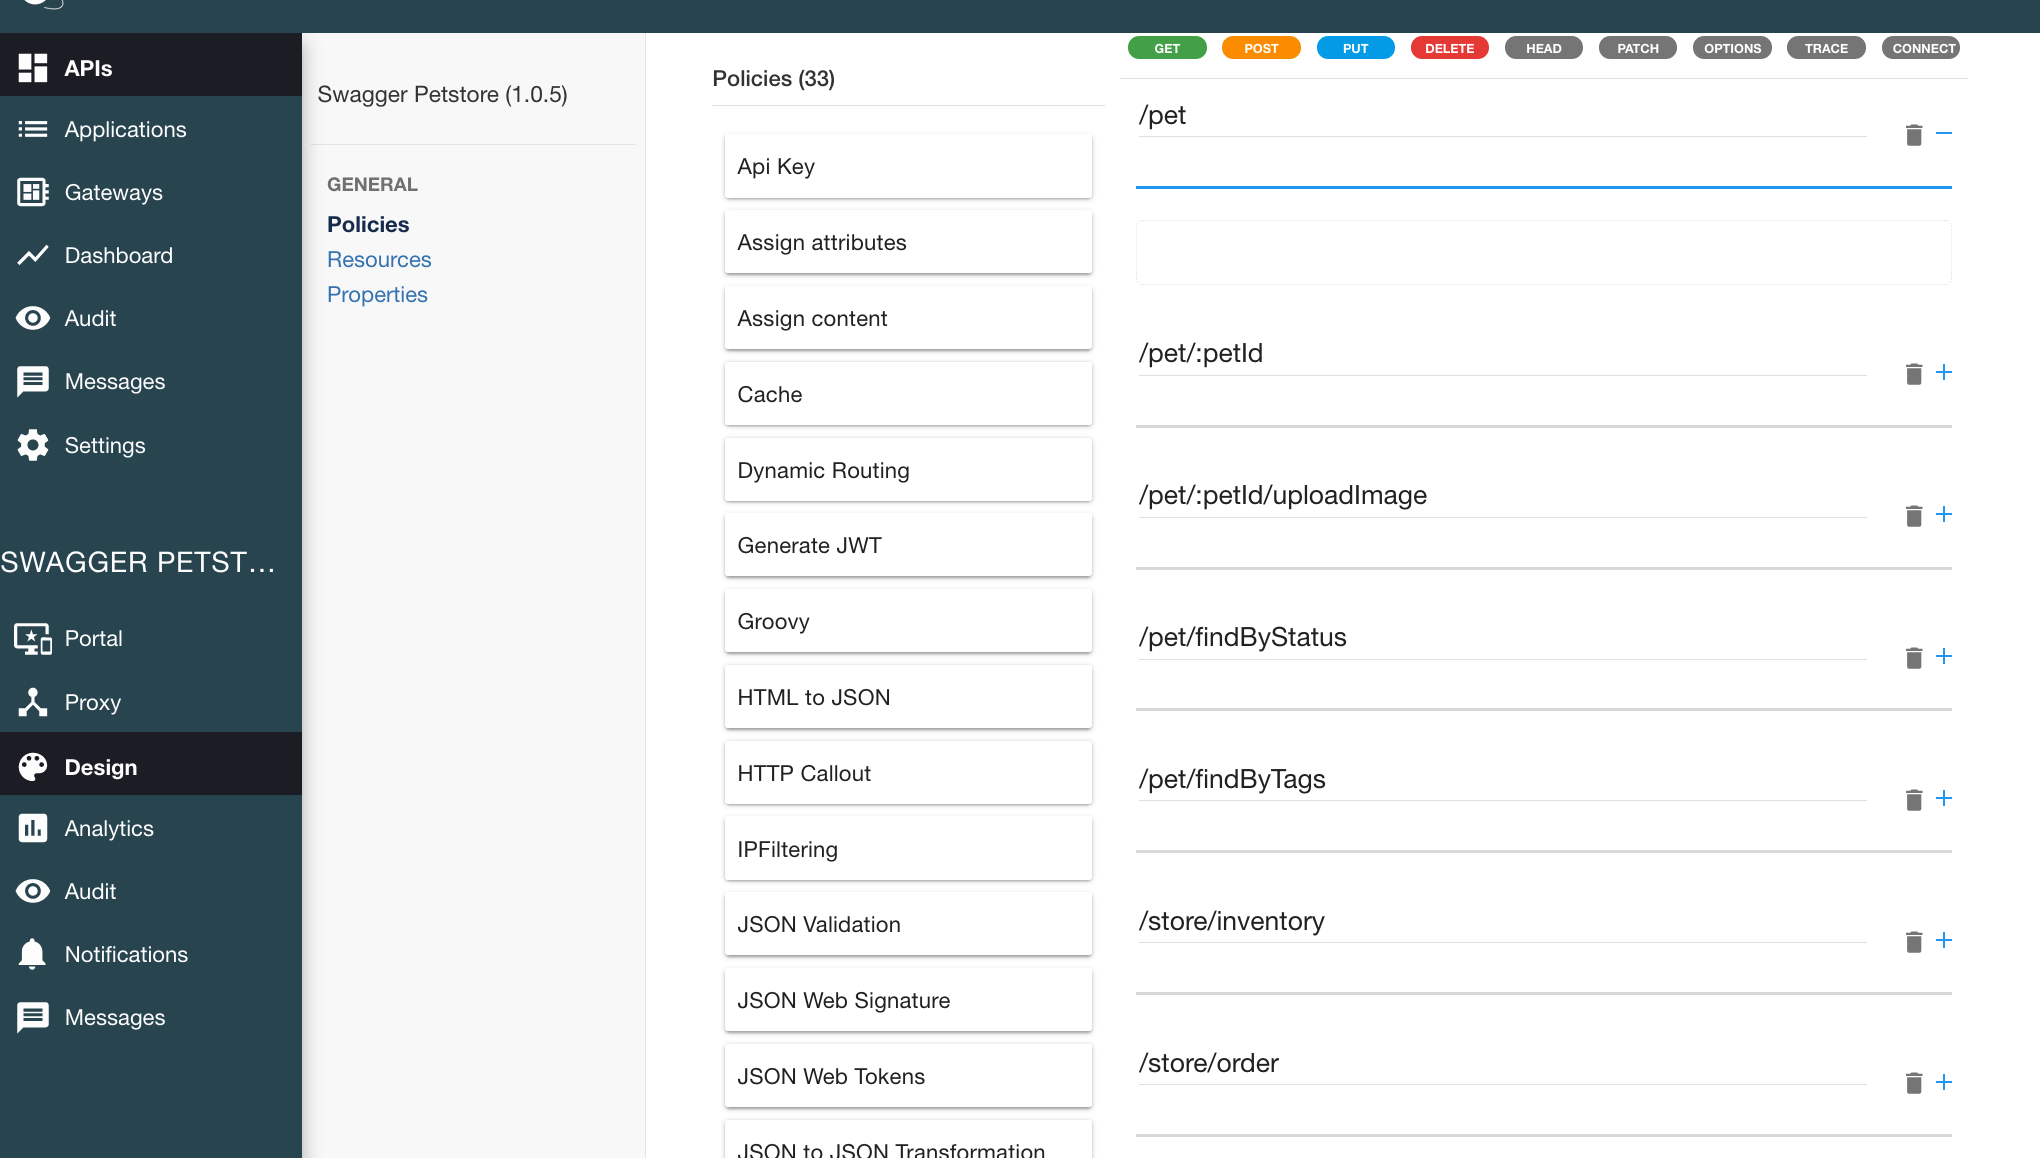
You can also choose to activate policies (below) that will be configured using the OpenAPI specification:
JSON Validation
For each operation, if an application/json request body exists, a JSON schema is computed from this body to configure a JSON Validation policy.
For more information, see the JSON Validation policy reference.
REST to SOAP
For each operation, if the definition contains specific vendor extensions, a REST to SOAP policy can be configured. These extensions are:
x-DSAPIio-soap-envelope: Contains the SOAP envelopex-DSAPIio-soap-action: Contains the SOAP action
For more information, see the REST to SOAP policy reference.
Mock
For each operation, a mock policy is configured, based on the example field if it exists, or by generating a random value for the type of attribute to mock.
For more information, see the Mock policy reference.
Request Validation
For each operation, NOT NULL rules are created with query parameters and headers.
For more information, see the Request Validation policy reference.
XML Validation
For each operation, if a application/xml request body exists, then a XSD schema is computed from this body to configure an XML Validation policy.
For more information, see the XML Validation policy reference.
Creating APIs with API Creation Wizard
The DSAPI API creation wizard provides an easy-to-use UI to create DSAPI Gateway APIs. There are two versions of the API creation wizard:
- v2: Creates APIs that use the DSAPI v2 API definition
- v4: Creates APIs that use the DSAPI v4 API definition
| Version | Supports |
|---|---|
| v2 API creation wizard |
|
| v4 API creation wizard |
|
Limitations
v4 APIs do not support DSAPI Debug mode
Creating APIs with the v4 API creation wizard
Introduction
The v4 API creation wizard makes it easy to create new Gateway APIs from scratch. The API creation wizard comprises several steps, each of which requires you to define certain sets of information:
Step 1: API details
The API details step is where you can define a name, version number, and description for your API. The name and version number are required, but we also recommend giving your API a description so that it is more easily understood and managed by internal users.
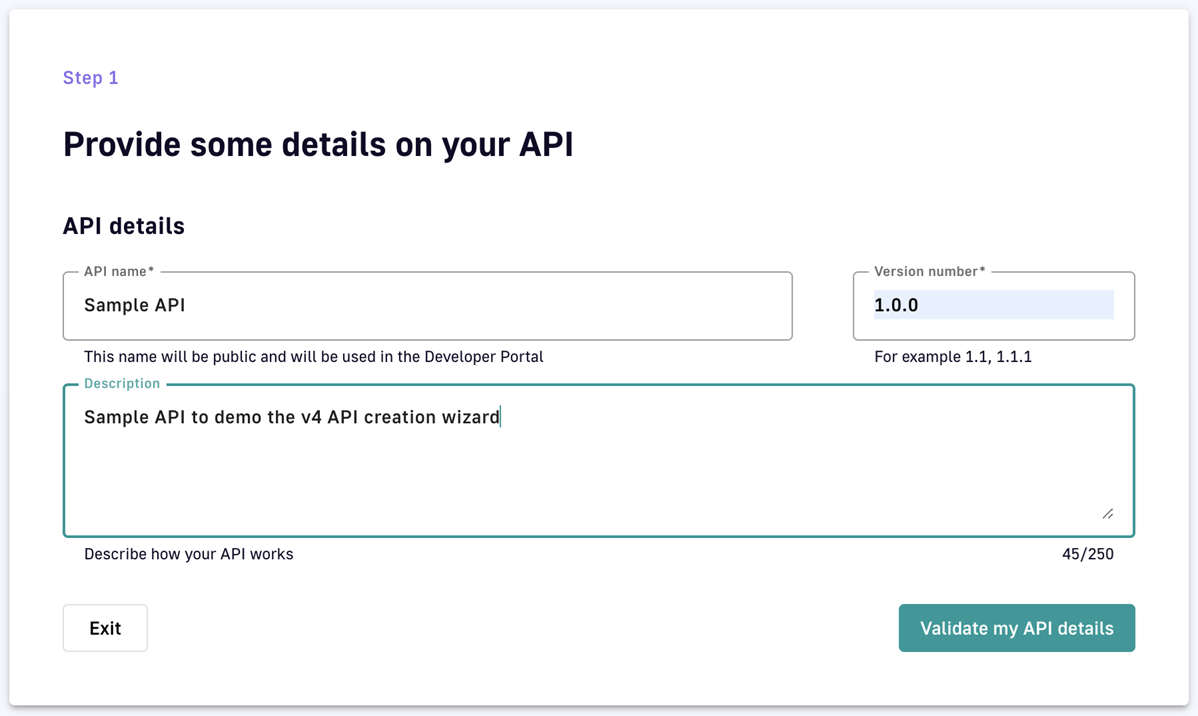
Step 1: Define your Gateway API's basic details.
Step 2: Entrypoints
Choose your backend exposure method
The first part of the Entrypoints step is to choose how you want to expose your backend:
- Proxy upstream protocol: Use this method if you want to use DSAPI to proxy backend REST APIs, SOAP APIs, WebSocket Server, gRPC, or GraphQL over HTTP or TCP. You will not be able to enforce policies at the message level.
- Introspect messages from event-driven backend: Use this method if you want to expose backend event brokers, such as Kafka and MQTT.
DSAPI documentation adopts concise terminology to differentiate between these API types:
HTTP proxy API: An API created using Proxy upstream protocol and called over HTTP
TCP proxy API: An API created using Proxy upstream protocol and called over TCP
Message API: An API created using Introspect messages from event-driven backend
What you choose will dictate the kinds of entrypoints and endpoints that you can select later on. For more in-depth information about what each method supports, refer to this documentation.
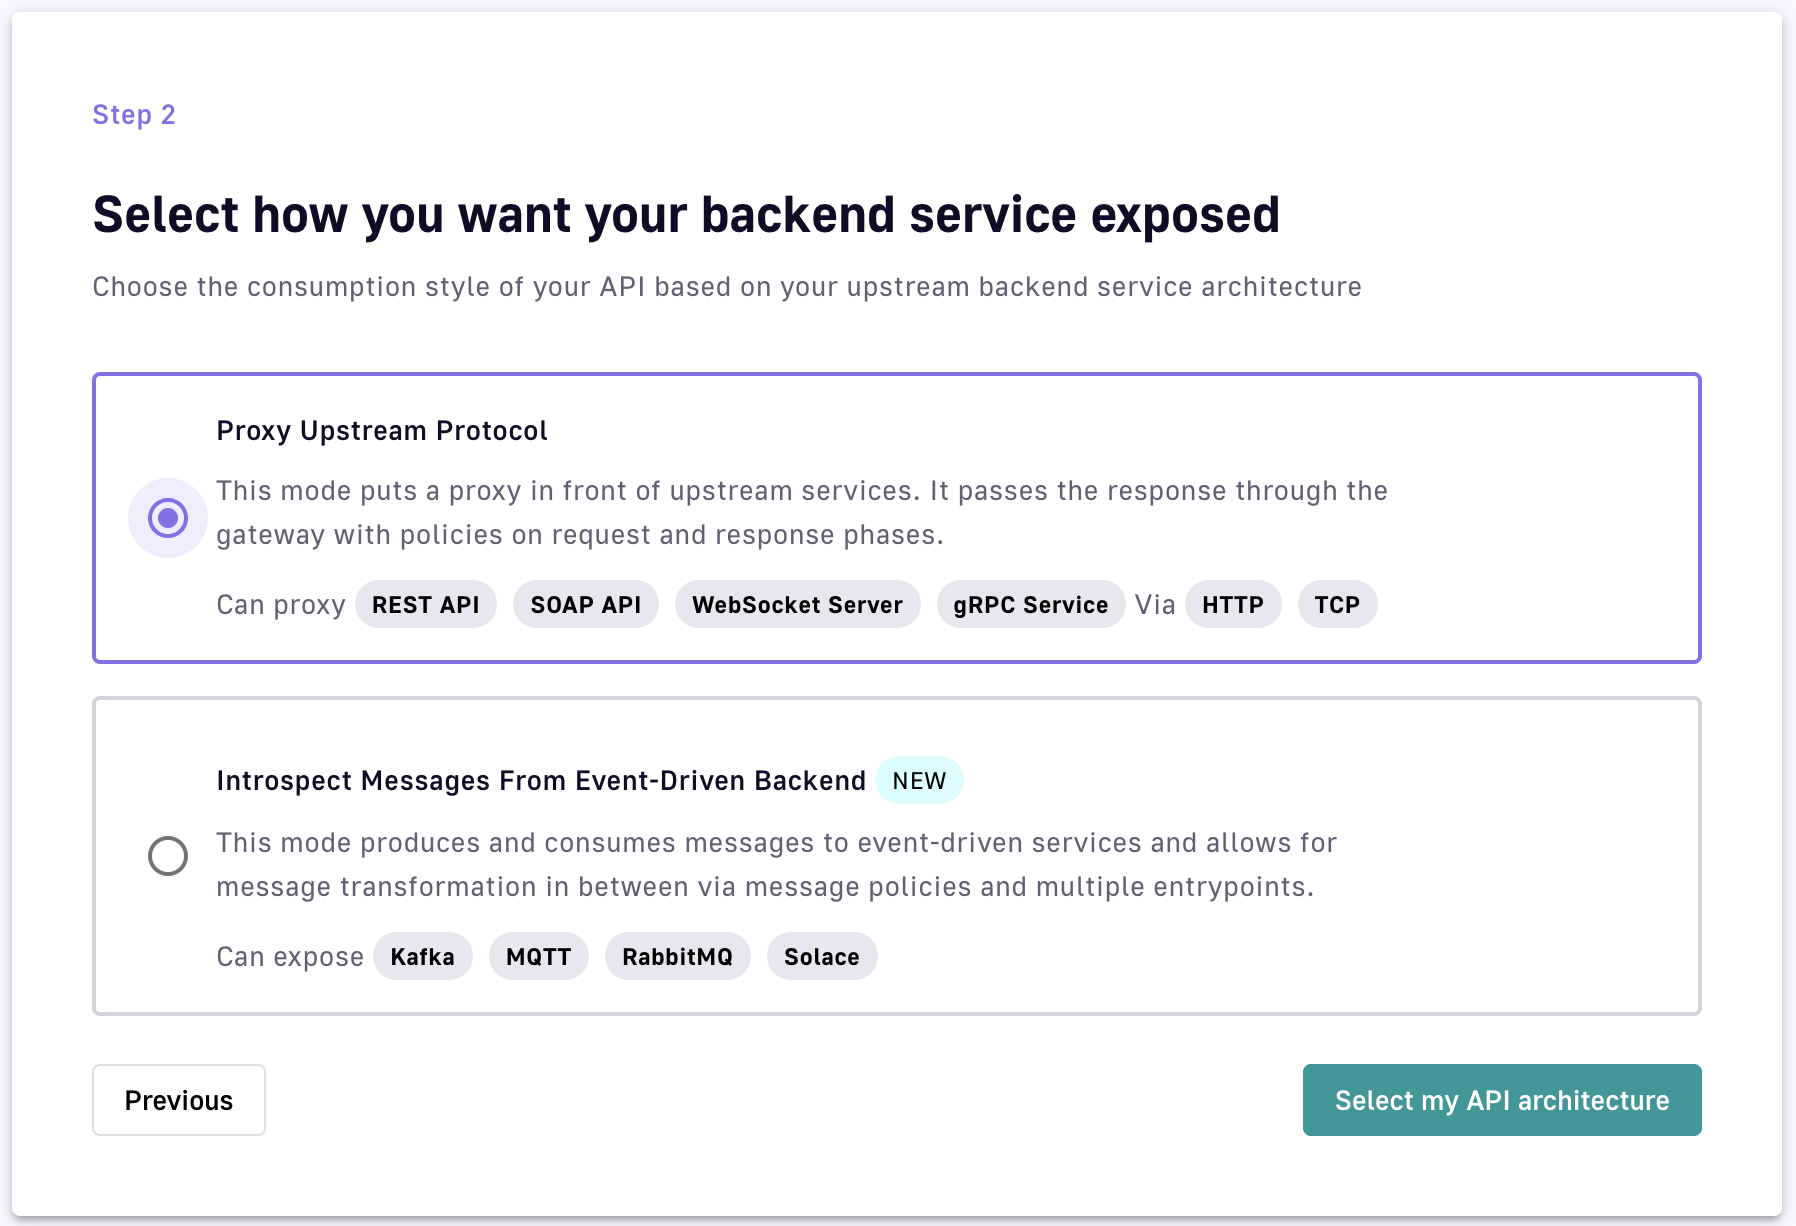
v4 API creation wizard: Select how you want your backend service exposed
After you choose your method of exposure, click Select my API architecture to view the entrypoint selection screen. The entrypoint selection and configuration for each exposure method are discussed below.
HTTP proxy entrypoints
If you chose Proxy upstream protocol, choose either HTTP Proxy or TCP Proxy as your entrypoint.
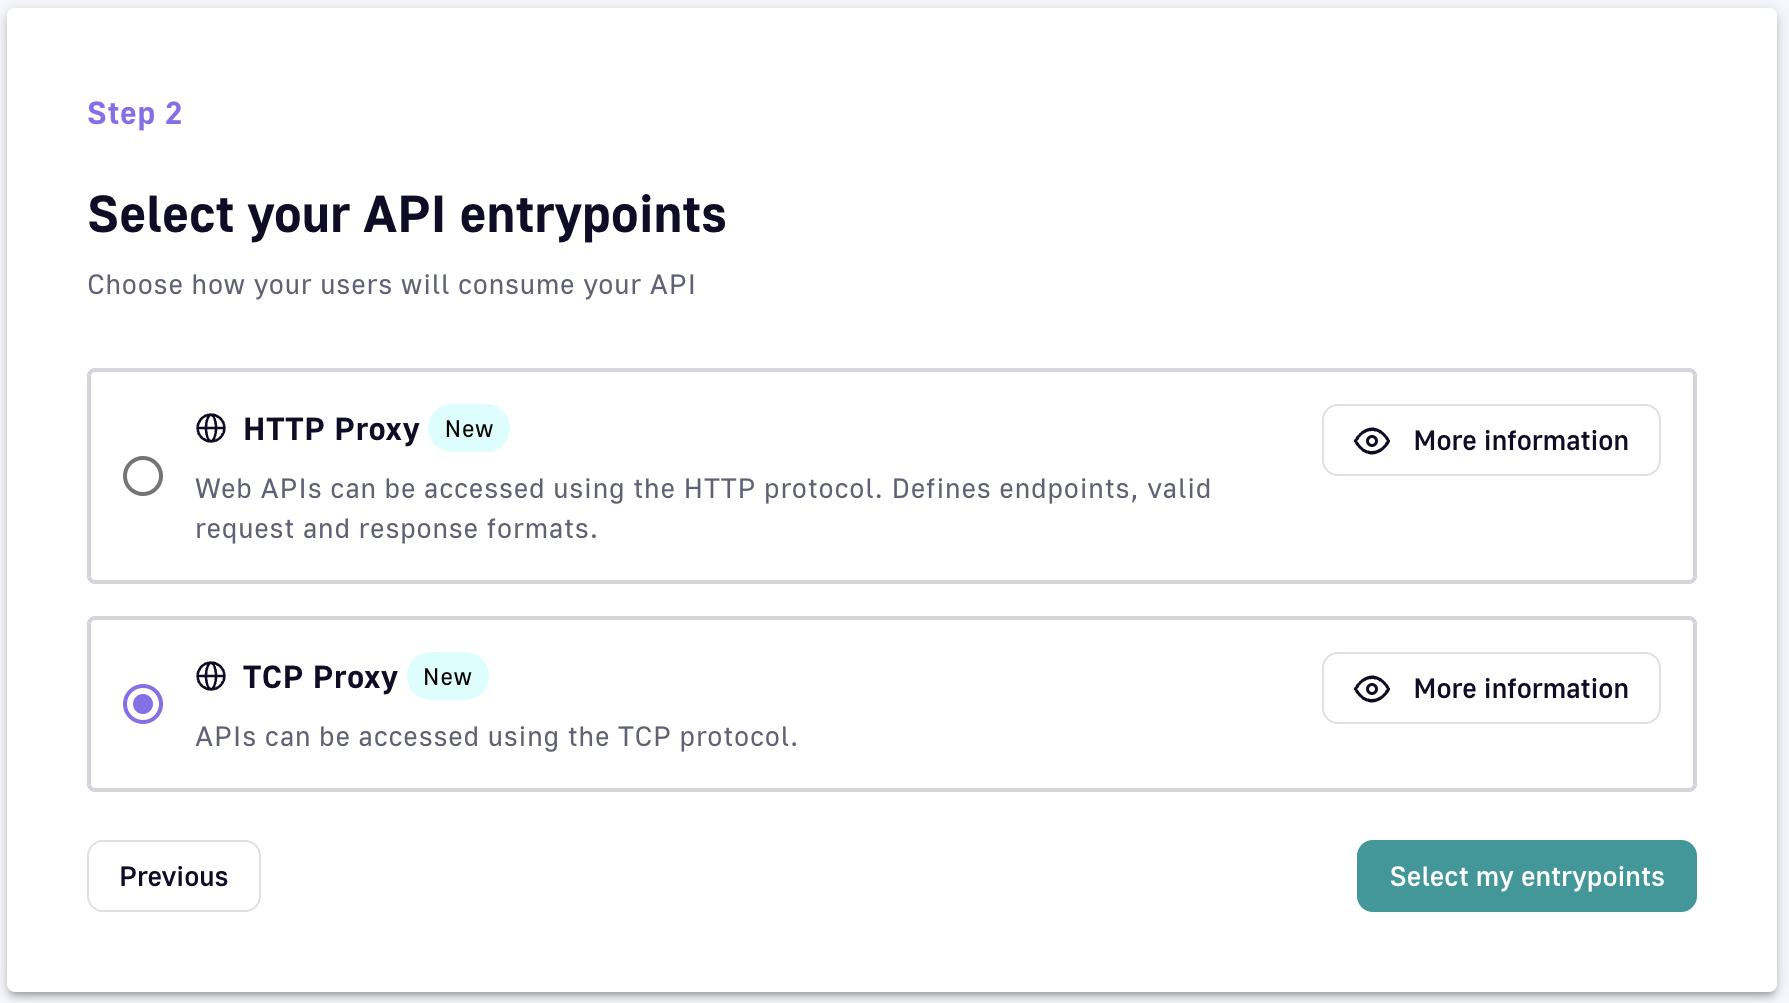
v4 API creation wizard: HTTP or TCP as a backend entrypoint
Once you select your entrypoint, additional configuration is required. The following sections outline the necessary configuration per entrypoint.
HTTP Proxy
- Context path: The URL of your API. For example, if your URL is
https://apim-master-gateway.team-apim.DSAPI.dev/myAPI, then/myAPIis the context path. - Virtual hosts: Enabling virtual hosts requires you to define your virtual host and optionally enable override access.
TCP Proxy
- Host: The name of the host. Duplicate hostnames cannot be entered for the current API.
Message introspection entrypoints
If you chose Introspect messages from Event-driven backend, you are presented with a much different set of entrypoint options:
- HTTP GET: Front a backend or data source with a Gateway REST API that supports the HTTP GET request.
- HTTP POST: Front a backend or data source with a Gateway REST API that supports the HTTP POST request.
- Server-sent Events: Front a backend or data source with a Gateway SSE API for unidirectional communication between server and client.
- Webhook: Front a backend or data source with a Gateway Webhook API. This allows consumers to subscribe to the DSAPI Gateway via Webhook and then retrieve streamed data in real-time from a backend data source, via the Gateway, over the consumer's Webhook callback URL.
- WebSocket: Front a backend or data source with a Gateway WebSocket API. This allows a consumer to retrieve and send streamed events and messages in real-time.
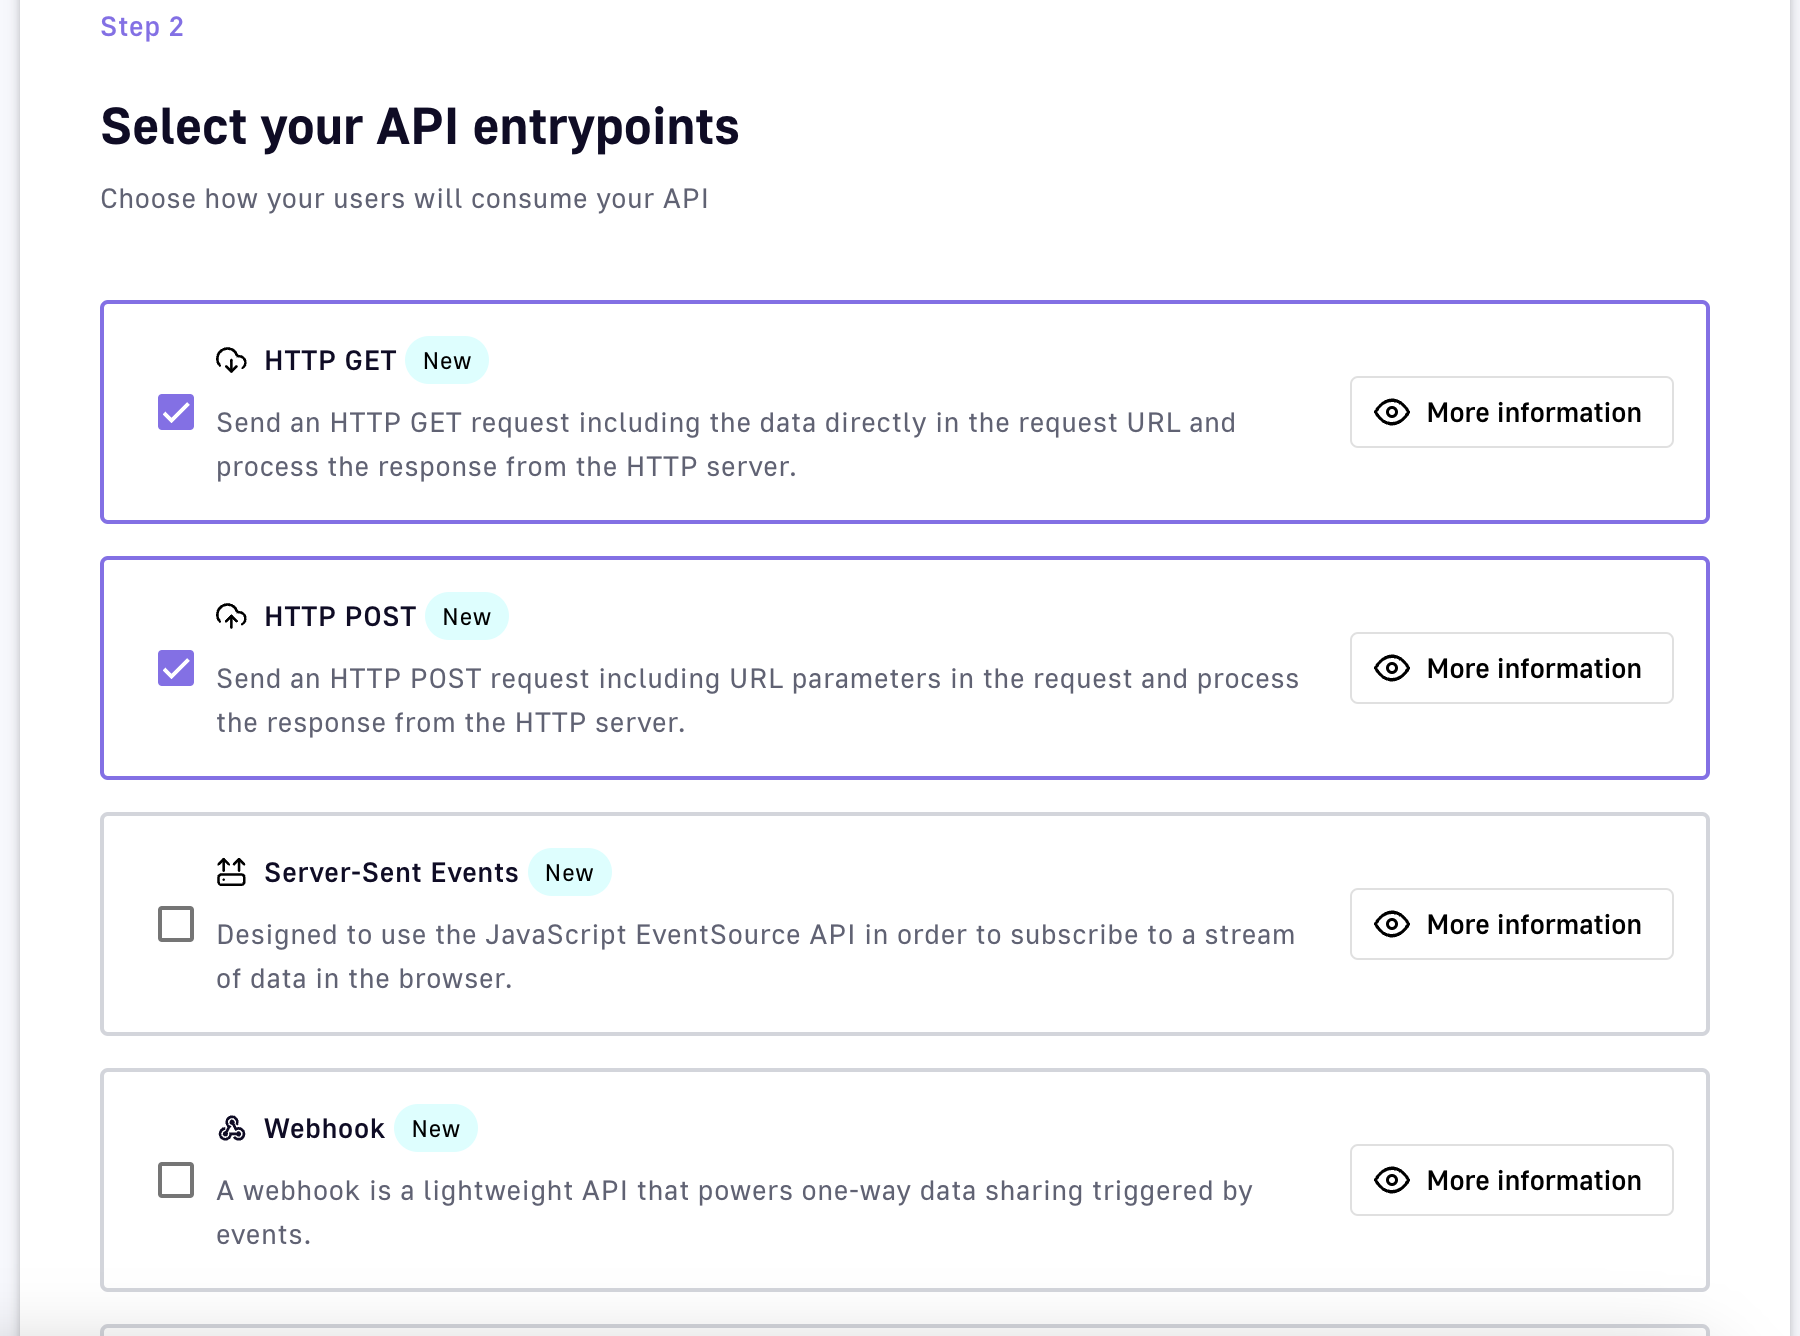
v4 API creation wizard: Event-driven backend entrypoints
Once you select your entrypoint(s), additional configuration is required. The following sections outline the necessary configuration per entrypoint.
Server-sent Events
- Context path: The URL of your API. For example, if your URL is
https://apim-master-gateway.team-apim.DSAPI.dev/myAPI, then/myAPIis the context path. - Virtual hosts: Enabling virtual hosts requires you to define your virtual host and optionally enable override access.
- SSE characteristics and permissions: Set up heartbeat intervals, metadata, headers, and quality of service.
Webhook
- HTTP Options: Configure connect timeout, read timeout, and idle timeout.
- Proxy Options: Select a proxy for client connections or use a system-level proxy.
- Quality of service: Select from available options for QoS compatibility.
WebSocket
- Context path: Define your API's URL.
- WebSocket configuration: Enable or disable publishing and subscription capabilities.
- Quality of service: Choose from available QoS options.
HTTP POST
- Context path: Define your API's URL.
- HTTP POST permissions: Configure request headers, message flow, and QoS options.
HTTP GET
- Context path: Define your API's URL.
- HTTP GET characteristics: Set message count and duration limits, and configure message header and metadata permissions.
Step 3: Endpoints
Gateway endpoints define the protocol and configuration by which the Gateway API will fetch data from or post data to the backend API. Your endpoints will be dictated by the API architecture that you selected earlier.
Proxy endpoints
If you chose the HTTP Proxy option, your endpoint will be an HTTP proxy. If you chose the TCP Proxy option, your endpoint will be a TCP proxy.
Depending on which endpoint you choose, you will need to further define certain sets of endpoint configurations. See the expandable sections below to learn more about the configuration of each available endpoint.
HTTP Proxy
- Define your target URL: Enter your target URL in the Target URL text field.
- Define your HTTP options:
- Choose to either allow or disallow h2c clear text upgrade by toggling Allow h2c Clear Text Upgrade ON or OFF.
- Choose to either enable or disable keep-alive by toggling Enable keep-alive ON or OFF. If enabled, you'll need to define a numeric timeout value in the Connect timeout text field.
- Choose to either enable or disable HTTP pipelining by toggling Enable HTTP pipelining ON or OFF.
- Choose to either enable or disable compression by toggling Enable compression (gzip, deflate) ON or OFF.
- Configure your idle timeout settings: Define the maximum time a connection will stay in the pool without being used.
- Choose whether to follow HTTP redirects by toggling Follow HTTP redirects ON or OFF.
- Define the number of max concurrent connections by entering a numeric value.
- Choose to propagate client Accept-Encoding header by toggling Propagate client Accept-Encoding header (no decompression if any) ON or OFF.
- Select + Add HTTP headers to add headers that the Gateway should add or override before proxying the request to the backend API.
- Define your Proxy options:
- Choose whether to use a proxy for client connections by toggling Use proxy ON or OFF.
- Choose whether to use the proxy configured at the system level.
- Define proxy host, proxy port, username, and password if using a system-level or client proxy.
- Define your SSL options
- Define your keystore
TCP Proxy
Target server
- Host: Name or IP of the backend host to connect to
- Port: Number of the backend port
- Is target secured: Toggle to enable SSL to connect to target
SSL Options
- Verify Host: Toggle to enable host name verification
- Trust all: Toggle ON for the Gateway to trust any origin certificates. Use with caution.
- Truststore: Select from options like None, JKS with path, PKCS#12, PEM with content, etc.
- Key store: Options similar to Truststore for key management.
TCP client options
- Connection timeout: Enter timeout in ms to connect to the target
- Reconnect attempts: Enter the number of times to try connecting to the target.
- Reconnect interval: Enter the interval in ms between connection retries
- Idle timeout: Maximum time a TCP connection will stay active if no data is received or sent.
- Read idle timeout: Timeout when no data is received.
- Write idle timeout: Timeout when no data is sent.
Proxy Options
- No proxy
- Use proxy configured at system level
- Use proxy for client connections: Select SOCKS4 or SOCKS5, define the proxy host, port, username, and password.
The endpoint configuration will determine the endpoint group’s default configuration, and the endpoint will inherit the configuration of the group by default.
By default, the endpoint group will be named Default <endpoint type> group and the endpoint will be named Default <endpoint type> as shown below:

Default TCP proxy API endpoint names
Introspect messages from event-driven backend endpoints
If you chose Introspect messages from event-driven backend as your exposure method, you will be able to choose from the following endpoints:
- Mock
- MQTT 5.X
- Kafka
- RabbitMQ
- Solace
Depending on which endpoint you choose, you will need to further define certain sets of endpoint configurations. See the expandable sections below to learn more about the configuration of each available endpoint.
Mock
The Endpoint Mock endpoint allows you to mock a backend service to emulate the behavior of a typical HTTP server and test processes. If you chose this endpoint, you will need to configure:
- Interval between messages publication: Defines, in milliseconds, the interval between published messages. The default is 1000.
- Content of published messages: Defines the content of the message body that will be streamed. The default is "mock message".
- Count of published messages: Defines, as an integer, the maximum number of published messages that are streamed as part of the mock. If left unspecified, there will be no limit.
MQTT 5.X
The MQTT 5.X endpoint allows the Gateway to open up a persistent connection and/or call a backend MQTT broker, as long as that broker is running on MQTT 5.x, via an MQTT client set up by the DSAPI Gateway. If you chose this endpoint, you will need to configure:
- How the Gateway will interact with the broker: Choose whether to use the Gateway as a producer, consumer, or both.
- Server host: Define the host for the MQTT broker.
- Server port: Define the port for the MQTT broker.
- Reconnect attempts: Set the number of reconnect attempts for the MQTT client.
- Session expiry interval: Defines the period of time the broker stores session information.
- Clean start: Toggle the clean start flag.
- Initial security settings: Define your MQTT-specific authentication flow (e.g., username, password).
- Producer settings: Define how the Gateway MQTT client will produce messages (e.g., Topic, Retain settings, Message expiry interval).
- Consumer settings: Define how the Gateway MQTT client will consume messages (e.g., Topic).
Kafka
The Kafka endpoint allows the Gateway to open up a persistent connection and/or call a backend Kafka broker via a Kafka client set up by the DSAPI Gateway. If you chose this endpoint, you will need to configure:
- How the Gateway will interact with the broker: Choose whether to use the Gateway as a producer, consumer, or both.
- Bootstrap servers: Define the comma-separated list of host/port pairs for initial connection.
- Initial security settings: Define your Kafka-specific security flow (e.g., PLAINTEXT, SASL, SSL).
- Producer settings: Define the Kafka producer settings, including topics and compression types.
- Consumer settings: Define the Kafka consumer settings, including message IDs and auto offset reset.
Solace
Choosing the Solace endpoint enables the DSAPI Gateway to create an API that exposes Solace resources and event APIs via your chosen DSAPI entrypoint(s). You will need to configure:
- URL: Your Solace broker's URL
- VPN name
- Producer settings: Define the topic and message retention settings for message production.
- Consumer settings: Define the settings for consuming messages from the Solace broker.
RabbitMQ
The RabbitMQ endpoint allows the Gateway to open up a persistent connection and/or call a backend RabbitMQ resource. If you chose this endpoint, you will need to configure:
- Server host: Define the host of your RabbitMQ resource.
- Server port: Define the port for RabbitMQ.
- Virtual host: Define the virtual host to use.
- Producer settings: Define the exchange, routing key, and whether to use durable or auto-delete settings.
- Consumer settings: Define the settings for consuming messages from RabbitMQ.
The endpoint configuration will determine the endpoint group’s default configuration and the endpoint will inherit the configuration of the group by default.
By default, the endpoint group will be named Default <endpoint type> group and the endpoint will be named Default <endpoint type> as shown below:

Default message API endpoint names
Step 4: Security
Next in the API creation wizard is the Security step, where you will configure:
- Plan information: Define a plan that provides the API producer with a method to secure, monitor, and transparently communicate details around access.
- Configuration: Define authorization resources, such as DSAPI AM or another OAuth2 resource.
- Limitations: Define access limitations, such as rate limiting and quotas.
Plan information
A plan is essentially an access layer around an API that provides the API producer with a method to secure, monitor, and transparently communicate the details of access.
To learn more about how plans function in DSAPI, refer to the plans documentation.
You will be able to choose between several different plan types:
- OAuth2: A standard designed to allow a website or application to access resources hosted by other web apps on behalf of a user.
- JWT: An open standard that defines a compact and URL-safe way to securely transmit information, in the form of a JSON object, between parties.
- API Key: A plan where the API Gateway rejects calls from consumers that do not pass the correct API key in a request.
- Keyless: A plan that, when configured, does not add security. This is considered an "Open" plan.
- Push plan: A plan that provides an access layer for the Gateway pushing data to consumers. This is used for subscribers.
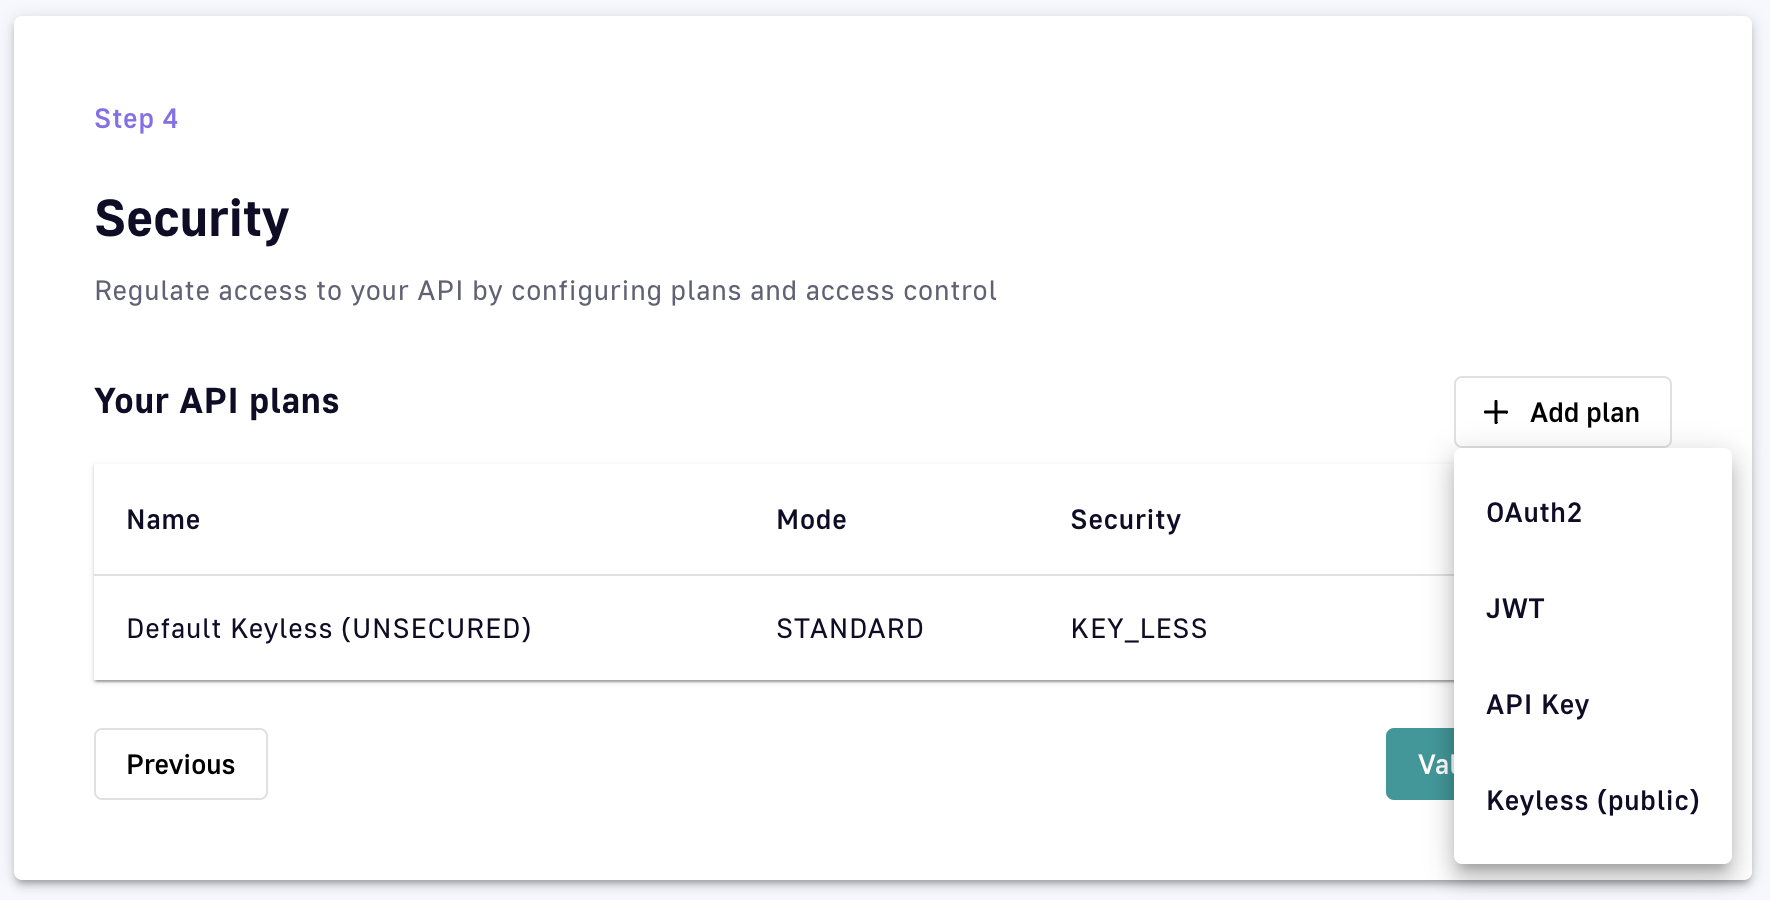
API creation wizard: Different Security plan types
Configuration differs by plan. See the expandable sections below to learn more about how to configure each of the different plans.
OAuth2 plan
To configure your OAuth2 plan, select OAuth2 from the +Add plan drop-down menu, then define general details, settings, and restrictions. On the General screen, define:
- Name
- Description
- Characteristics
- Subscription: Choose whether to auto-validate subscriptions, require a message from a consumer during subscription, and/or present a message to the consumer upon subscription.
- Access control: Select any Groups within APIM that you do not want to have access to this API. For more information on Groups, refer to the Groups documentation.
.png)
Select Next to move on to OAuth2 authentication configuration. Here, you'll specify:
- Your OAuth2 resource in the OAuth2 resource field. This should be the resource that you'll use to validate the token.
- Your cache resource in the Cache resource field. This should be the cache resource that you will use to store the tokens.
- (Optional) Extract an OAuth2 payload: pushes the token endpoint payload into the oauth.payload context attribute.
- (Optional) Check scopes: Instructs your authentication method to check required scopes in order to access the resource. If you choose to check scopes, you must define your list of required scopes using the Required scopes module.
- Whether strict mode is enabled or disabled. If you choose Strict, scopes will be checked against the exact list you provided in the Required scopes section.
- Whether to permit authorization headers to target endpoints.
- (Optional) Define additional selection rules. If you are managing multiple plans that share the same type, this will help the plan selection process. You will need to use the DSAPI Expression Language. For more information on the DSAPI Expression Language, please refer to the Expression Language documentation.
.png)
Select Next to define any additional restrictions for the plan. These restrictions include:
- Rate limiting: Specify the maximum number of requests that an application can make within a given number of seconds or minutes, then:
- Enable or disable Non-strict mode: This enables rate limiting to be applied in an asynchronous manner, which results in the distributed counter value not being strict.
- Enable or disable Add response headers.
- Define your rate limit's Key.
- Define the max request count (this can be a static or dynamic count).
- Define the time duration (e.g., a one-second time interval within which to apply the request limitation).
- Quota: Define a rate limit over a period of hours, days, or months. If you choose this, you will need to define the same settings that are applicable to rate limiting (see above).
- Resource filtering: Restricts resources based on defined whitelist/allowed and/or blacklist/disallowed settings. These will be defined by path patterns and methods.
.png)
JWT plan
If you chose JWT, you will need to specify general details, the authentication configuration, and restrictions. On the General screen, define:
- Name
- Description
- Characteristics
- Subscription: Choose whether to auto-validate subscriptions, require a message from a consumer during subscription, and/or present a message to the consumer upon subscription.
- Access control: Select any Groups within APIM that you do not want to have access to this API. For more information on Groups, refer to the Groups documentation.
Once you're done with your general details, select Next to define your JWT authentication configuration. This will require you to:
- Choose a Signature to define how your JWT token must be signed. The options are:
- RSA_RS256
- RSA_RS384
- RSA_RS512
- HMAC_HS512
- HMAC_HS384
- HMAC_HS384
- Define your JWKS resolver. This defines how your JSON Web Key Set is retrieved.
- Define your Resolver parameter.
- Choose whether to use a system proxy.
- Choose whether to enable extra JWT claims.
- Choose whether to propagate Authorization headers.
- Define the User claim where users can be extracted.
- Define the Client Id claim where the client can be extracted.
- Define additional selection rules using the DSAPI Expression Language.
Select Next to define any restrictions associated with this plan. Your options include:
- Rate limiting: specify the maximum number of requests that an application can make within a given number of seconds or minutes, then:
- Enable or disable Non-strict mode
- Enable or disable Add response headers
- Define your rate limit's Key
- Define the max request count
- Define the time duration
- Quota: define a rate limit over a period of hours, days, or months.
- Resource filtering: restricts resources based on defined whitelist/allowed and/or blacklist/disallowed settings.
.png)
API key
If you chose API key, you will define general settings, the API key authentication configuration, and restrictions. On the General screen, define:
- Name
- Description
- Characteristics
- Subscription: Choose whether to auto-validate subscriptions, require a message from a consumer during subscription, and/or present a message to the consumer upon subscription.
- Access control: Select any Groups within APIM that you do not want to have access to this API. For more information on Groups, refer to the Groups documentation.
Select Next to be taken to the API key authentication configuration page. Here, you need to:
- Choose whether to propagate your API key to upstream APIs.
- Define any additional selection rules using the DSAPI Expression Language.
Select Next to be taken to the Restriction page to define any additional restrictions that you want to be associated with your plan. Your options include:
- Rate limiting: specify the maximum number of requests that an application can make within a given number of seconds or minutes.
- Quota: define a rate limit over a period of hours, days, or months.
- Resource filtering: restricts resources based on defined whitelist/allowed and/or blacklist/disallowed settings.
Keyless plan
If you chose Keyless, you will only need to define general details and restrictions, as there is no authentication to configure (unlike OAuth2, JWT, and API key). On the General screen, define:
- Name
- Description
- Characteristics
- Subscription: Choose whether to auto-validate subscriptions, require a message from a consumer during subscription, and/or present a message to the consumer upon subscription.
- Access control: Select any Groups within APIM that you do not want to have access to this API. For more information on Groups, refer to the Groups documentation.
Select Next to be taken to the Restriction page to define any additional restrictions that you want to be associated with your plan. Your options include:
- Rate limiting: specify the maximum number of requests that an application can make within a given number of seconds or minutes.
- Quota: define a rate limit over a period of hours, days, or months.
- Resource filtering: restricts resources based on defined whitelist/allowed and/or blacklist/disallowed settings.
Step 5: Documentation
Documentation for v4 APIs can be configured. See the documentation section for more details on creating and managing documentation for your API.
Step 6: Summary
The final step is to review and create or deploy your API. Creating your API will create the API as a DSAPI artifact, but not deploy it to the Gateway. If you choose Deploy, the API will be created and deployed to the DSAPI Gateway.
Creating APIs with the v2 API creation wizard
Introduction
In DSAPI, your API definition is a JSON representation of your Gateway API. The v2 API definition supports HTTP-based APIs and the legacy version of the Policy Studio. This article describes how to create APIs in DSAPI using the v2 API creation wizard.
Access the API creation wizard
To create a v2 API in DSAPI:
- Log in to your APIM Console
- Select APIs tab from the left nav
- Click + Add API in the top right corner of the UI
- Choose Create a v2 API from scratch to enter the API creation wizard for v2 APIs
Step 1: General
The first step is to define your API's general details. Give your API a:
- Name
- Version
- Description
- Context path: This is the path where the API is exposed
Optionally, you can select the Advanced mode hyperlink in the top right corner of the General page. This allows you to define:
- Whether to use a group as the primary owner of the API
- (Optional) The primary owner group
- (Optional) A list of groups that will have access to, but not own, the API
Step 2: Gateway
Define your Backend, which is the target backend where the request will be received.
Optionally, you can select Advanced mode to define Tenants and/or Sharding tags for this API. These specify the Gateways to which the API is deployed.
Refer to Tenants and/or Sharding tags for more information.
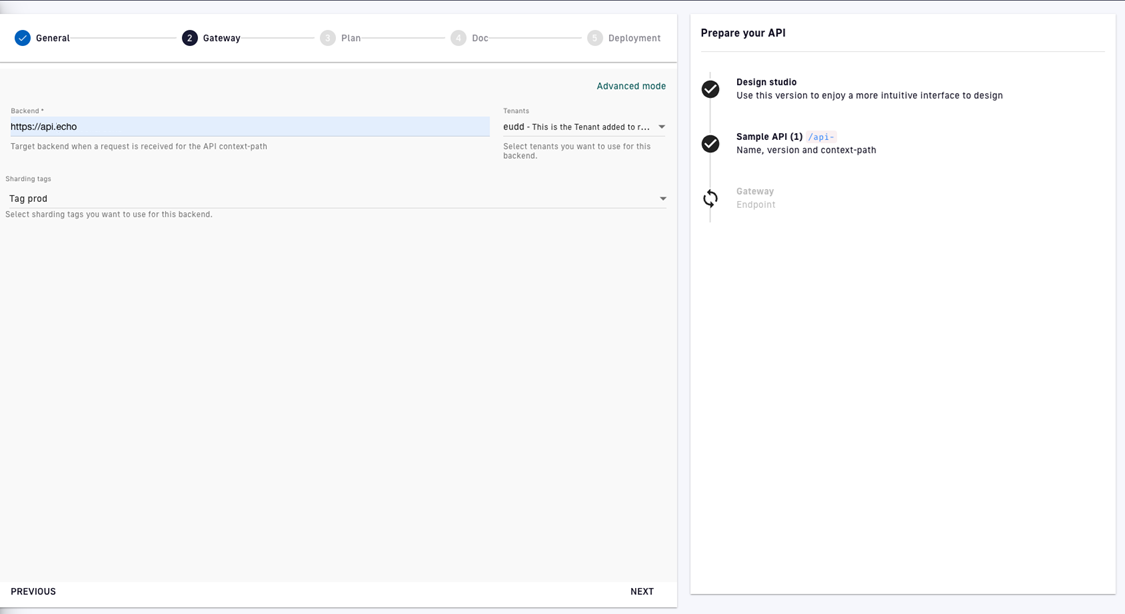
Define your API Gateway settings
Step 3: Plan
A plan is an access layer around an API that provides the API producer with a method to secure, monitor, and transparently communicate details related to access. This step is optional.
The API creation wizard allows you to create either an API key or Keyless plan for your API. Once you choose your plan type and give it a name and description, you will have the option of adding:
- A rate limit: Sets the maximum number of API requests that may occur during the specified number of seconds or minutes
- A quota: Sets the maximum number of API requests that may occur during the specified number of hours, days, weeks, or months
- Resource filtering: Allows you to filter resources based on whitelists and blacklists
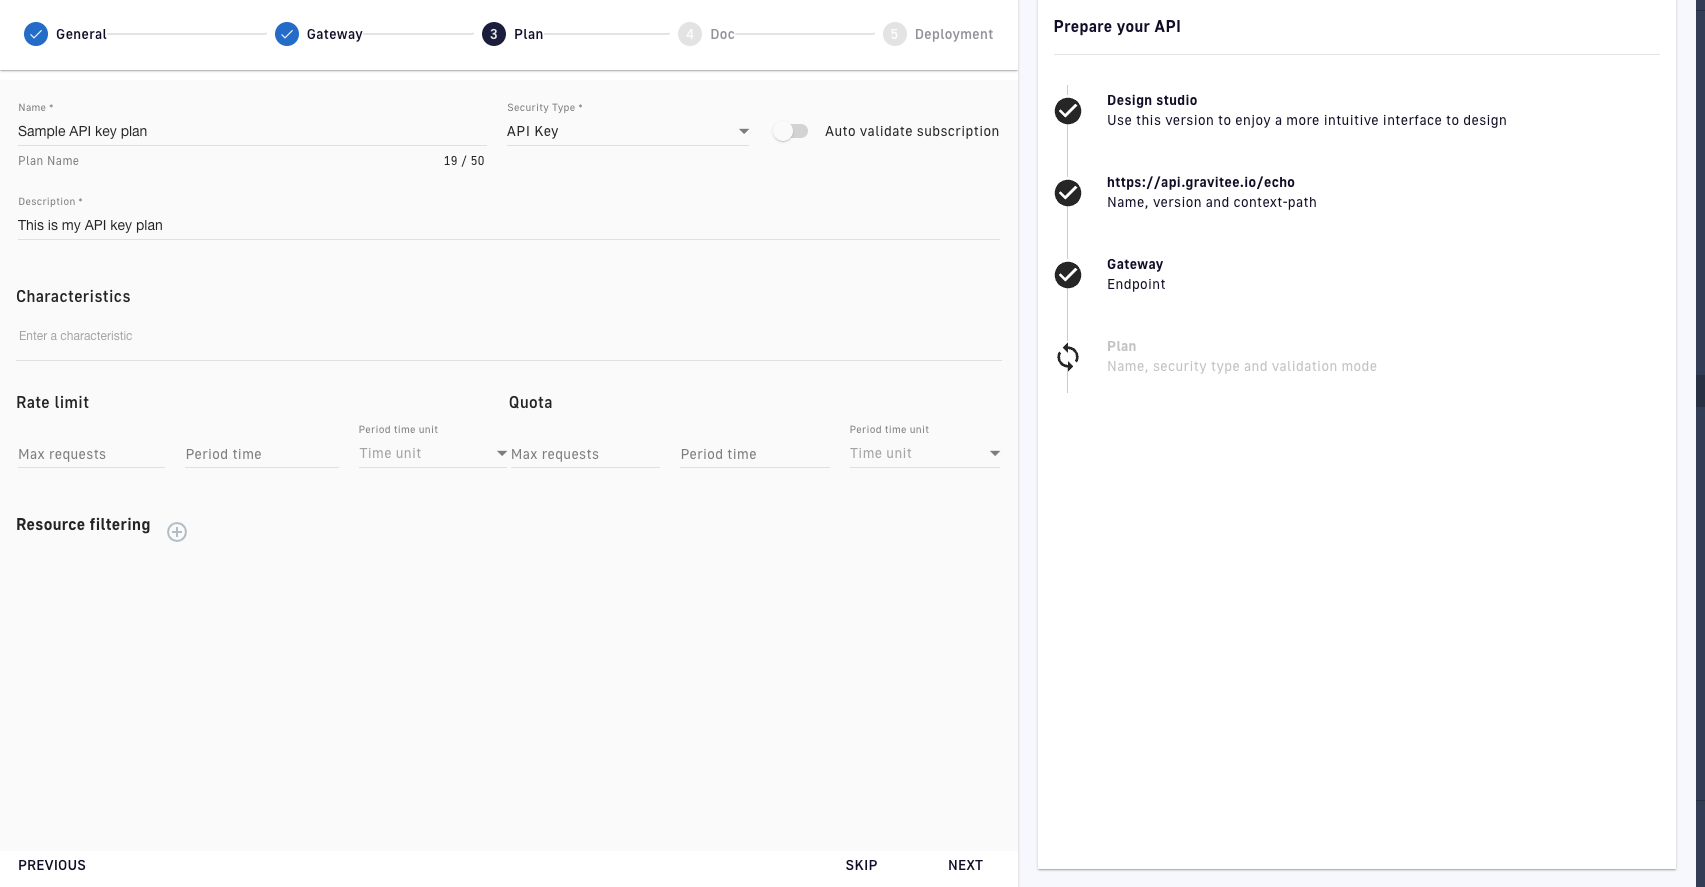
v2 API creation wizard: Plans
DSAPI offers additional plan features that are not configured in the API creation wizard. For more in-depth information on plans, refer to the plans documentation.
Once you have defined your plan, click NEXT.
Step 4: Documentation
On the Documentation page, you can upload your API's documentation as a file. Creating documentation is optional.
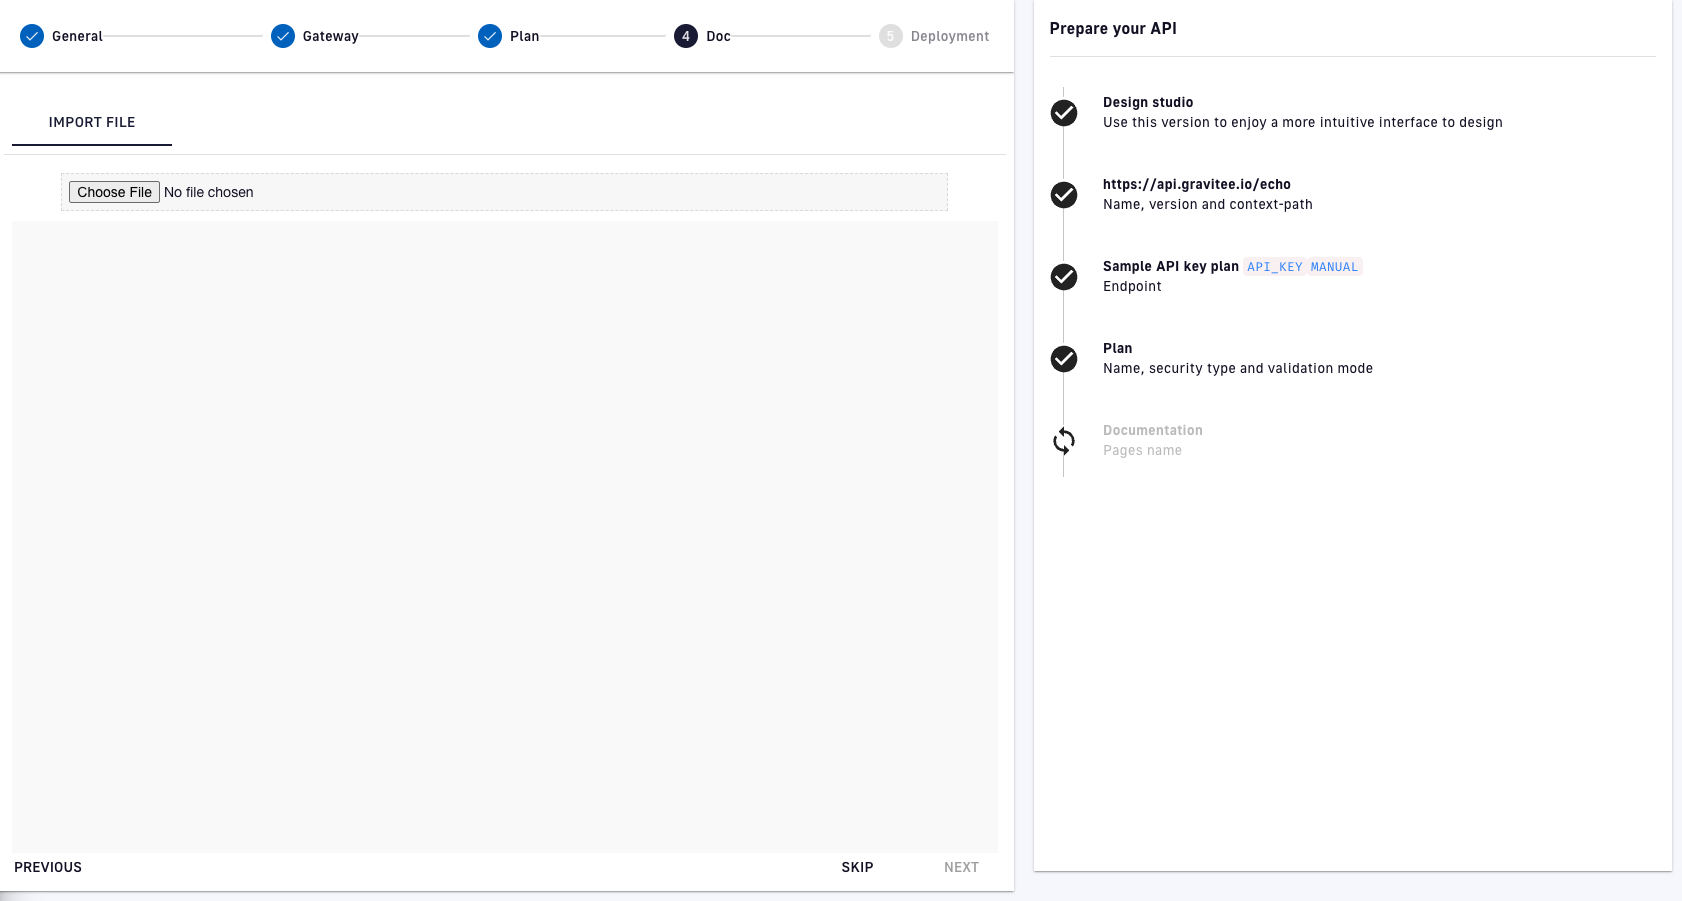
v2 API creation wizard: Documentation
Step 5: Deployment
On the Deployment page, you will see a summary of your API and can choose how you want to create it:
- Create without deploying the API: Creates the API as an artifact in DSAPI, without deploying the API to the Gateway. You can access, configure, and design policies for the API.
- Create and deploy the API: Creates the API in DSAPI and deploys it to the Gateway. You can access, configure, and design policies for the API, but must redeploy it after making changes.
Creating and publishing an API with the Management API
Overview
This guide uses the v4-Proxy API definition to create an HTTP Proxy API. The principles are the same for other types of APIs.
* If the Enable API Review option is enabled in your API Management settings, you need to use the "Ask for a review" and "Accept a review" requests to complete the API Review process.
* The Enable API Review option ensures that someone other than the API creator reviews and approves an API before the API creator publishes the API to a Gateway or the Developer Portal. For more information about the Enable API Review, see API Quality.
To create, deploy, and publish your API to the Developer Portal, you must complete the following steps:
- Obtain a Personal Access Token
- Create the API definition in JSON
- Create API via a mAPI call
- Create a plan for the API
- Publish the plan
- Start the API
- (Optional) Publish the API to the developer portal
Obtain a Personal Access Token
To authenticate with the Management API (mAPI), you must provide a set of credentials or a Personal Access Token (PAT).
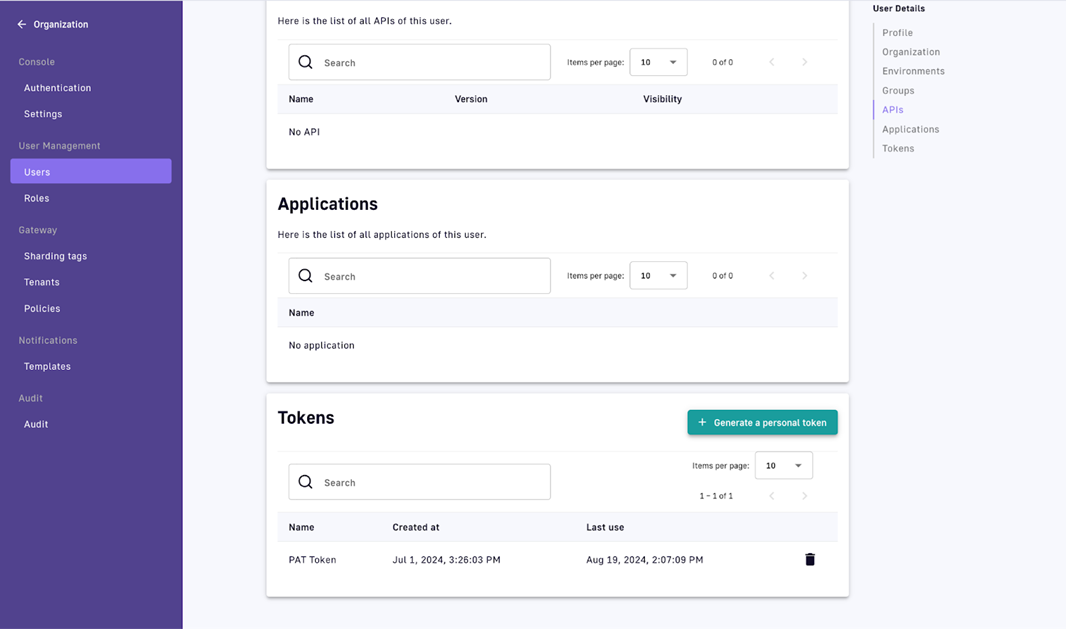
To generate a PAT, complete the following steps:
- Log into your API Management Console
- In the navigation menu, click
Organization. - In the
User Managementsection of theOrganization menu, clickUsers. - Click your username, and then scroll to
Tokens. - Click
Generate a personal token. This (bearer) token is used in theAuthorizationheader when you make requests to the Management API.
6. Set the Personal Access Token and management API base URL to environment variables by using values appropriate for your environment:
export PERSONAL_ACCESS_TOKEN="kd2l91mL01110F..."
export MANAGEMENT_API_URL="localhost:8083"
Create the API definition in JSON
You can create the API definition manually for your API in JSON.
You can also create an API definition using the following methods:
- Exporting an existing API definition, and then modifying the API definition.
- Using a Kubernetes resource in DSAPI Kubernetes Operator (GKO).
If you craft the API definition manually, complete the following step:
Insert the API data in a JSON file called my-api.json. Your my-api.json file should match the following example:
{
    "name":"My First API",
    "apiVersion":"1.0.0",
    "definitionVersion":"V4",
    "type":"PROXY",
    "description":"Example of creating my first API using the Management API (mAPI)",
    "listeners": [
        {
            "type":"HTTP",
            "paths": [
                {
                    "path":"/myfirstapi"
                }
            ],
            "entrypoints": [
                {
                    "type":"http-proxy"
                }
            ]
        }
    ],
    "endpointGroups": [
        {
            "name":"default-group",
            "type":"http-proxy",
            "endpoints": [
                {
                    "name":"default",
                    "type":"http-proxy",
                    "weight":1,
                    "inheritConfiguration":false,
                    "configuration": {
                        "target":"https://api.DSAPI.io/echo"
                    }
                }
            ]
        }
    ]
}
Create the API with a mAPI call
- Run the following
curlcommand to create the API from the JSON definition:
You can pass the full JSON definition in the data (-d) argument of the curl command.
curl -H "Authorization: ${PERSONAL_ACCESS_TOKEN}" \
     -H "Content-Type:application/json;charset=UTF-8" \
     -X POST \
     -d @my-api.json \
https://${MANAGEMENT_API_URL}/management/v2/organizations/DEFAULT/environments/DEFAULT/apis
A successful request returns a HTTP 201 Created status and the full configuration of the API.
2. Capture the API id to use in subsequent calls.
In future calls, you can set this id as an environment variable like the following example:
export API_ID="54593ae4-0e2e-41fe-993a-e40e2ee1fe61"
Create a plan for the API
Your API must have at least one Security/Consumer Plan associated with it before it can be deployed to a Gateway. For more information about Plans, see plans-and-policies. The following procedure explains how to create a KEYLESS plan.
To create a Keyless plan, complete the following steps:
- To create a plan using the mAPI, run the following command:
curl -H "Authorization: Bearer ${PERSONAL_ACCESS_TOKEN}" \
     -H "Content-Type:application/json;charset=UTF-8" \
     -X POST \
     -d '{"definitionVersion":"V4","name":"Keyless","description":"Keyless Plan","characteristics":[],"security":{"type":"KEY_LESS"},"mode":"STANDARD"}' \
https://${MANAGEMENT_API_URL}/management/v2/organizations/DEFAULT/environments/DEFAULT/apis/${API_ID}/plans
If your request is successful, The API call returns a HTTP 201 Created status and a full configuration of your new plan.
2. Capture the plan id to use in subsequent calls.
In future calls, you can set this id as an environment variable like the following example:
export PLAN_ID="211jf90-dk211kl-9313-j9119-3k21t6leel19"
Publish the plan
You must publish the Plan in accordance with the API lifecycle management guidelines.
To publish the Plan, run the following command:
curl -H "Authorization: Bearer ${PERSONAL_ACCESS_TOKEN}" \
     -H "Content-Type:application/json;charset=UTF-8" \
     -X POST \
https://${MANAGEMENT_API_URL}/management/v2/organizations/DEFAULT/environments/DEFAULT/apis/${API_ID}/plans/${PLAN_ID}/_publish
If you published your plan successfully, you receive a HTTP 200 OK status.
Start the API
To start the API using the mAPI, use the following command:
curl -H "Authorization: Bearer ${PERSONAL_ACCESS_TOKEN}" \
     -X POST \
https://${MANAGEMENT_API_URL}/management/v2/organizations/DEFAULT/environments/DEFAULT/apis/${API_ID}/_start
If the API starts successfully, you receive a HTTP 204 No Content status.
You can now view your API in your DSAPI API Management Console. The API has the KEYLESS Plan published. Also, the API is deployed to the Gateway.
(Optional) Publish the API to the Developer Portal
If you want to publish your API to the Developer Portal, you must modify its configuration. To modify the API's configuration, complete the following steps:
- From the JSON response of the Create API Request, modify the
lifecycleStateattribute to valuePUBLISHED, and then send the result in aPUTrequest like the following example:
curl -H "Authorization: Bearer ${PERSONAL_ACCESS_TOKEN}" \
     -H "Content-Type:application/json;charset=UTF-8" \
     -X PUT \
     -d '${MODIFIED_RESPONSE_FROM_CREATE_API_REQUEST}' \
https://${MANAGEMENT_API_URL}/management/v2/organizations/DEFAULT/environments/DEFAULT/apis/${API_ID}
If the PUT request is successful, you receive a HTTP 200 OK status.
2. Re-deploy the API configuration using the following command:
curl -H "Authorization: Bearer ${PERSONAL_ACCESS_TOKEN}" \
     -H "Content-Type:application/json;charset=UTF-8" \
     -X POST \
https://${MANAGEMENT_API_URL}/management/v2/organizations/DEFAULT/environments/DEFAULT/apis/${API_ID}/deployments
A HTTP 202 Accepted status informs you the deployment of your API configuration to the Gateway has been started.
v2 APIs and v4 APIs comparison
v2 APIs and v4 APIs have some differences in functionality. The following table shows the differences for the following API types:
- v2 proxy APIs
- v4 proxy APIs
- v4 message APIs
v2 APIs and v4 APIs support comparison for functionalities
| Functionality | v2 proxy APIs | v4 proxy APIs | v4 message APIs |
|---|---|---|---|
| Add docs page on import of API from OAS | ✅ | ✅ | This function is not applicable for v4 message APIs. |
| Analytics | ✅ | ||
| APIs alerts | ✅ | ||
| API Quality | ✅ | This function is replaced by API Score. For more information about API Score. | This function is replaced by API Score. For more information about API Score. |
| API Review | ✅ | ✅ | ✅ |
| APIs show platform-level analytics | ✅ | ||
| APIs show in platform-level dashboards | ✅ | ||
| Audit Logs | ✅ | ✅ | ✅ |
| Categories | ✅ | ✅ | ✅ |
| Compare API to previous versions | ✅ | ✅ | ✅ |
| CORS | ✅ | ✅ | ✅ |
| Custom Dashboards | ✅ | ||
| Debug Mode | ✅ | ||
| Deployment History | ✅ | ✅ | ✅ |
| Documentation - AsciiDoc | ✅ | ||
| Documentation - AsyncAPI | ✅ | ✅ | ✅ |
| Documentation - Group Access Control | ✅ | ✅ | ✅ |
| Documentation - Home page | ✅ | ✅ | ✅ |
| Documentation - Markdown | ✅ | ✅ | ✅ |
| Documentation - Metadata | ✅ | ✅ | ✅ |
| Documentation - Nested Folder Creation | ✅ | ✅ | ✅ |
| Documentation - Role Access Control | ✅ | ||
| Documentation - Swagger vs. Redoc Control | ✅ | ✅ | ✅ |
| Documentation - Translations | ✅ | ||
| Documentation - Try It Configuration | ✅ | ✅ | ✅ |
| Documentation - OAS | ✅ | ✅ | ✅ |
| Export API as GKO spec | ✅ | ✅ | ✅ |
| Export API as DSAPI def (+options) | ✅ | ✅ | ✅ |
| Failover | ✅ | ✅ | The use of this function depends on your use case. For more information, contact us. To contact us, go to Contact us. |
| Health check | ✅ | ✅ | |
| Health Check Dashboard | ✅ | ||
| Import API from DSAPI def (+options) | ✅ | ✅ | ✅ |
| Import API from OAS | ✅ | ✅ | This function is not applicable for v4 message APIs. |
| Import API from OAS and automatically add policies for validation | ✅ | ✅ | This function is not applicable for v4 message APIs. |
| Import API from WSDL | ✅ | This function is not applicable for v4 message APIs. | |
| Improved Policy Studio | ✅ | ✅ | |
| Logs | ✅ | ✅ | ✅ |
| Messages / Broadcasts | ✅ | ✅ | ✅ |
| Notifications | ✅ | ✅ | ✅ |
| Path mapping | ✅ | ||
| Plans | ✅ | ✅ | ✅ |
| Properties | ✅ | ✅ | ✅ |
| Response templates | ✅ | ✅ | ✅ |
| Rollback | ✅ | ✅ | ✅ |
| Service Discovery | ✅ | ||
| Sharding tags | ✅ | ✅ | ✅ |
| Subscriptions | ✅ | ✅ | ✅ |
| Tenants | ✅ | ||
| Terms & Conditions on a Plan | ✅ | ✅ | ✅ |
| User Permissions | ✅ | ✅ | ✅ |
| Virtual Hosts | ✅ | ✅ | ✅ |
| Resources | ✅ | ✅ | ✅ |
v2 APIs and v4 APIs policies support
v2 APIs and v4 APIs support only some policies. Also, you can apply v2 APIs and v4 APIs to different phases within a request or a response. For more information about the policies that the v2 APIs and the v4 APIs support and the phases that you can apply these policies to, see Policy support and versioning.