Federating your APIs Last updated 17-Dec-2024
Why federation
A growing number of organizations have an IT footprint that extends across multiple clouds and multiple enterprise software solutions. All of these systems contain valuable data and services that your organization can use to get ahead. As architects and platform engineers, your success will be measured against your ability to harness this complexity to the benefit of the business. This means two things:
- Governance: maintaining up-to-date knowledge and control of the solutions used in the organization, ensuring they meet the organization’s standards in terms of security, quality, and consistency.
- Developer experience: ensuring that developers inside and outside the organization can easily discover, consume, build upon, and even configure these systems.
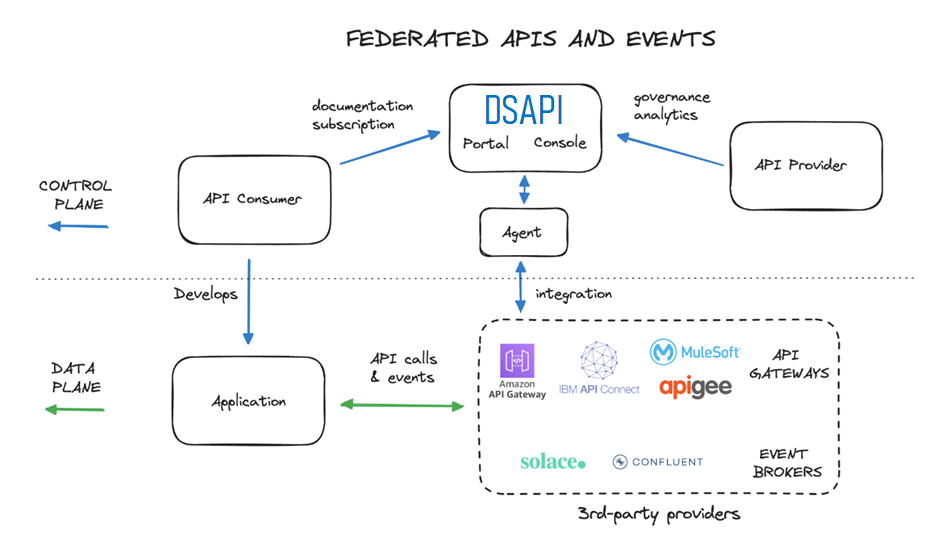
It just so happens that the systems you need to govern and productize for your developers often take the form of APIs deployed on different enterprise products, whether they’re REST APIs running on DSAPI, AWS API Gateway, and IBM API Connect, or event streams running on message-based systems like Kafka or Solace.
Beyond APIs, you might be thinking why not apply the same approach to centralize access to integrations from your iPaaS solution, or OpenAPI or AsyncAPI specifications spread across Github repositories, to name a few examples.
Developers are struggling to find and consume what they need because everything is spread across multiple platforms and technologies. Each platform has its own portal or catalog, and its own way of handling access control. Developers are wasting days or weeks in long email chains before they can start building applications that deliver value to the business.
Manage APIs and event streams from any vendor
DSAPI is known as the leading full-lifecycle API management solution that natively supports both synchronous and asynchronous APIs across a wide range of protocols.
Today, many of the same API management principles can also be applied to APIs and event streams deployed on AWS API Management, Azure API Management, IBM API Connect, Apigee, Confluent, and Solace, with many more to come. We call this federated API management, and it is accelerating DSAPI’s vision to become the API management platform for any type of API running on any platform.
Thanks to the integrations we support, you can now:
- Discover APIs, OAS & AsyncAPI definitions, API products, Kafka schemas, and other useful metadata from 3rd-party providers
- Ingest these as first-class citizens into DSAPI’s API management platform
- Enrich these assets with documentation and access controls
- Publish these assets for discovery by developers on the DSAPI Developer Portal
- Manage subscription requests from developers, providing them with API keys or OAuth tokens that will allow them to directly consume the 3rd-party systems, without having to go through the DSAPI gateway
Developers no longer need to navigate to different catalogs or portals to discover useful APIs and event streams, they can find them all in one place.
Centralized API subscription management
Whether your API is running on IBM API Connect, Solace, or anything in between, DSAPI can take care of managing requests from developers to subscribe to and consume your APIs.
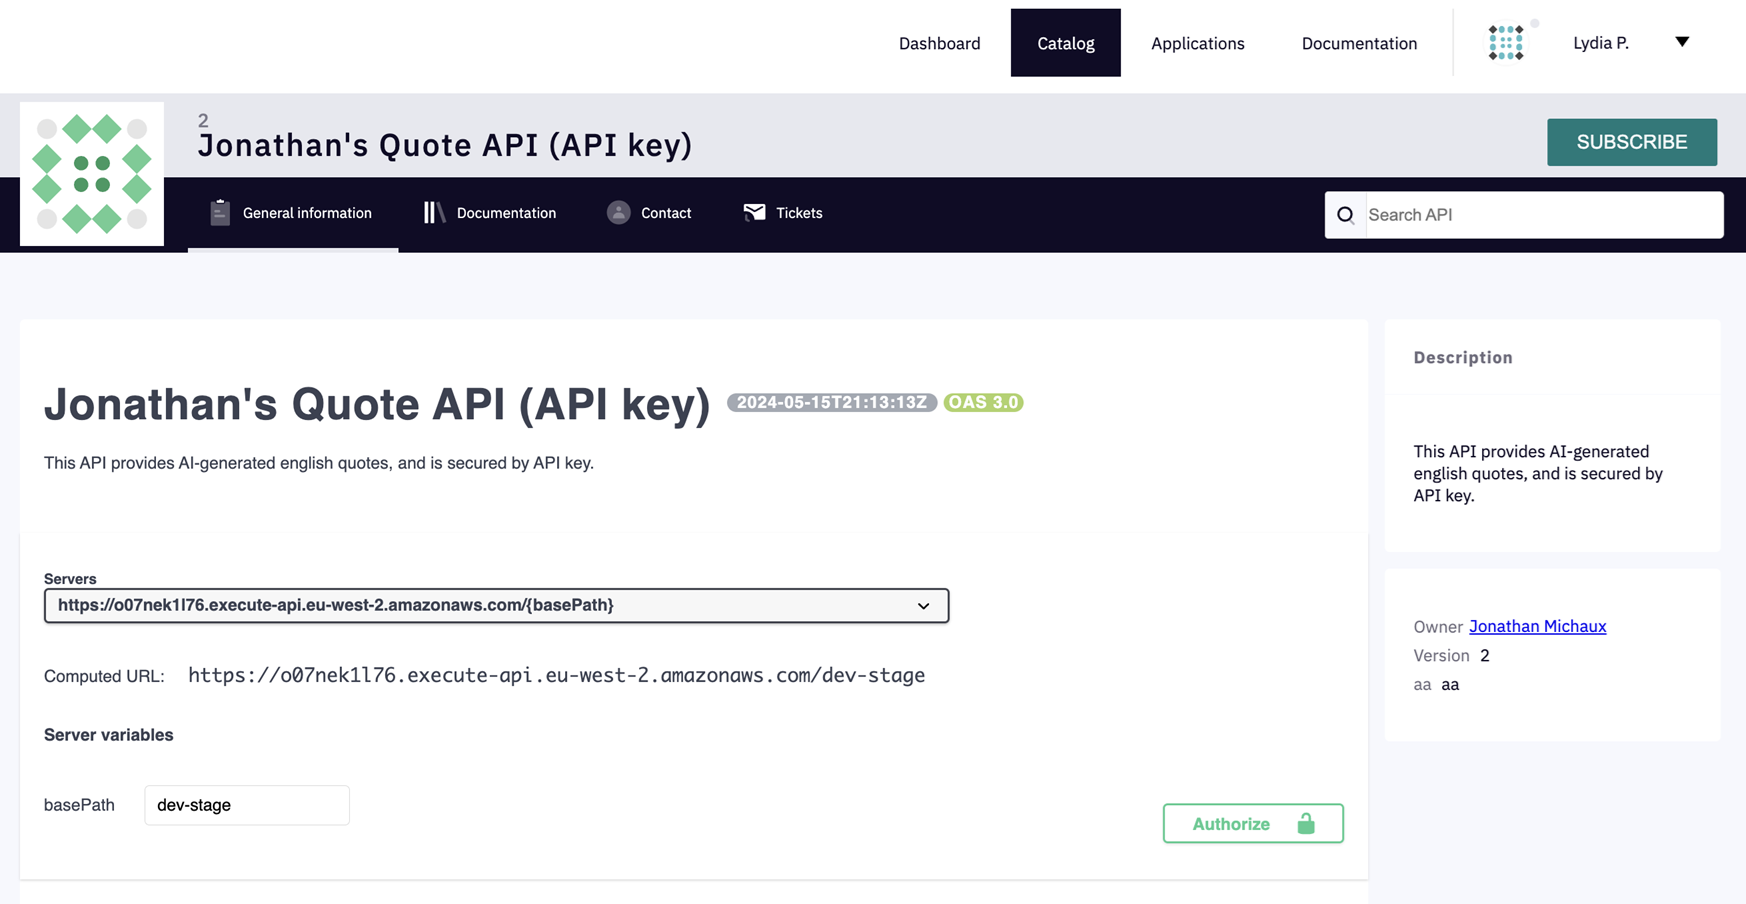
The screenshot below shows the vanilla DSAPI Developer Portal that includes an API from AWS. Hitting the “Subscribe” button will allow any developer to easily obtain an API key to directly consume the underlying AWS API.
By integrating concepts like API Products and Plans from 3rd-party platforms, DSAPI can expose these concepts to your developers who will be able to request subscriptions for their applications to consume these APIs. DSAPI acts as a middleman, allowing you, the admin team, to accept or reject subscription requests before they are forwarded to the 3rd-party platform.
JWT, OAuth, and API key subscriptions can be configured according to your needs, including integrations with external authorization servers to perform token generation and validation.
For more information about Federating your APIs, see the following articles:
Integrations
Introduction
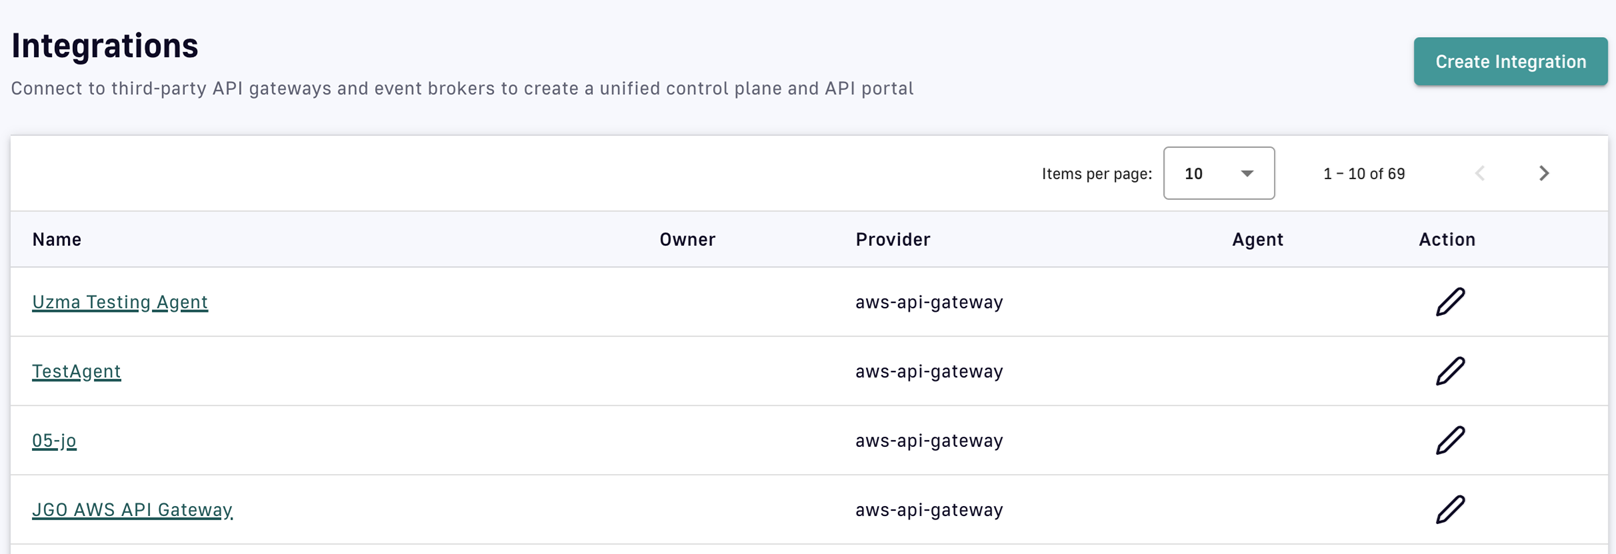
Integrations are components that allow users to connect DSAPI to 3rd-party API gateways or event brokers to discover, then import, APIs and other assets. Integrations are managed and configured through the DSAPI APIM Console.
Each integration is paired with a component called an agent, which handles the communication between the 3rd-party provider and DSAPI.
Integration management
Create an integration
To create an integration, the user selects an integration type and provides basic information, such as a name and description. Once created, the integration must be connected to an agent to be fully functional.
-
Log in to your APIM Console
-
Select Integrations from the left nav
-
Click Create Integration
-
Choose an integration provider
-
Enter general information for the integration

-
Click Create Integration
View or edit an integration
DSAPI automatically detects which integrations were installed by the customer. Depending on the integration, parts of the UI are dynamic, such as forms for entering 3rd-party provider connection parameters. These forms adapt based on the schema provided by the integration.
To view or edit an integration:
-
Log in to your APIM Console
-
Select Integrations from the left nav
-
Click on the integration you're interested in
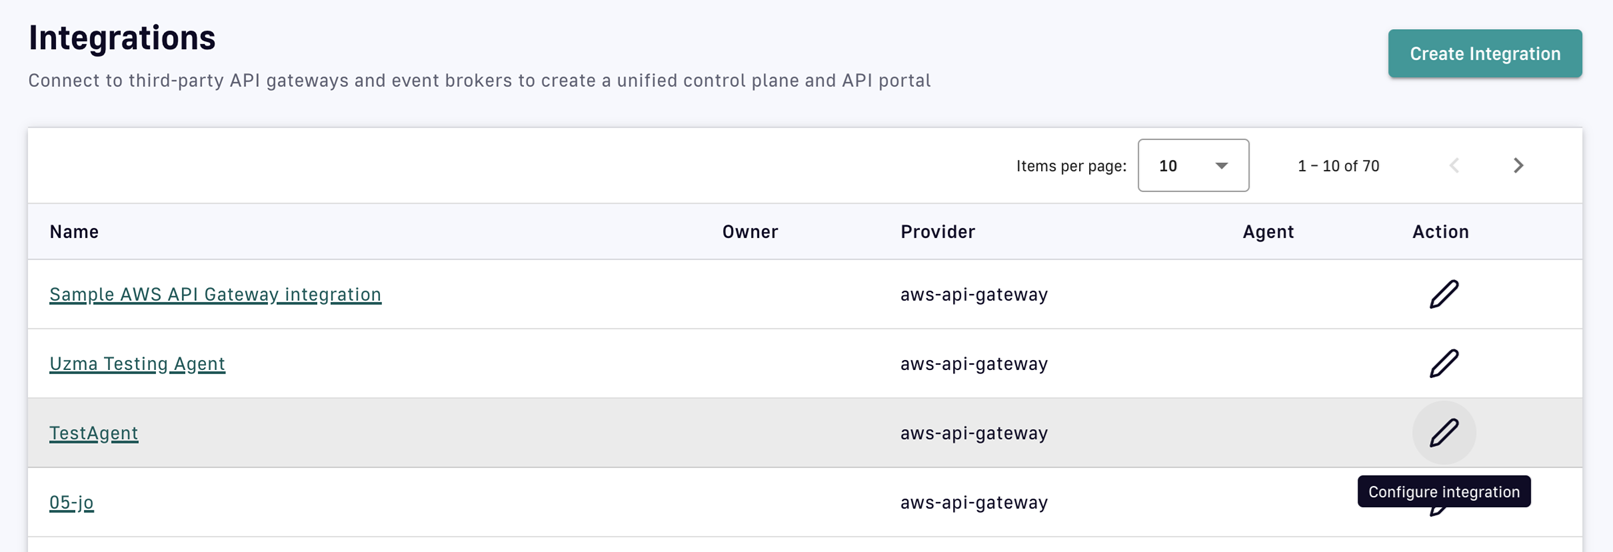
-
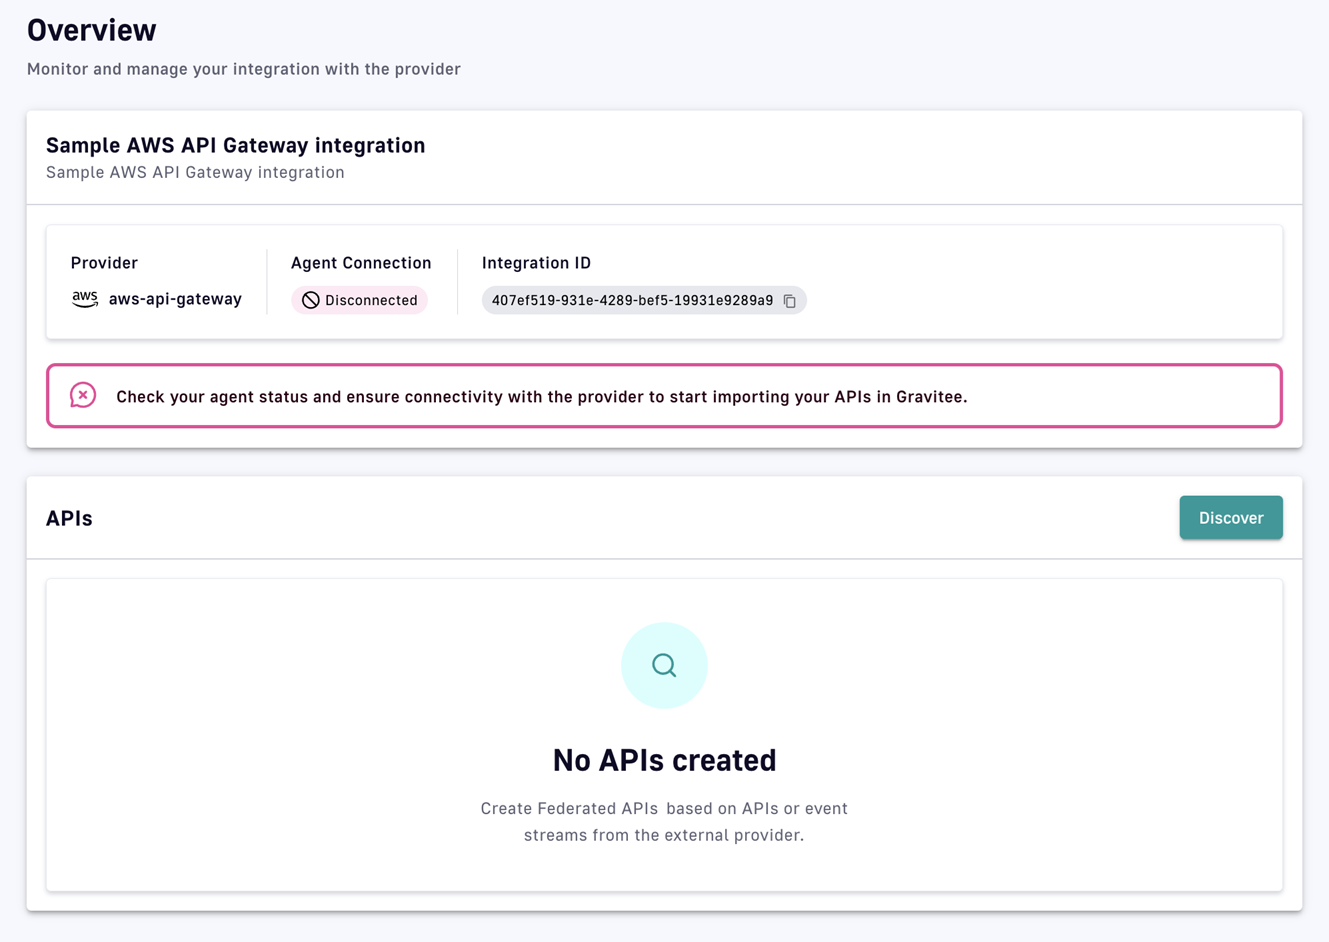
From the inner left nav, select Overview to run discovery and edit discovered APIs, or select Configuration to edit the general information or delete the integration (if no federated APIs are linked to it)
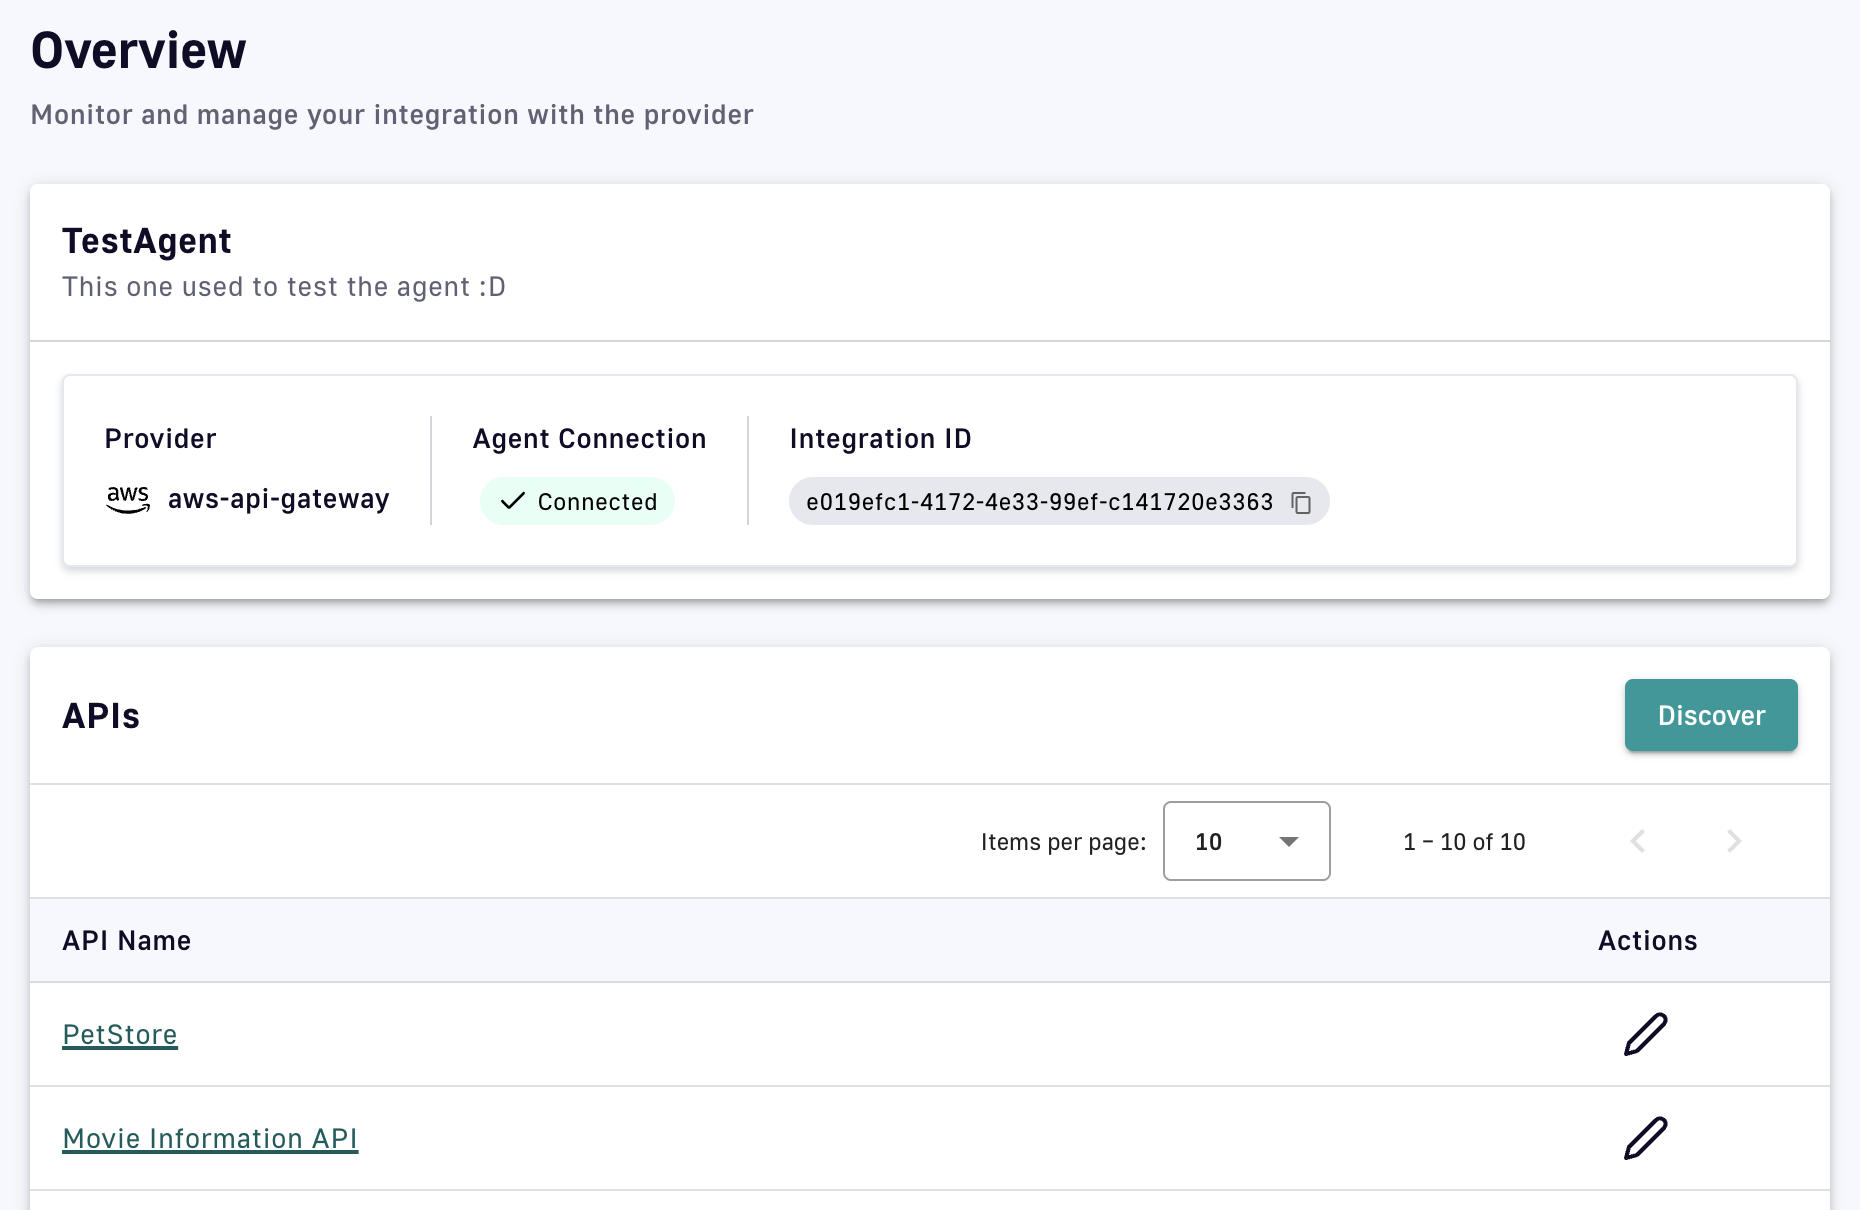 Integration status provides the user with critical information, such as if the integration is active and can reach the agent, if the agent is running and can reach the provider, and if the agent is receiving errors.
Delete an integration
To delete an integration:
-
Log in to your APIM Console
-
Select Integrations from the left nav
-
Click on the integration you're interested in
-
Select Configuration from the inner left nav
-
In the Danger Zone section, click Delete Integration
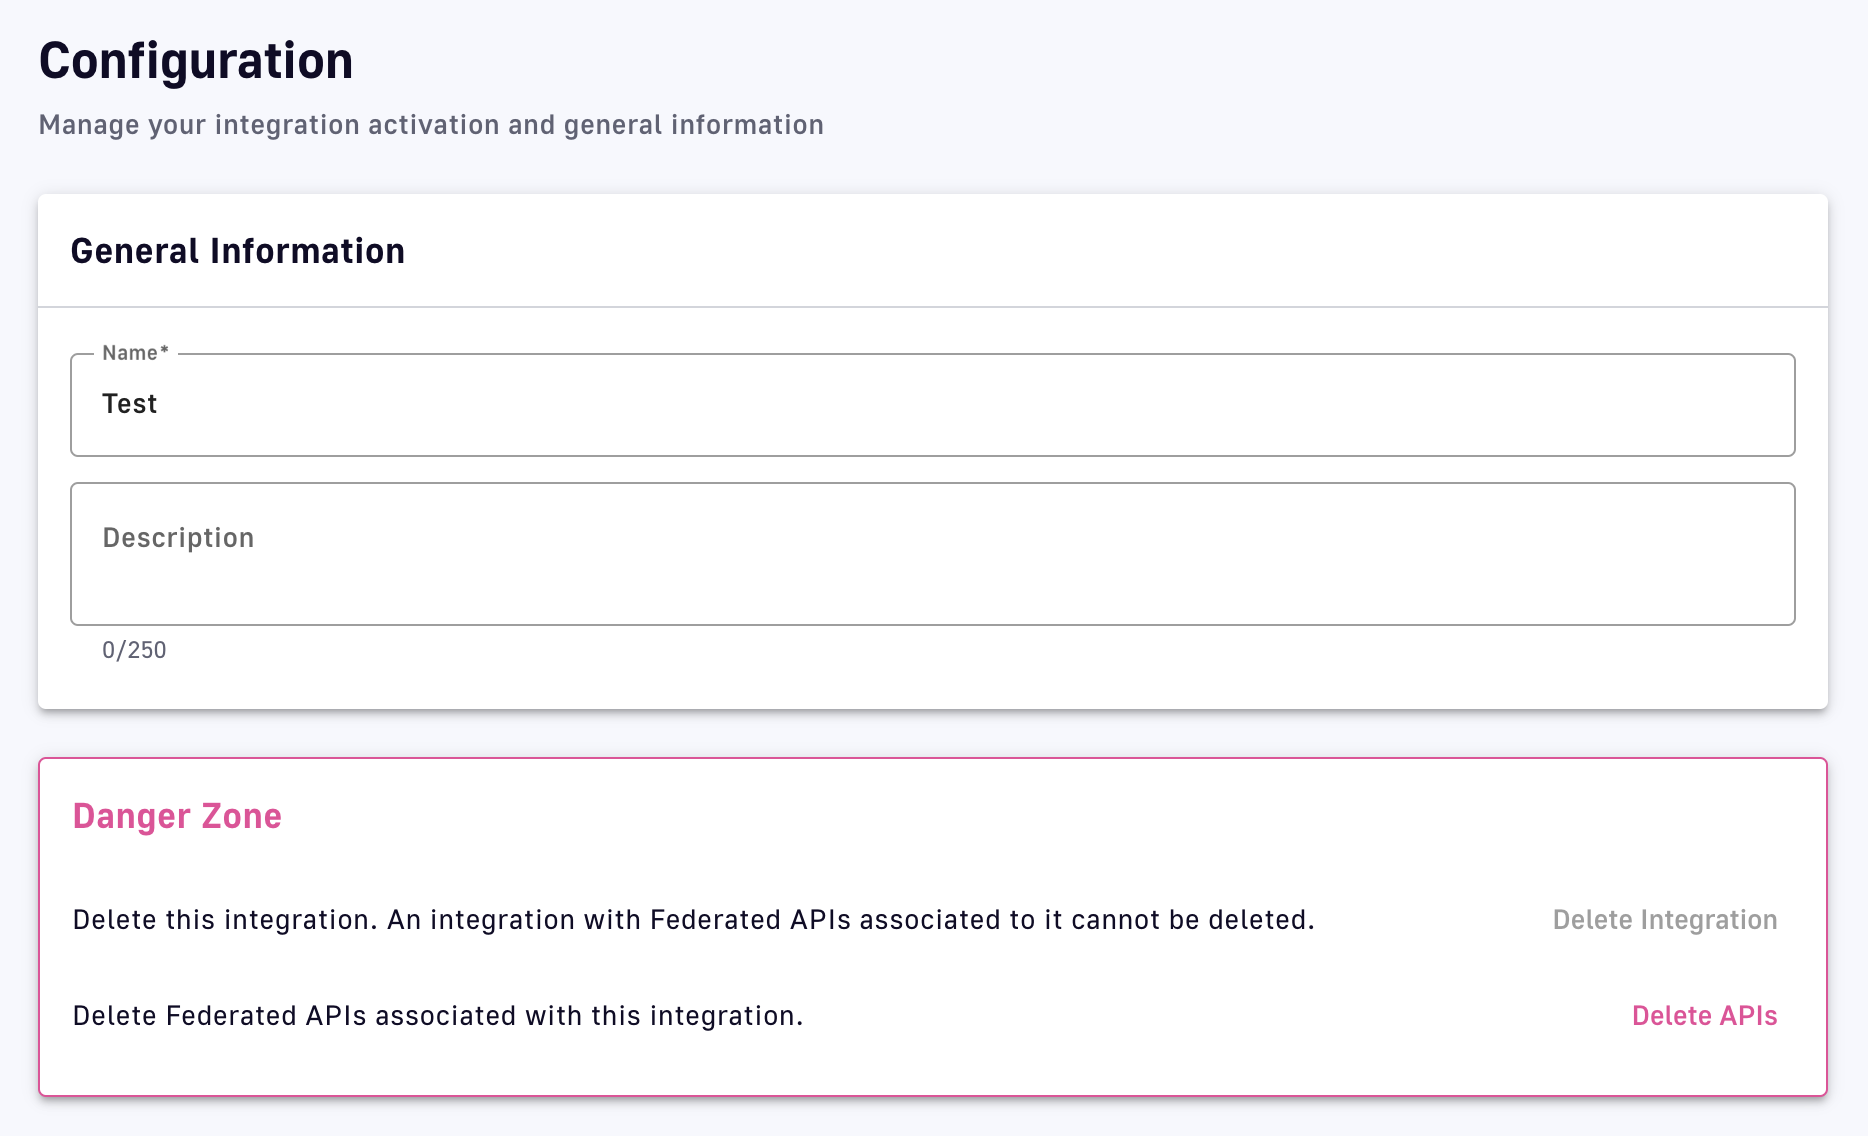 If Delete Integration is grayed out, you must first click Delete APIs to delete the federated APIs associated with the integration.
Permissions
You can control which user roles can manage Integrations in DSAPI.
The environment-level INTEGRATION permission corresponds to the following CRUD permissions:
- Create: Create a new integration
- Read: View an integration’s details
- Update: Modify an integration’s attributes, refresh agent status.
- Delete: Delete an integration
By default, user roles have the following permissions:
- ADMIN: CRUD
- API_PUBLISHER: CRUD
- USER: _R__
The federation agent
A federation agent is an executable (e.g., docker-compose and configuration files) that integrates with a 3rd-party provider and communicates with an integration defined in DSAPI. For an integration to function, its associated agent to be properly configured and deployed. Agents are necessary because the DSAPI control plane (APIM Console and Management API) may not have direct network access to the 3rd-party provider’s management API. You may also simply prefer to not provide DSAPI with credentials to access your platforms, particularly if the DSAPI control plane is SaaS.
Follow the steps below to set up and run a local instance of a federation agent that connects to a 3rd-party provider.
Discovery
Overview
The process of an integration connecting to the management API of a 3rd-party provider to discover its assets is known as discovery. Assets that can be discovered by an integration are:
- APIs: REST API proxies running on 3rd-party API gateways. The integration can potentially discover their OAS definitions.
- Event streams: e.g., Kafka or Solace topics and their schemas. The integration can potentially discover their AsyncAPI definitions.
- Productisation and consumption related objects like API products and Plans: Assets that satisfy or contribute to DSAPI's concept of a plan, which provides a service and access layer on top of an API that specifies access limits, subscription validation modes, and authentication protocols.
Scope of discovery
The scope of assets discovered by an integration depends on several factors. For example, instead of an integration automatically discovering every API that belongs to the entire underlying account, discovery is scoped to a subset of the APIs owned by that organization.
Limiting factors include:
- The permissions given to the agent by the 3rd-party account administrator that dictate which resources can be accessed
- Filter parameters that are provided as part of the agent's configuration and provide a boundary as to which assets should be discovered (e.g., the AWS stage, Solace application domain, or Confluent topic prefix)
- Asset relevance, e.g., ignoring APIs that are undeployed, in draft mode, or archived, or not part of an API product
Discovery execution
Discovery must be executed to initially import APIs, then subsequently if the scope of discovery has changed or new 3rd-party APIs are discoverable.
- Log in to your APIM Console
- Select Integrations from the left nav
- Click on the integration you're interested in
- Select Overview from the inner left nav
- Ensure the agent status is Connected
- Click the Discover button
- Discovery provides the option to add new APIs to a collection, if new APIs are discovered on the 3rd-party provider
- Discovery provides the option to update existing APIs that were previously discovered. In this case, changes to attributes made in DSAPI will be overwritten by conflicting attributes coming from the 3rd-party.
Federated APIs
Overview
Federated APIs join proxy and message APIs as one of the three main types of v4 DSAPI APIs. Federated APIs are created based on assets discovered by integrations with 3rd-party API gateway or event broker providers. This page discusses:
- Creating federated APIs
- Publishing federated APIs
- Federated API documentation
- Federated API plans, applications, and subscriptions
- Configuring federated APIs
- Deleting federated APIs
The data plane of a federated API is managed by the underlying 3rd-party provider. This means that Federated APIs don't include some of the features available on other API types, such as:
- Backend services, policies, proxy settings are unavailable
- Cannot be started, stopped, or deployed to the DSAPI API Gateway
Creating federated APIs
DSAPI Federated APIs cannot be created manually, they can only be discovered and ingested by the Discovery process.
After running Discovery, you'll end up with a number of new federated APIs in DSAPI.
If you open one, you'll be able to view that API's details, add additional documentation and metadata, and publish that API to your DSAPI Developer portal, just like you can for a native DSAPI Gateway API.
Configuring federated APIs
Compared to traditional DSAPI v2 and v4 APIs, the configuration options available to federated APIs are limited. However, the APIM Console offers a subset of identical configuration pages and capabilities regardless of API type.
To access federated API configuration options:
- Log in to your APIM Console
- Select APIs from the left nav
- Click on the federated API you're interested in
- Select a configuration category from the inner left nav: Configuration, Consumers, or Documentation
Follow the links below to visit the documentation for each configuration page.
| Configuration category | Configuration page | Comments |
|---|---|---|
| Configuration | ||
| Consumers | Plans cannot be manually added to federated APIs | |
| Documentation |
Federated API plans, applications, and subscriptions
Plans for federated APIs are based on API products, usage plans, and similar concepts already defined and automatically imported from 3rd-party providers. A plan only exists to the extent that a matching concept exists in the 3rd-party provider.
When DSAPI API plans are ingested from a 3rd-party provider, they enable subscriptions to the 3rd-party APIs be managed directly from within DSAPI. Under the hood, the federation agent will integrate with the third partie's management API to create the required objects that will enable the requested subscription. This may result in an API key being returned to the user in DSAPI APIM or in the DSAPI Developer portal. In other cases, it will simply create the right permissions on the third party, while access control is done using a 3rd-party OAuth server for instance.
To manage your federated API's plans and their subscriptions, go to the Consumers tab for your federated API.

Under the Plans tab, you'll see all of the plans for your API that are either in staging, published, deprecated or closed. You will only be able to alter your federated API plans as it pertains to:
- Deprecation, publishing, closing your plans (deprecating or closing the plan will not alter the state of the usage plan in the third party provider, but will only stop the correlate DSAPI plan)
- Defining general plan information, such as name, description, characteristics, and general conditions
- Subscription options: either allowing auto-validation of all subscription requests, or, enforcing API consumers to submit a request for manual approval by the API Publisher
- Defining certain groups that can or cannot subscribe to your API via DSAPI groups

Before publishing your federated API to the Developer Portal, make sure that your plan is published. Otherwise, there will be know way for API consumers to subscribe to your federated API.
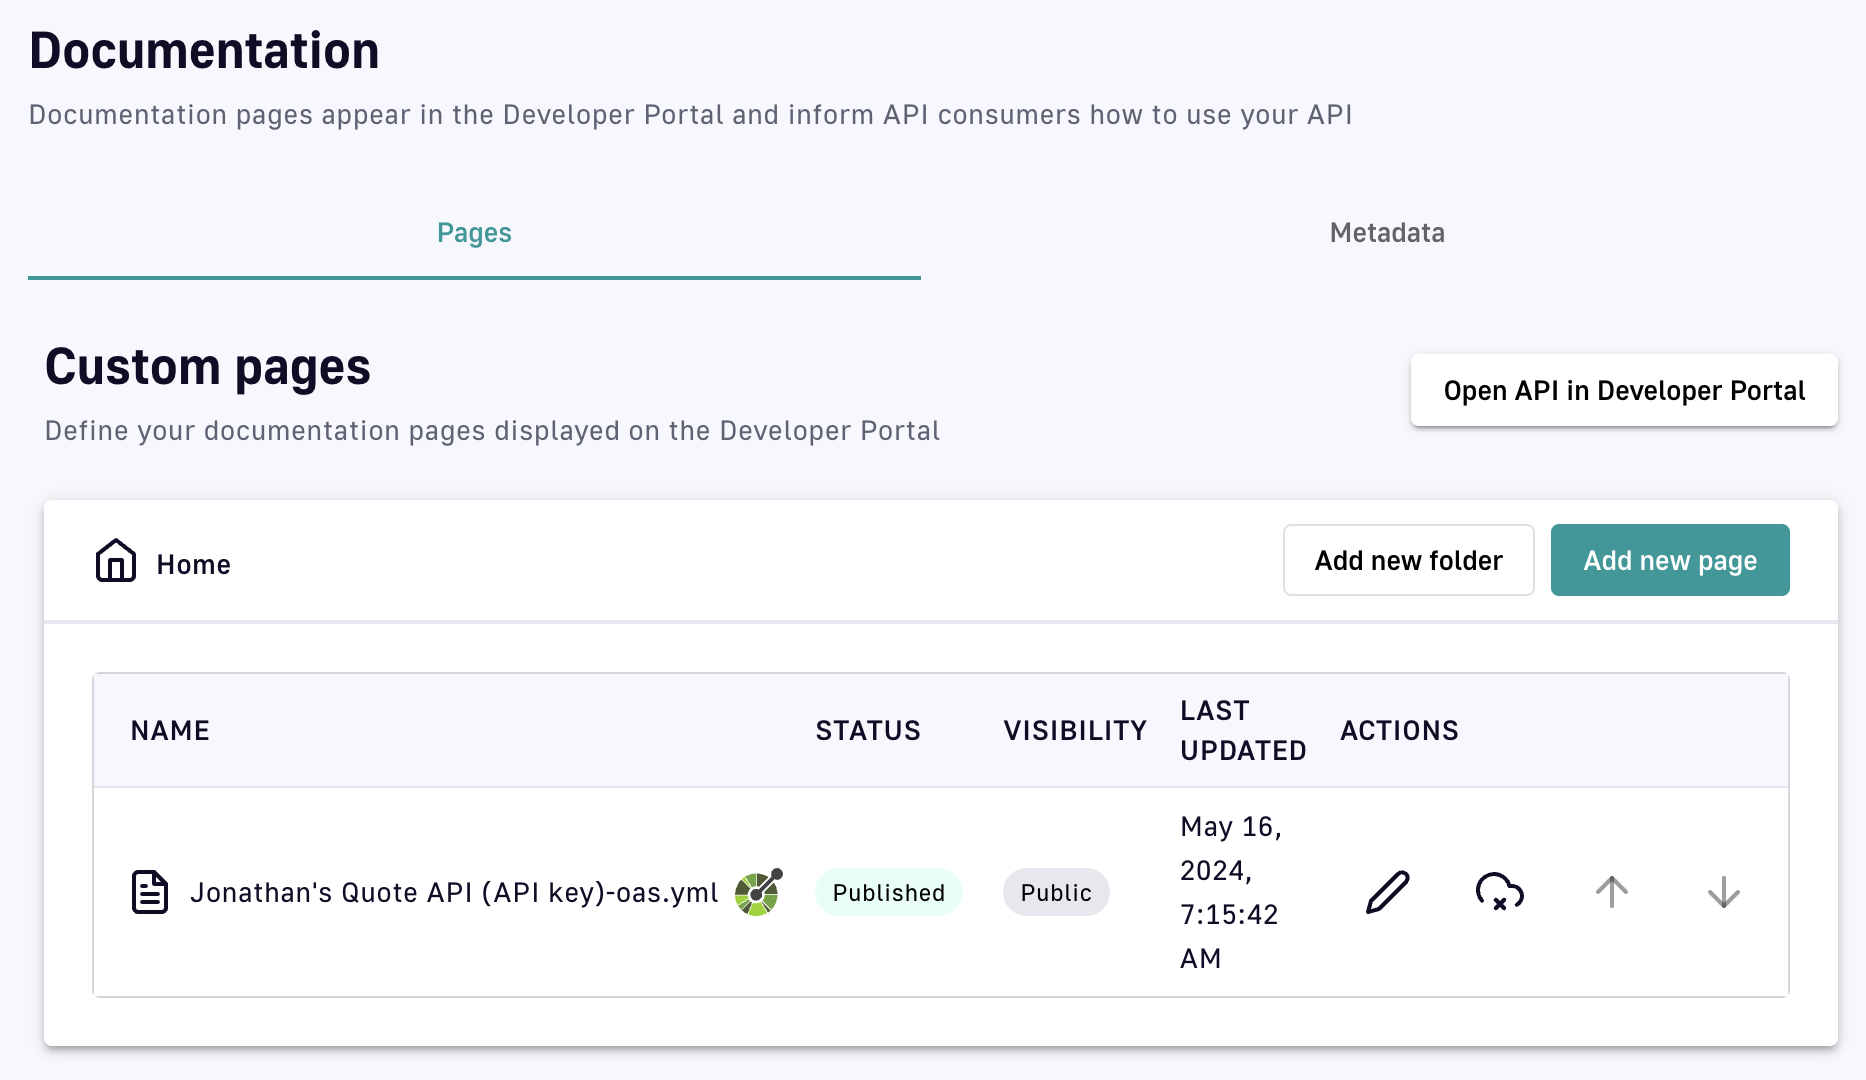
Federated API documentation
Federation enables a centralized location where API consumers can discover unified API documentation for diverse API gateways and event brokers. While an integration is syncing, available assets (e.g., OAS/AsyncAPI definitions or Markdown files) are automatically imported from the 3rd-party provider to form the basis of the API's documentation published to the Developer Portal. New documentation pages and assets can also be created directly within DSAPI.
To view or add documentation to an existing federated API:
- Log in to your APIM Console
- Select APIs from the left nav
- Click on the federated API you're interested in
- Select Documentation from the inner left nav
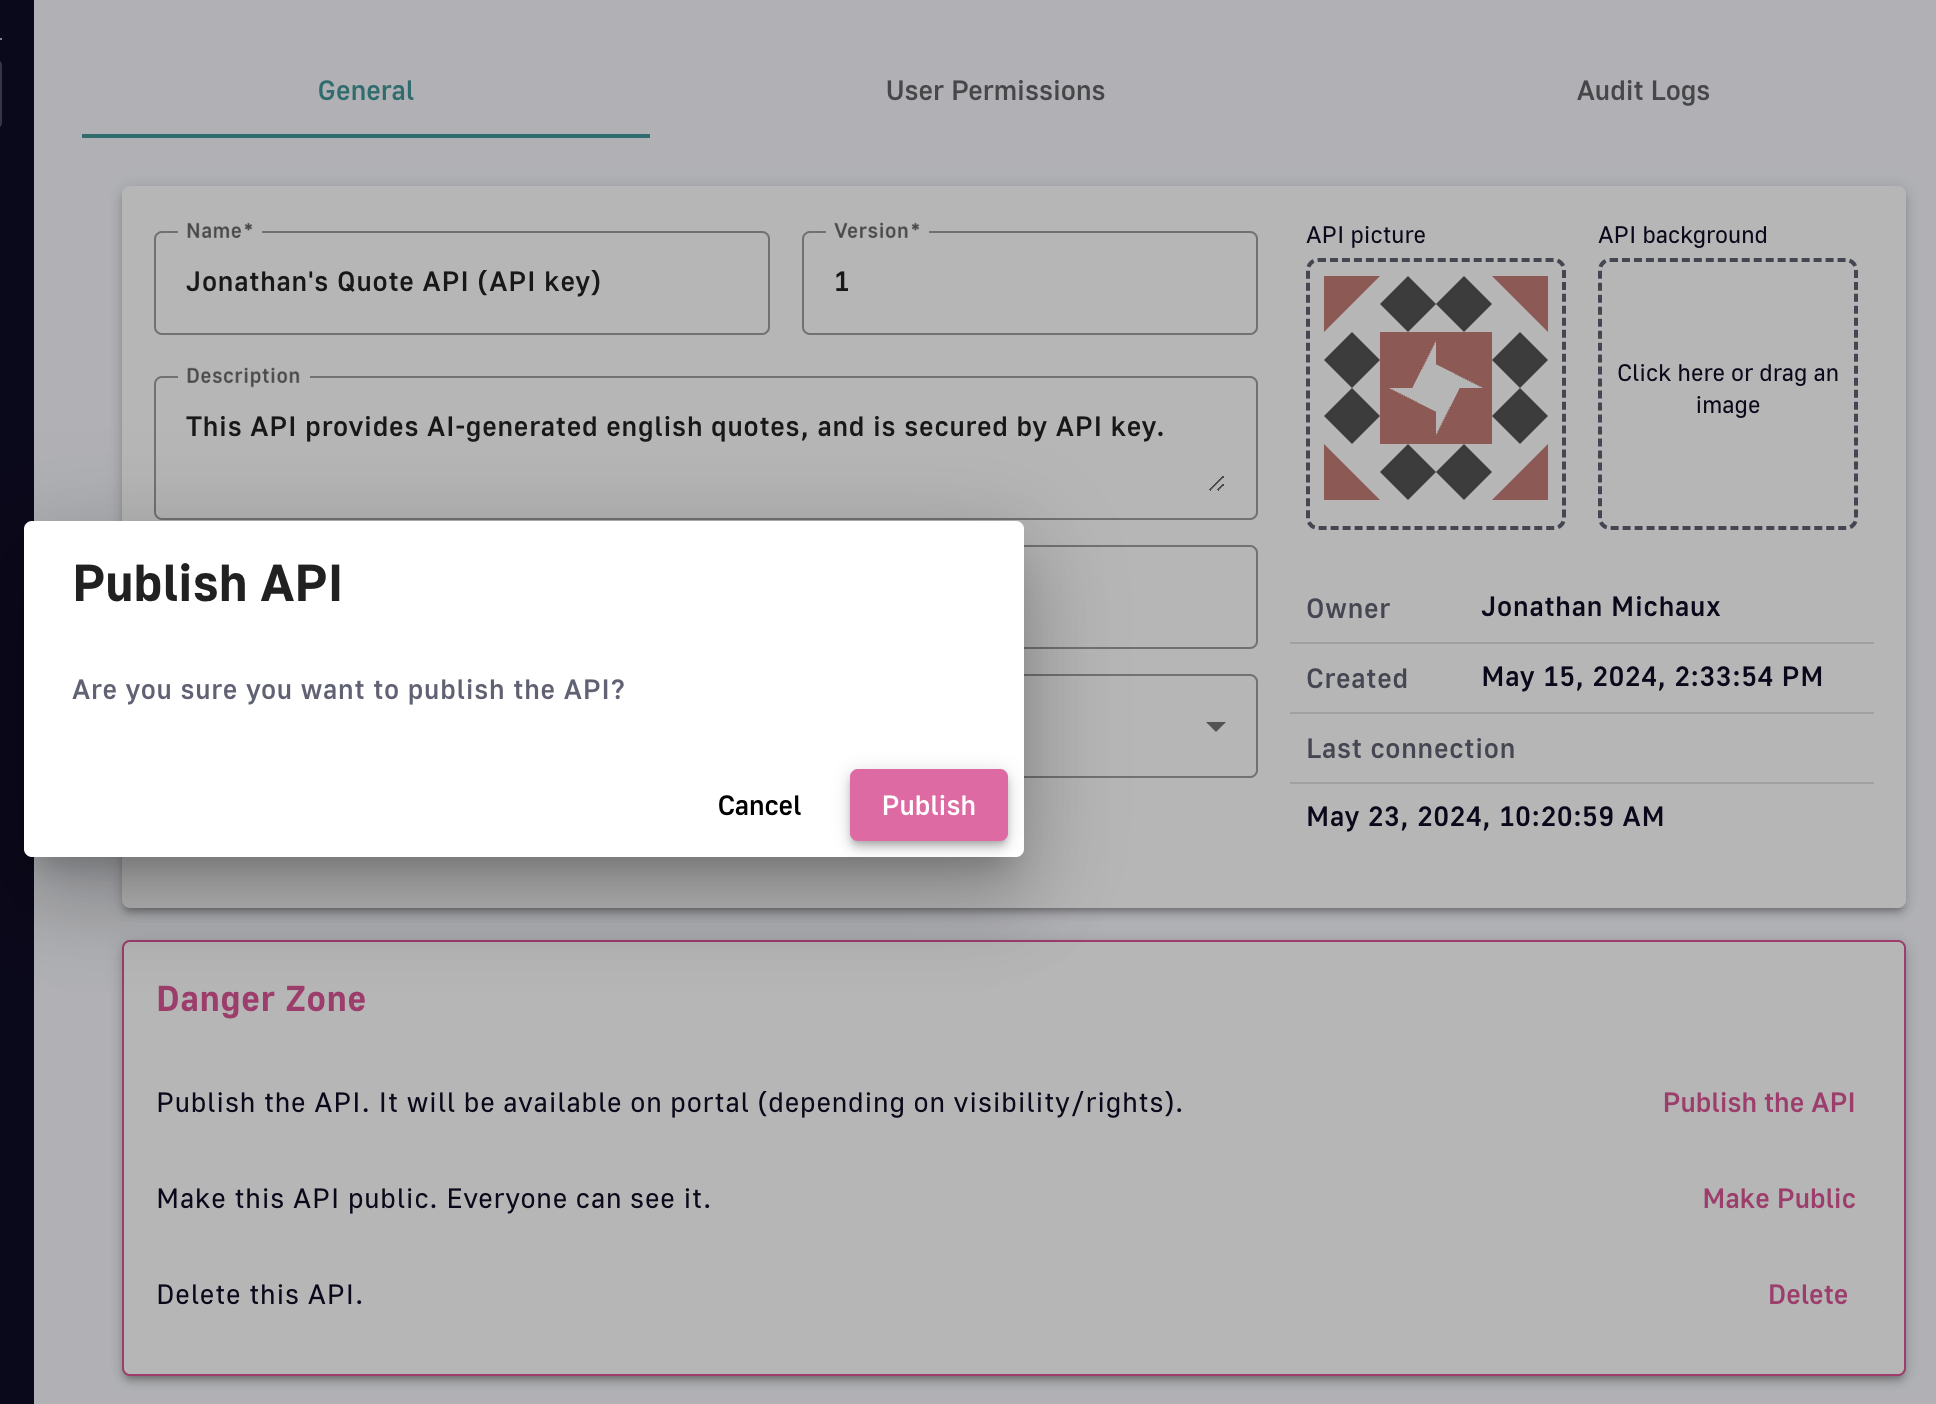
Publishing federated APIs to the Developer Portal
APIs federated from multiple vendors can be published in a single DSAPI Developer Portal. This acts as a centralized location from which API consumers can access documentation and subscriptions. By default, federated APIs imported from an integration are not published to the portal.
To publish an existing federated API:
- Log in to your APIM Console
- Select APIs from the left nav
- Click on the API you want to publish
- Select Configuration from the inner left nav
- In the Danger Zone, click Publish the API
View your API in the Developer Portal
To view the API that you just published, select Developer Portal. This will open your DSAPI Developer Portal in a new window. From here, you should be able to view your API, its documentation, and its subscription plan options.
(For API consumers) Discover and subscribe to federated APIs in the DSAPI Developer Portal
From here, API consumers can access their DSAPI Developer Portal and search for the federated APIs that API Publishers have published. Simply access the url of the Developer Portal and either search for the specific API or browse the larger catalog of APIs have been published from the DSAPI API Gateway. From here, consumers can:
- View API documentation
- Interface directly with the API Publisher
- Self-service subscribe
- View tickets
- And more
Subscribe to APIs
-
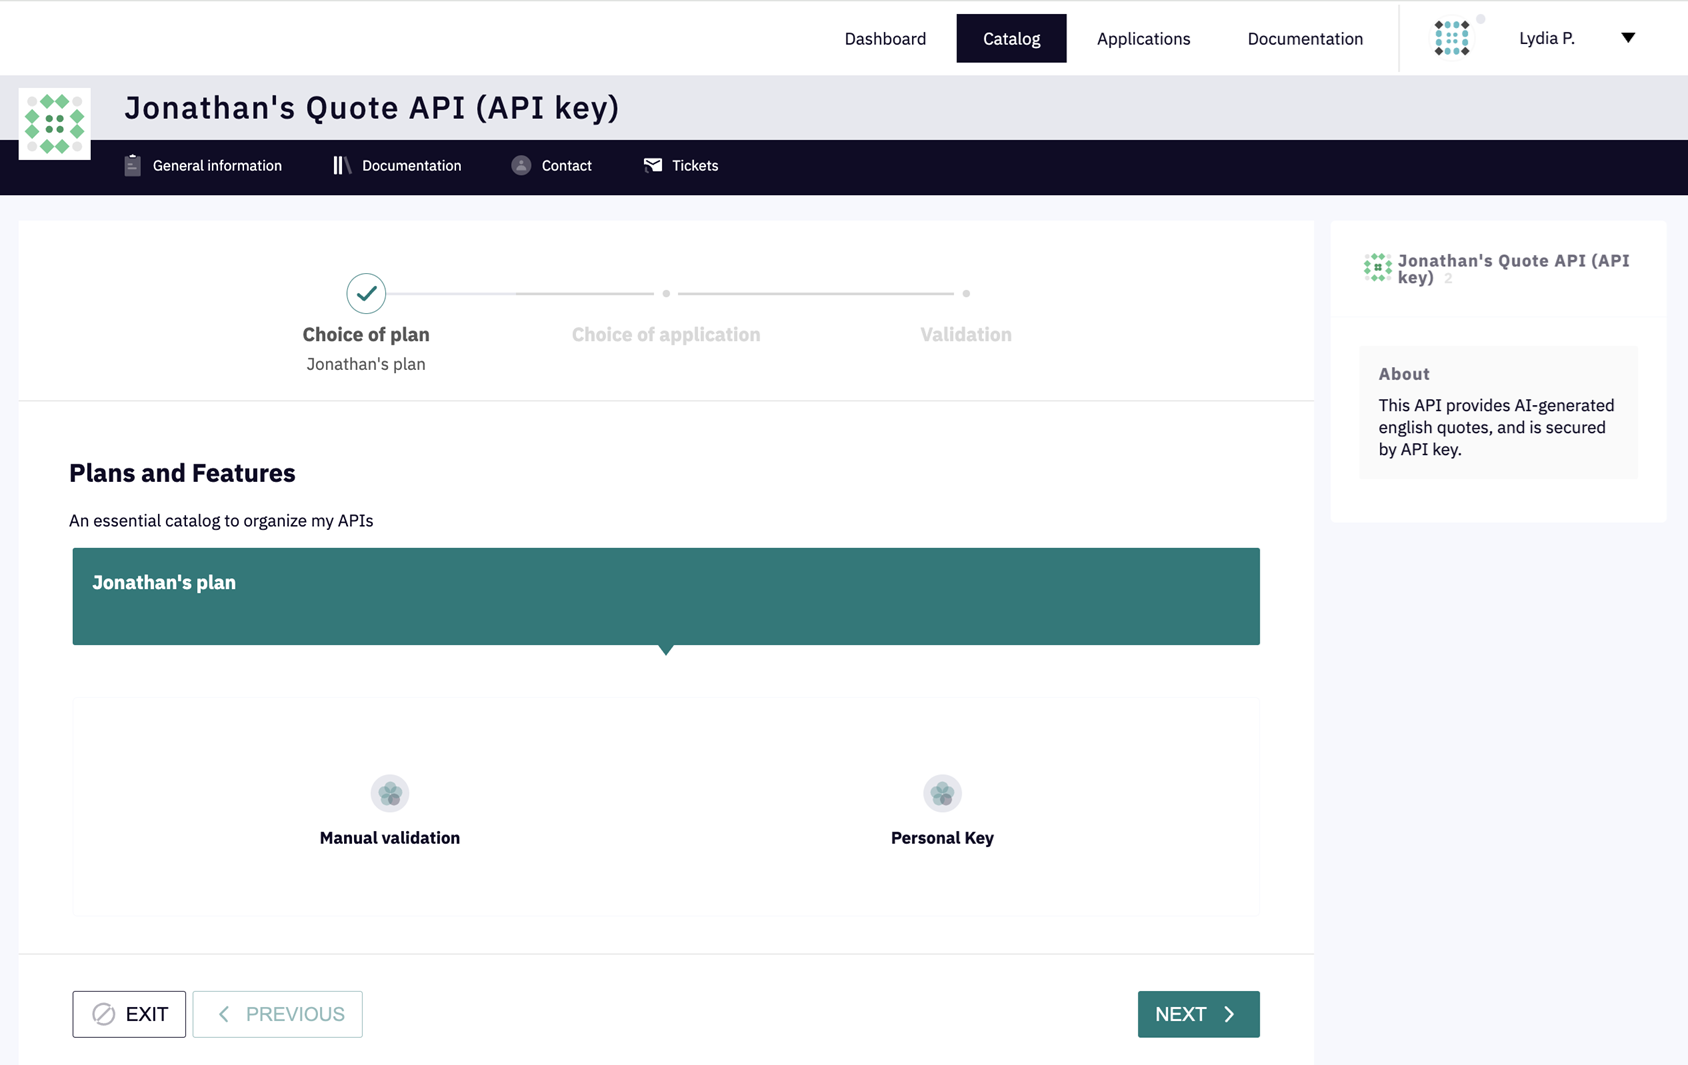
When you've found the API that you want to subscribe to, click the SUBSCRIBE button
-
Select the plan you want to subscribe to, then click Next
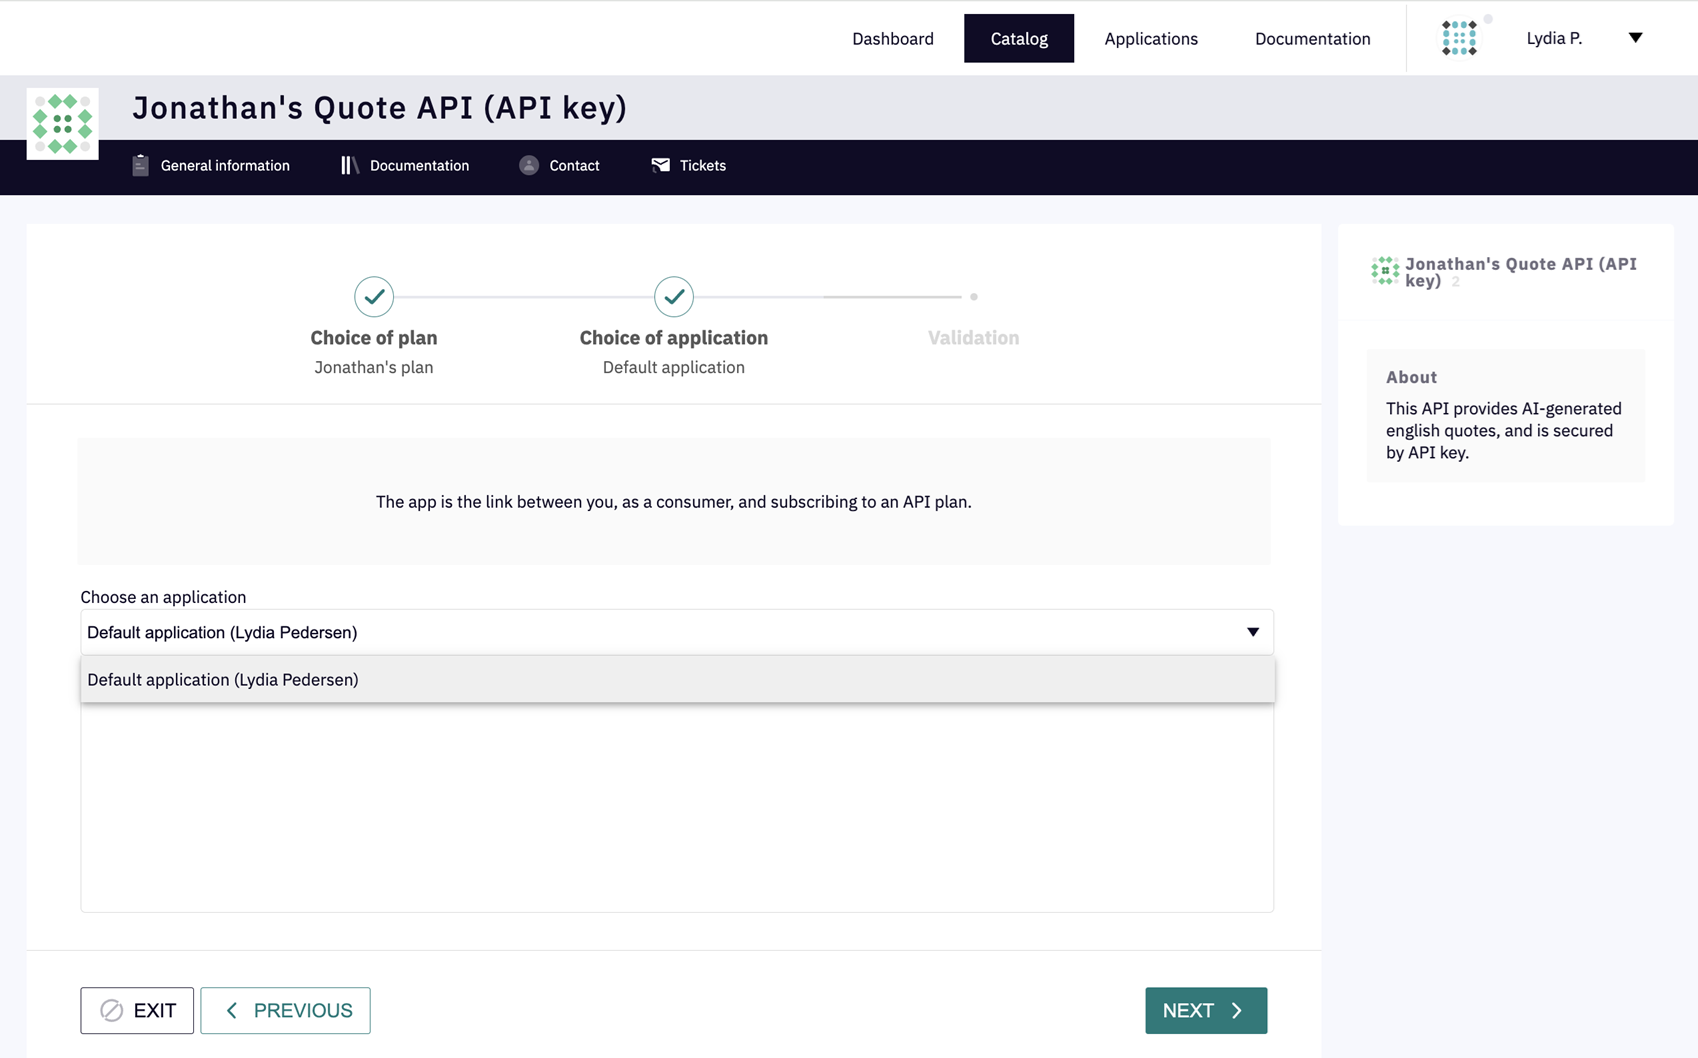
-
Use the Choose an application drop-down menu to select an application to use for the subscription, then click Next. If you do not yet have an application, please refer to the Applications documentation to create a DSAPI Application.
Depending on the subscription configuration, the application will either auto-validate or require approval.
- For more information on how to create and manage applications in APIM, see Applications.
- For more information on how to create and manage subscriptions in APIM, see Subscriptions.
Deleting federated APIs
Deleting a federated API will close or delete all objects inside of it such as plans, documentation pages, and subscriptions.
When you delete a federated API in DSAPI, you are not deleting the original API asset on the side of the third party provider. You will only delete the federated API within DSAPI.
To delete a federated API:
-
Access the Federated API that you want to delete either from the APIs menu or the Integrations tab.
-
Select Configuration from the inner left nav
-
Select the General header tab
-
In the Danger Zone section, click Delete
To delete all of an integration's federated APIs as a group:
-
Log in to your APIM Console
-
Select Integrations from the left nav
-
Click on the integration you're interested in
-
Select Configuration from the inner left nav
-
In the Danger Zone section, click Delete APIs
Create a service account for the federation agent
The best way to provide credentials for the federation agent to connect to your APIM installation is to create a service account in the DSAPI API Management console dedicated to the agent.
To do this, head to the organisation settings in APIM, create a new user, and choose Service Account.
.png)
The service account email is optional. It is used to send notifications pertaining to the account and its related activities.
Next, ensure that this service account has the right permissions for the federation agent to be able to fulfil its duties. It requires CRUD permissions on the Integration object at environment-level:
.png)
You can create a new dedicated Federation Agent role just for this purpose, which will enable you to give the agent the minimum necessary permissions.
Alternatively, you can give the agent the API_PUBLISHER role at environment level.
The screenshot below shows the environment-level permissions included in the API_PUBLISHER role by default:
.png)
From the newly created service account, scroll to the Tokens section at the bottom of the page and create a new token:
.png)
You can now use this token as part of your agent's configuration.
3rd-party providers
There is a dedicated integration for each 3rd-party API gateway or event broker whose APIs can be federated into DSAPI. DSAPI provides one agent dedicated to each provider. Please reach out to us if you're interested in having a single agent that can handle multiple providers. The details of each provider integration are linked below.
Features and compatibility
| Provider | Discovery | Subscription | OAS ingestion | AsyncAPI ingestion | Minimum DSAPI version |
| AWS API Gateway | ✅ | ✅ | ✅ | N/A | 4.4.0 |
| Azure APIM | ✅ | ✅ | ✅ | N/A | 4.5.0 |
| Apigee | ✅ | ✅ | N/A | N/A | 4.4.2 |
| IBM API Connect | ✅ | - | ✅ | N/A | 4.5.0 |
| Solace | ✅ | ✅ | N/A | ✅ | 4.4.0 |
| Confluent Platform | ✅ | ✅ | N/A | ✅ | 4.5.0 |
AWS API Gateway
AWS API Gateway is AWS's built-in API management solution and is commonly used to expose services running in the AWS cloud to the public internet.
Prerequisites
In order to Federate AWS API Management APIs into DSAPI, you'll need permission to access the AWS API Management console, or you'll at least need access to somebody who does so that they can provide you with credentials that the agent will use to authenticate against AWS.
The minimum permissions required by the federation agent are described in the section called Minimum AWS permissions required by the agent.
For the federation agent to authenticate with DSAPI API Management, you'll also need an access token. Head to our dedicated guide on how to create a service account and an access token for the federation agent.
1. Create an AWS API Management integration in the DSAPI APIM Console
Head to the DSAPI APIM Console, open the Integrations section in the left menu, and create a new AWS API Management integration.
Once you've created the integration, copy the integration ID that will be visible on the integration overview tab, you'll use this later:
.png)
2. Configure the AWS APIM federation agent
The AWS APIM federation agent will need the following configuration parameters in order to connect to your AWS account:
- AWS region
- AWS credentials
- either an access key and secret
- or you can also use IAM role or instanceRole-based authentication
To learn how to create an AWS access key for the agent, please follow the guide provided by AWS.
To learn how to use IAM role-based authentication, please reach out to your DSAPI customer service or account representative. We'll be able to provide you with AWS CloudFormation templates to help you set this up.
3. Run the AWS APIM federation agent with Docker
In this guide, we'll run the federation agent using Docker.
Copy and save the following into a Docker Compose file called docker-compose.yaml:
services:
    integration-agent:
      image: DSAPIio/federation-agent-aws-api-gateway:1.0.0
      restart: always
      environment:
        - DSAPI_integration_connector_ws_endpoints_0=${WS_ENDPOINTS}
        - DSAPI_integration_connector_ws_headers_0_name=Authorization
        - DSAPI_integration_connector_ws_headers_0_value=bearer ${WS_AUTH_TOKEN}
        - DSAPI_integration_providers_0_configuration_accessKeyId=${AWS_ACCESS_KEY_ID}
        - DSAPI_integration_providers_0_configuration_region=${AWS_REGION}
        - DSAPI_integration_providers_0_configuration_secretAccessKey=${AWS_SECRET_ACCESS_KEY}
        - DSAPI_integration_providers_0_integrationId=${INTEGRATION_ID}
        - DSAPI_integration_providers_0_type=aws-api-gateway
        - DSAPI_integration_providers_0_configuration_0_stage=${AWS_0_STAGE:-}
        - DSAPI_integration_providers_0_configuration_1_stage=${AWS_1_STAGE:-}
Next, create a file named .env in the same directory. We'll use it to set the required Docker Compose variables. Fill the values in this file from those you obtained in step 2.
## DSAPI PARAMETERS ##

  # DSAPI APIM management API URL, typically suffixed with the path /integration-controller
  WS_ENDPOINTS=https://[your-APIM-management-API-host]/integration-controller

  # DSAPI APIM token to be used by the agent
  WS_AUTH_TOKEN=[your-token]

  # ID of the APIM integration you created for this agent
  INTEGRATION_ID=[your-integration-id]

  # APIM organization ID, example: DEFAULT
  WS_ORG_ID=[organization-id]

  ## AWS API MANAGEMENT PARAMETERS ##

  # AWS Region, example: us-west-2
  AWS_REGION=[your-aws-region]

  # AWS stage filter, optional
  # AWS_0_STAGE=prod
  # AWS_1_STAGE=dev

  # AWS Credentials.
  # Optional if you're using IAM Role-based authentication
  AWS_ACCESS_KEY_ID=[your-key-id]
  AWS_SECRET_ACCESS_KEY=[your-access-key]
Run the following command to make sure you've got the latest available docker image:
docker compose pull
Then you can start the agent in the background with the following command:
docker compose up -d
In the DSAPI API Management console, after refreshing, you should now see the agent's status set to Connected:
.png)
If your Agent Connection still shows as Disconnected, then please inspect the agent's container logs. There you should find error logs that will help you troubleshoot.
Minimum AWS permissions required by the agent
The following AWS PolicyDocument describes the minimum permissions required for the agent to be able to perform discovery of AWS assets as well as management of subscriptions to AWS API usage plans.
PolicyDocument:
      Version: '2012-10-17'
      Statement:
          - Effect: Allow
            Action:
                - apigateway:GET
            Resource:
                - arn:aws:apigateway:*::/restapis/*
                - arn:aws:apigateway:*::/restapis/*/stages/*
                - arn:aws:apigateway:*::/usageplans
          - Effect: Allow
            Action:
                - apigateway:POST
            Resource:
                - arn:aws:apigateway:*::/apikeys
                - arn:aws:apigateway:*::/usageplans/*/keys
          - Effect: Allow
            Action:
                - apigateway:DELETE
            Resource:
                - arn:aws:apigateway:*::/apikeys/*
Solace
Solace is an advanced event broker that enables an event mesh architecture.
Prerequisites
Event Portal is a Solace product that acts like an API portal, but for Events. DSAPI's Solace federation agent relies in part on the Solace Event portal.
In order to Federate Solace Event APIs into DSAPI, you'll need permission to access the Solace console, or you'll at least need access to somebody who does so that they can provide you with credentials that the agent will use to authenticate against Solace's management API.
For more information about how to use the Solace Event portal to manage Event API, check out the getting started guide: https://api.solace.dev/cloud/reference/apim-getting-started.
The minimum permissions required by the federation agent are described in the section called Minimum Solace permissions required by the agent. It is also worth taking a look at the Solace documentation about authenticating against the Solace management API.
For the federation agent to authenticate with DSAPI API Management, you'll also need an access token. Head to our dedicated guide on how to create a service account and an access token for the federation agent.
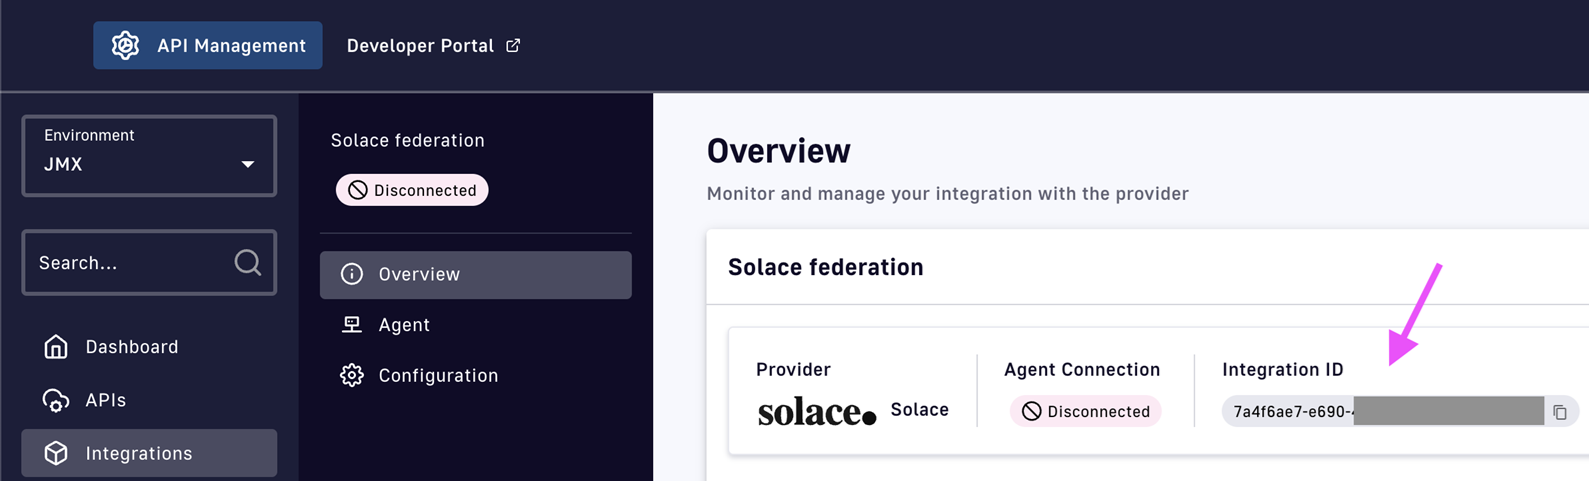
1. Create a Solace integration in the DSAPI APIM Console
Head to the DSAPI APIM Console, open the Integrations section in the left menu, and create a new Solace integration.
Once you've created the integration, copy the integration ID that will be visible on the integration overview tab, you'll use this later:
2. Configure the Solace federation agent
The Solace federation agent will need the following configuration parameters in order to connect to your Solace instance:
- Solace endpoint
- Solace API token
The Solace endpoint to be used is common for all Solace customers:
https://apim-production-api.solace.cloud/api/v2/apim
To generate Solace API Token you need to have Solace PubSub+ Cloud account first with a manager role (or higher).
When logged in, click on the profile icon and choose the Token Management option.
In the top right corner, a Create token button opens a wizard for the API Token creation.
Please refer to the Minimum Solace permissions required for the agent.
3. Run the Solace federation agent with Docker
In this guide, we'll run the federation agent using Docker.
Copy and save the following into a Docker Compose file called docker-compose.yaml:
services:
    integration-agent:
      image: DSAPIio/federation-agent-solace:1.0.0
      restart: always
      environment:
        - DSAPI_integration_connector_ws_endpoints_0=${WS_ENDPOINTS}
        - DSAPI_integration_connector_ws_headers_0_name=Authorization
        - DSAPI_integration_connector_ws_headers_0_value=bearer ${WS_AUTH_TOKEN}
        - DSAPI_integration_providers_0_configuration_authToken=${SOLACE_AUTH_TOKEN}
        - DSAPI_integration_providers_0_integrationId=${INTEGRATION_ID}
        - DSAPI_integration_providers_0_type=solace
        - DSAPI_integration_providers_0_configuration_url=${SOLACE_ENDPOINT:-https://api.solace.cloud/api/v2/architecture}
        - DSAPI_integration_providers_0_configuration_0_appDomains=${SOLACE_APPLICATION_0_DOMAIN:-}
Next, create a file named .env in the same directory. We'll use it to set the required Docker Compose variables. Fill the values in this file from those you obtained in step 2.
## DSAPI PARAMETERS ##

  # DSAPI APIM management API URL, typically suffixed with the path /integration-controller
  WS_ENDPOINTS=https://[your-APIM-management-API-host]/integration-controller

  # DSAPI APIM token to be used by the agent
  WS_AUTH_TOKEN=[your-token]

  # ID of the APIM integration you created for this agent
  INTEGRATION_ID=[your-integration-id]

  # APIM organization ID, example: DEFAULT
  WS_ORG_ID=[organization-id]

  ## SOLACE PARAMETERS ##

  # Solace endpoint, this is common for all
  SOLACE_ENDPOINT=https://apim-production-api.solace.cloud/api/v2/apim

  # Solace API token
  SOLACE_AUTH_TOKEN=[your-token]

  # Optionally you can filter for one or more Solace application domains
  SOLACE_APPLICATION_0_DOMAIN=[your-application-domain]
Run the following command to make sure you've got the latest available docker image:
docker compose pull
Then you can start the agent in the background with the following command:
docker compose up -d
In the DSAPI API Management console, after refreshing, you should now see the agent's status set to Connected:
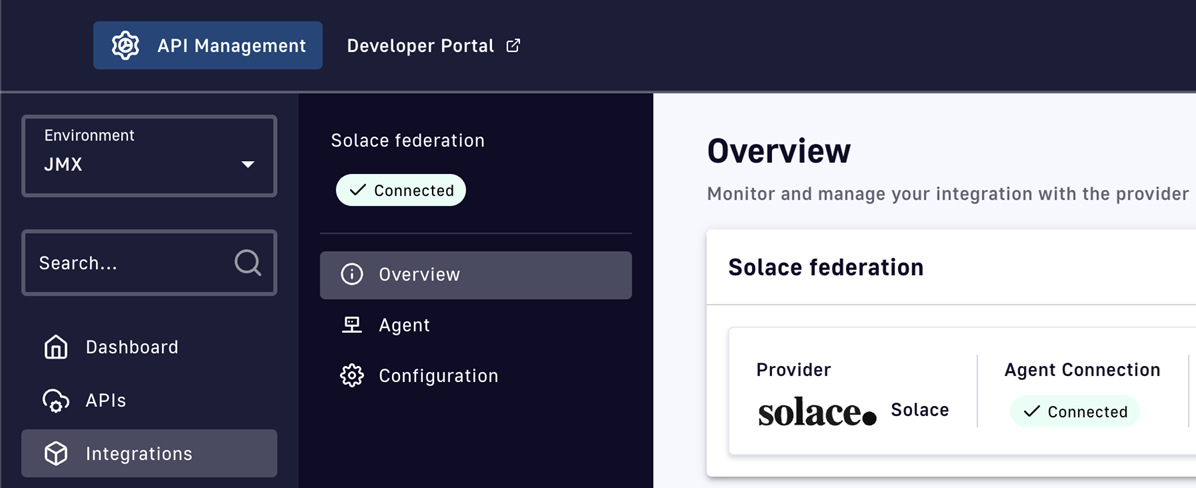
If your Agent Connection still shows as Disconnected, then please inspect the agent's container logs. There you should find error logs that will help you troubleshoot.
Minimum Solace permissions required by the agent
Below are the minimum permissions required by the agent in order to perform required operations against the Solace management API. Please review the details on the official Solace documentation too.
mission_control:access
  services:get:self
  service_requests:post:client_profile
  services:get
  ep_environment:get:*
  modeled_event_broker:get:*
  modeled_event_mesh:get:*
  apim_event_api_product:*:*
  apim_event_api_product:get:*
  application_domain:get:*
  event_designer:access
IBM API Connect
IBM API Connect, or IBM APIC for short, is IBM's API management solution.
Prerequisites
You'll need an IBM API Connect account. The agent works with both Cloud and on-premise versions of IBM APIC. It is generally expected to work with versions 10.0.5 and above, and may also work with older versions.
For the federation agent to authenticate with DSAPI API Management, you'll also need an access token. Head to our dedicated guide on how to create a service account and an access token for the federation agent.
1. Create an IBM API Connect integration in the DSAPI APIM Console
Head to the DSAPI APIM Console, open the Integrations section in the left menu, and create a new IBM API Connect integration.
Once you've created the integration, copy the integration ID that will be visible on the integration overview tab, you'll use this later:
.png)
2. Configure the IBM API Connect agent
The DSAPI IBM API Connect federation agent will need the following configuration parameters in order to connect to your IBM APIC account:
- The URL of the IBM API Connect platform
- The name of the IBM API Connect organization
- Credentials to authenticate with IBM (client ID, client secret, and API key)
To locate the IBM API Connect organization name, open the IBM API Connect console and head to Home → Settings → Overview → Name.
The IBM API Connect federation agent requires an IBM API Connect API key in order to authenticate against the IBM management API.
An API key belongs to a user account in IBM. You can either create an API key for you personal user account, or (recommended) create a dedicated IBM APIC service account for the DSAPI federation agent.
Once you've chosen the account you want to use, to generate an API Key for that account you can click on the user profile icon in the top-right of the IBM APIC Console and select the My API Keys menu item. Alternatively, on older versions of IBM APIC, you can also append the /apikey path to the IBM APIC home page to access this page.
Once in the API key page, click on the Add button and generate a new key. If you don't see this button, you may not have the appropriate permissions in IBM to generate new API keys. Once you've created a key, IBM shows an example curl request that can be used to exchange the credentials against an access token that can be used to call the IBM APIC management API.
In this example curl request, you'll find the information you need to configure your agent:
- Client Id
- Client secret
- Platform API URL address
Copy these values, we'll use them to configure the agent.
3. Run the IBM API Connect federation agent with Docker
In this guide, we'll run the federation agent using Docker.
Copy and save the following into a Docker Compose file called docker-compose.yaml:
services:
    integration-agent:
      image: DSAPIio/federation-agent-ibm-api-connect:1.0.0
      restart: always
      environment:
        - DSAPI_integration_connector_ws_endpoints_0=${WS_ENDPOINTS}
        - DSAPI_integration_connector_ws_headers_0_name=Authorization
        - DSAPI_integration_connector_ws_headers_0_value=bearer ${WS_AUTH_TOKEN}
        - DSAPI_integration_providers_0_integrationId=${INTEGRATION_ID}
        - DSAPI_integration_providers_0_configuration_platformApiUrl=${PLATFORM_API_URL}
        - DSAPI_integration_providers_0_configuration_clientId=${CLIENT_ID}
        - DSAPI_integration_providers_0_configuration_clientSecret=${CLIENT_SECRET}
        - DSAPI_integration_providers_0_configuration_organizationName=${ORGANIZATION_NAME}
        - DSAPI_integration_providers_0_configuration_apiKey=${API_KEY}
        - DSAPI_integration_providers_0_type=ibm-api-connect
Next, create a file named .env in the same directory. We'll use it to set the required Docker Compose variables. Fill the values in this file from those you obtained in step 2.
## DSAPI PARAMETERS ##

  # DSAPI APIM management API URL, typically suffixed with the path /integration-controller
  WS_ENDPOINTS=https://[your-APIM-management-API-host]/integration-controller

  # DSAPI APIM token to be used by the agent
  WS_AUTH_TOKEN=[your-token]

  # ID of the APIM integration you created for this agent
  INTEGRATION_ID=[your-integration-id]

  # APIM organization ID, example: DEFAULT
  WS_ORG_ID=[organization-id]

  ## IBM API CONNECT PARAMETERS ##

  # IBM Platform API URL
  PLATFORM_API_URL=[your-platform-api-url]

  # IBM organization name
  ORGANIZATION_NAME=[your-organization-name]

  # IBM account client ID
  CLIENT_ID=[your-client-id]

  # IBM account client secret
  CLIENT_SECRET=[your-client-secret]

  # IBM account client secret
  API_KEY=[your-api-key]
Run the following command to make sure you've got the latest available docker image:
docker compose pull
Then you can start the agent in the background with the following command:
docker compose up -d
In the DSAPI API Management console, after refreshing, you should now see the agent's status set to Connected:
.png)
If your Agent Connection still shows as Disconnected, then please inspect the agent's container logs. There you should find error logs that will help you troubleshoot.
Azure API Management
Azure API Management, or Azure APIM for short, is Azure's built-in API management solution and is commonly used to expose services running in the Azure cloud to the public internet.
Prerequisites
In order to Federate Azure API Management APIs into DSAPI, you'll need permission to access the Azure API Management console, or you'll at least need access to somebody who does so that they can provide you with credentials that the agent will use to authenticate against Azure APIM.
For the federation agent to authenticate with DSAPI API Management, you'll also need an access token. Head to our dedicated guide on how to create a service account and an access token for the federation agent.
1. Create an Azure API Management integration in the DSAPI APIM Console
Head to the DSAPI APIM Console, open the Integrations section in the left menu, and create a new Azure API Management integration.
Once you've created the integration, copy the integration ID that will be visible on the integration overview tab, you'll use this later:
.png)
2. Configure the Azure federation agent
The Azure APIM federation agent will need the following configuration parameters in order to connect to your Azure APIM account:
- Azure APIM Subscription ID
- Azure APIM Resource Group name
- Azure APIM Service name
- Azure APIM Tenant ID
- Azure credentials (App Id and App Secret)
Point to the right Azure APIM instance
The easiest way to obtain much of this information is to use the Azure CLI.
Start by login in:
az login
Then you can list the tenants and subscriptions like so:
az account list --output table --query '[].{Name:name, SubscriptionId:id, TenantId:tenantId}'
This should produce an output similar to the following:
Name           SubscriptionId                        TenantId
-------------  ------------------------------------  ------------------------------------
DSAPI       02ae5fba-...........................  b7389665-...........................
Copy the IDs of the Azure APIM tenant and subscription you want to use.
Now run the following command to configure Azure CLI to work with your chosen subscription:
az account set --subscription <your-subscriptionId>
Once this is set, you can obtain the Service name and Resource Group name with the following command:
az apim list --query '[].{ServiceName:name, ResourceGroup:resourceGroup}' -o table
This should produce an output similar to the following:
ServiceName      ResourceGroup
---------------  ----------------------
my-service-name  my-resource-group-name
Copy both of these values.
Now you should have these 4 key pieces of information that you'll need in the next steps:
- Azure APIM Subscription ID
- Azure APIM Resource Group name
- Azure APIM Service name
- Azure APIM Tenant ID
Authenticate with Azure APIM
Finally, the DSAPI Azure APIM federation agent will need to authenticate with the Azure APIM management API in order to perform actions like discovery and subscription management.
To achieve this, you'll need to create a Service Principal for the agent in Azure, and assign it the Contributor role.
The easiest way to set this up is to use the Azure CLI.
To make it easier to run this command, you can start by setting a couple of environment variables based on previously obtained Azure information:
RESOURCE_GROUP_NAME=[your-resource-group-name]
SERVICE_NAME=[your-service-name]
SUBSCRIPTION_ID=[your-subscription-id]
Once these are set, you can run the command to create the Azure service principal:
az ad sp create-for-rbac --role Contributor --scopes /subscriptions/${SUBSCRIPTION_ID}/resourceGroups/${RESOURCE_GROUP_NAME}/providers/Microsoft.ApiManagement/service/${SERVICE_NAME}
This should produce an output similar to below, you'll need to copy the appId and password for use later:
{
  "appId": "12345",
  "displayName": "12345",
  "password": "12345",
  "tenant": "12345"
}
.png)
3. Run the Azure federation agent with Docker
In this guide, we'll run the federation agent using Docker.
Copy and save the following into a Docker Compose file called docker-compose.yaml:
services:
  integration-agent:
    image: DSAPIio/federation-agent-azure-api-management:1.0.0
    restart: always
    environment:
      # DSAPI-specific configuration
      - DSAPI_integration_connector_ws_endpoints_0=${WS_ENDPOINTS}
      - DSAPI_integration_connector_ws_headers_0_name=Authorization
      - DSAPI_integration_connector_ws_headers_0_value=Bearer ${WS_AUTH_TOKEN}
      - DSAPI_integration_providers_0_integrationId=${INTEGRATION_ID}
      - DSAPI_integration_providers_0_type=azure-api-management
      # Azure APIM authentication
      - DSAPI_integration_providers_0_configuration_auth_appId=${APP_ID}
      - DSAPI_integration_providers_0_configuration_auth_appSecret=${APP_SECRET}
      - DSAPI_integration_providers_0_configuration_auth_tenant=${TENANT_ID}
      - DSAPI_integration_providers_0_configuration_subscription=${SUBSCRIPTION}
      - DSAPI_integration_providers_0_configuration_resourceGroup=${RESOURCE_GROUP}
      - DSAPI_integration_providers_0_configuration_service=${SERVICE}
      - DSAPI_integration_providers_0_configuration_dev_email=${AZURE_DEV_EMAIL}
      - DSAPI_integration_providers_0_configuration_dev_firstName=${AZURE_DEV_FIRST_NAME}
      - DSAPI_integration_providers_0_configuration_dev_lastName=${AZURE_DEV_LAST_NAME}
Next, create a file named .env in the same directory. We'll use it to set the required Docker Compose variables. Fill the values in this file from those you obtained in step 2.
## DSAPI PARAMETERS ##

# DSAPI APIM management API URL, typically suffixed with the path /integration-controller
WS_ENDPOINTS=https://[your-APIM-management-API-host]/integration-controller

# DSAPI APIM token to be used by the agent
WS_AUTH_TOKEN=[your-token]

# ID of the APIM integration you created for this agent
INTEGRATION_ID=[your-integration-id]

# APIM organization ID, example: DEFAULT
WS_ORG_ID=[organization-id]

## AZURE API MANAGEMENT PARAMETERS ##

# Azure APIM tenant ID
TENANT_ID=[your-tenant-id]

# Azure APIM subscription ID
SUBSCRIPTION=[your-subscription-id]

# Azure APIM resource group name
RESOURCE_GROUP=[your-resource-group]

# Azure APIM service name
SERVICE=[your-service]

# Azure APIM developer details
# This developer will be used as the owner of applications
# that are created by DSAPI in Azure APIM
# DSAPI will create the developer if it doesn't already exist
# or will reuse an existing developer if it exist in Azure
# The provided email address will receive notifications from Azure
AZURE_DEV_EMAIL=[developer-email]
AZURE_DEV_FIRST_NAME=[developer-firstname]
AZURE_DEV_LAST_NAME=[developer-lastname]

# Azure APIM credentials
APP_ID=[your-app-id]
APP_SECRET=[your-app-secret]
Run the following command to make sure you've got the latest available docker image:
docker compose pull
Then you can start the agent in the background with the following command:
docker compose up -d
In the DSAPI API Management console, after refreshing, you should now see the agent's status set to Connected:
.png)
If your Agent Connection still shows as Disconnected, then please inspect the agent's container logs. There you should find error logs that will help you troubleshoot.
Confluent Platform
Prerequisites
The Confluent Platform federation agent supports both enterprise and community editions of Confluent Platform.
For the federation agent to authenticate with DSAPI API Management, you'll also need an access token. Head to our dedicated guide on how to create a service account and an access token for the federation agent.
Spinning up a test Confluent Platform environment
Confluent provides a demo project that you can easily be run locally.
It is a practical way to get started with the Confluent Platform federation agent.
A dedicated Git project is provided by Confluent and can be installed by following the instructions provided here:
{% embed url="https://docs.confluent.io/platform/current/tutorials/cp-demo/on-prem.html#docker" %}
For those that want a TL;DR, you can check out the repo and run a lightweight version of the project (with minimal dependencies) like so:
git clone https://github.com/confluentinc/cp-demo
  cd cp-demo
  git checkout 7.7.1-post
  VIZ=false ./scripts/start.sh
Once started (which can take a few minutes), you should be able to open the Confluent Platform web console at http://localhost:9021.
1. Create a Confluent Platform integration in the DSAPI APIM Console
Head to the DSAPI APIM Console, open the Integrations section in the left menu, and create a new Confluent Platform integration.
Once you've created the integration, copy the integration ID that will be visible on the integration overview tab, you'll use this later:
.png)
2. Configure the Confluent Platform federation agent
The Confluent Platform federation agent will need the following configuration parameters in order to connect to your Confluent Platform instance:
- Cluster API endpoint
- Schema registry endpoint
- Confluent Platform credentials (user/password)
Determine your cluster and schema registry endpoints
If you're running the Confluent demo project mentioned in the Prerequisites on your local machine, which is where you also plan to run the agent for testing, then you can determine the cluster and schema registry endpoints as follows.
To find your local IP, run the following command in the terminal:
ipconfig getifaddr en0
This should provide an IP address as the output, for example 192.168.1.27.
Based on this, the addresses you need are likely to be of the form:
CLUSTER_API_ENDPOINT=https://192.168.1.27:8091/kafka
  SCHEMA_REGISTRY_ENDPOINT=https://192.168.1.27:8085
Obtain Confluent credentials for the agent
The Confluent Platform federation agent needs credentials to be able to connect to the cluster and schema registry APIs.
If you're using the demo project mentioned in the Prerequisites, you can simply use the default super user account, where both user and password are set to superUser.
For non-development environments, we recommend that you create a dedicate principal in Confluent to be used by the DSAPI agent.
3. Run the Confluent Platform federation agent with Docker
In this guide, we'll run the federation agent using Docker.
Copy and save the following into a Docker Compose file called docker-compose.yaml:
services:
      integration-agent:
          image: DSAPIio/federation-agent-confluent-platform:1.0.0
          restart: always
          environment:
              - DSAPI_integration_connector_ws_endpoints_0=${WS_ENDPOINTS}
              - DSAPI_integration_connector_ws_headers_0_name=Authorization
              - DSAPI_integration_connector_ws_headers_0_value=Bearer ${WS_AUTH_TOKEN}
              - DSAPI_integration_providers_0_integrationId=${INTEGRATION_ID}
              - DSAPI_integration_providers_0_type=confluent-platform
              - DSAPI_integration_providers_0_configuration_cluster_api_endpoint=${CLUSTER_API_ENDPOINT}
              - DSAPI_integration_providers_0_configuration_schema_registry_endpoint=${SCHEMA_REGISTRY_ENDPOINT}
              - DSAPI_integration_providers_0_configuration_auth_password=${BASIC_AUTH_LOGIN:-}
              - DSAPI_integration_providers_0_configuration_auth_username=${BASIC_AUTH_PASSWORD:-}
              - DSAPI_integration_providers_0_configuration_topic_prefix=${PREFIX:-}
              - DSAPI_integration_providers_0_configuration_trust_all=${TRUST_ALL:-}
Next, create a file named .env in the same directory. We'll use it to set the required Docker Compose variables. Fill the values in this file from those you obtained in step 2.
## DSAPI PARAMETERS ##

  # DSAPI APIM management API URL, typically suffixed with the path /integration-controller
  WS_ENDPOINTS=https://[your-APIM-management-API-host]/integration-controller

  # DSAPI APIM token to be used by the agent
  WS_AUTH_TOKEN=[your-token]

  # ID of the APIM integration you created for this agent
  INTEGRATION_ID=[your-integration-id]

  # APIM organization ID, example: DEFAULT
  WS_ORG_ID=[organization-id]

  ## CONFLUENT PLATFORM PARAMETERS ##

  # Cluster API endpoint, example: https://192.168.1.27:8091/kafka
  CLUSTER_API_ENDPOINT=[your-cluster-endpoint]

  # Schema registry endpoint, example: https://192.168.1.27:8085
  SCHEMA_REGISTRY_ENDPOINT=[your-schema-registry-endpoint]

  # Credentials for Confluent Platform, example: superUser/superUser
  BASIC_AUTH_LOGIN=[your-login]
  BASIC_AUTH_PASSWORD=[your-password]

  # Optional topic prefix filter
  # DSAPI creates one API per topic in the cluster
  # PREFIX allows you to only create APIs for topics that match the prefix
  PREFIX=[your-prefix]

  # Optional, for example set to TRUE to accept the self-signed cert when
  # using the Confluent Platform demo project
  TRUST_ALL=true
Run the following command to make sure you've got the latest available docker image:
docker compose pull
Then you can start the agent in the background with the following command:
docker compose up -d
In the DSAPI API Management console, after refreshing, you should now see the agent's status set to Connected:
.png)
If your Agent Connection still shows as Disconnected, then please inspect the agent's container logs. There you should find error logs that will help you troubleshoot.
Apigee X
Apigee X is Google Cloud Platform's predominant API management solution.
Prerequisites
You'll need access to an Apigee X account that includes access to features like Apigee API products.
The account will need a minimum set of permissions in order for the federation agent to do its job. The minimum permissions are described in section Minimum Apigee permissions required by the agent.
For the federation agent to authenticate with DSAPI API Management, you'll also need an access token. Head to our dedicated guide on how to create a service account and an access token for the federation agent.
1. Create an Apigee X integration in the DSAPI APIM Console
Head to the DSAPI APIM Console, open the Integrations section in the left menu, and create a new Apigee X integration.
Once you've created the integration, copy the integration ID that will be visible on the integration overview tab, you'll use this later:
.png)
2. Configure the Apigee X federation agent
The Apigee X federation agent will need the following configuration parameters in order to connect to your Apigee X account:
- A Google Cloud Platform project ID
- Google Cloud Service Account with the correct set of permissions
- Service Account Key for the Service Account
Obtain the project ID
To find the ID of the Google Cloud project you want to work with, you can head to the GCP console and open the Project drop down in the header bar. In there, you should be able to find your desired project's ID:
.png)
Create a GCP service account key for the agent
To generate a Service Account Key you need to create a service account first. Please view the dedicated GCP docs on How to create a GCP Service Account.
Once your service account is created, enter the GCP IAM application and choose the Service Accounts tab from the menu bar on the left side. Then select your service account and click on the Keys tab → Add key button → Create new key button → Key type: JSON → Save the key on your computer.
In step 3, we'll show you how to configure your agent's Docker Compose file. There are two ways in which you can pass the service account key as a parameter in Docker Compose.
- Referencing the service account key file on your filesystem by providing a path
- Passing the service account key inline
With the first option, you must include a SERVICE_ACCOUNT_KEY_PATH variable with your docker-compose configuration.
For the inline method, you need to provide the full content of your Service Account Key and paste it directly into your docker-compose file. The key must be put in between apostrophes ('content'). For this option, you must use the SERVICE_ACCOUNT_KEY_INLINEparameter name with your docker-compose file.
3. Run the Apigee X federation agent with Docker
In this guide, we'll run the federation agent using Docker.
Copy and save the following into a Docker Compose file called docker-compose.yaml:
services:
    integration-agent:
      image: DSAPIio/federation-agent-apigee:1.0.0
      restart: always
      volumes:
        - ${SERVICE_ACCOUNT_KEY_PATH:-/dev/null}:/opt/DSAPIio-integration-agent/config/key/key.json
      environment:
        - DSAPI_integration_connector_ws_endpoints_0=${WS_ENDPOINTS}
        - DSAPI_integration_connector_ws_headers_0_name=Authorization
        - DSAPI_integration_connector_ws_headers_0_value=bearer ${WS_AUTH_TOKEN}
        - DSAPI_integration_providers_0_integrationId=${INTEGRATION_ID}
        - DSAPI_integration_providers_0_configuration_gcpProjectId=${GCP_PROJECT_ID}
        - DSAPI_integration_providers_0_configuration_developerEmail=${APIGEE_DEV_EMAIL}
        - DSAPI_integration_providers_0_configuration_developerFirstName=${APIGEE_DEV_FIRST_NAME}
        - DSAPI_integration_providers_0_configuration_developerLastName=${APIGEE_DEV_LAST_NAME}
        - DSAPI_integration_providers_0_configuration_developerUsername=${APIGEE_DEV_USERNAME}
        - DSAPI_integration_providers_0_configuration_serviceAccountKeyInline=${SERVICE_ACCOUNT_KEY_INLINE}
        - DSAPI_integration_providers_0_type=apigee
This Docker Compose file proposes both ways of passing the service account key (either inline or from a file), but you'll need to make sure to only set one of the associated variables in the .env file.
Next, create a file named .env in the same directory. We'll use it to set the required Docker Compose variables. Fill the values in this file from those you obtained in step 2.
## DSAPI PARAMETERS ##

  # DSAPI APIM management API URL, typically suffixed with the path /integration-controller
  WS_ENDPOINTS=https://[your-APIM-management-API-host]/integration-controller

  # DSAPI APIM token to be used by the agent
  WS_AUTH_TOKEN=[your-token]

  # ID of the APIM integration you created for this agent
  INTEGRATION_ID=[your-integration-id]

  # APIM organization ID, example: DEFAULT
  WS_ORG_ID=[organization-id]

  ## APIGEE X PARAMETERS ##

  # Google Cloud project ID
  GCP_PROJECT_ID=[your-project-id]

  # Apigee developer information
  # This Apigee developer will be the owner of applications
  # created by DSAPI in Apigee for managing subscriptions
  # DSAPI will reuse a matching account, or create it
  # if it doesn't exist.
  # The provided email may receive notifications from Apigee
  APIGEE_DEV_EMAIL=[your-dev-email]
  APIGEE_DEV_FIRST_NAME=[your-dev-firstname]
  APIGEE_DEV_LAST_NAME=[your-dev-lastname]
  APIGEE_DEV_USERNAME=[your-dev-username]

  # Service account key - select either PATH or INLINE
  # SERVICE_ACCOUNT_KEY_PATH=[service-account-key-path]
  SERVICE_ACCOUNT_KEY_INLINE='{
    "type": "service_account",
    "project_id": "1234",
    "private_key_id": "1234",
    "private_key": "-----BEGIN PRIVATE KEY-----\n1234==\n-----END PRIVATE KEY-----\n",
    "client_email": "abcd",
    "client_id": "1234",
    "auth_uri": "https://accounts.google.com/o/oauth2/auth",
    "token_uri": "https://oauth2.googleapis.com/token",
    "auth_provider_x509_cert_url": "https://www.googleapis.com/oauth2/v1/certs",
    "client_x509_cert_url": "abcd",
    "universe_domain": "googleapis.com"
  }'
Run the following command to make sure you've got the latest available docker image:
docker compose pull
Then you can start the agent in the background with the following command:
docker compose up -d
In the DSAPI API Management console, after refreshing, you should now see the agent's status set to Connected:

If your Agent Connection still shows as Disconnected, then please inspect the agent's container logs. There you should find error logs that will help you troubleshoot.
Minimum Apigee permissions required by the agent
Below is the list of minimum required permissions that have to be attached to the role used by the GCP Service Account:
- apigee.apiproducts.list
- apigee.appkeys.create
- apigee.appkeys.delete
- apigee.appkeys.get
- apigee.appkeys.manage
- apigee.apps.get
- apigee.developerapps.create
- apigee.developerapps.delete
- apigee.developerapps.get
- apigee.developers.create
- apigee.developers.get
- apigee.proxies.list
- apigee.proxyrevisions.get