Configuring APIs Last updated 17-Dec-2024
API Configuration
Introduction
After you've created your APIs, you can further configure them using both the DSAPI API definition and the DSAPI APIM Console. This section focuses on how to configure APIs using the APIM Console.
API configuration differs slightly for v2 and v4 APIs. We have split this section into two main components to mirror this difference:
Configuring v2 APIs
General Info Settings
Info: Only v2 APIs support the API Quality feature
Overview
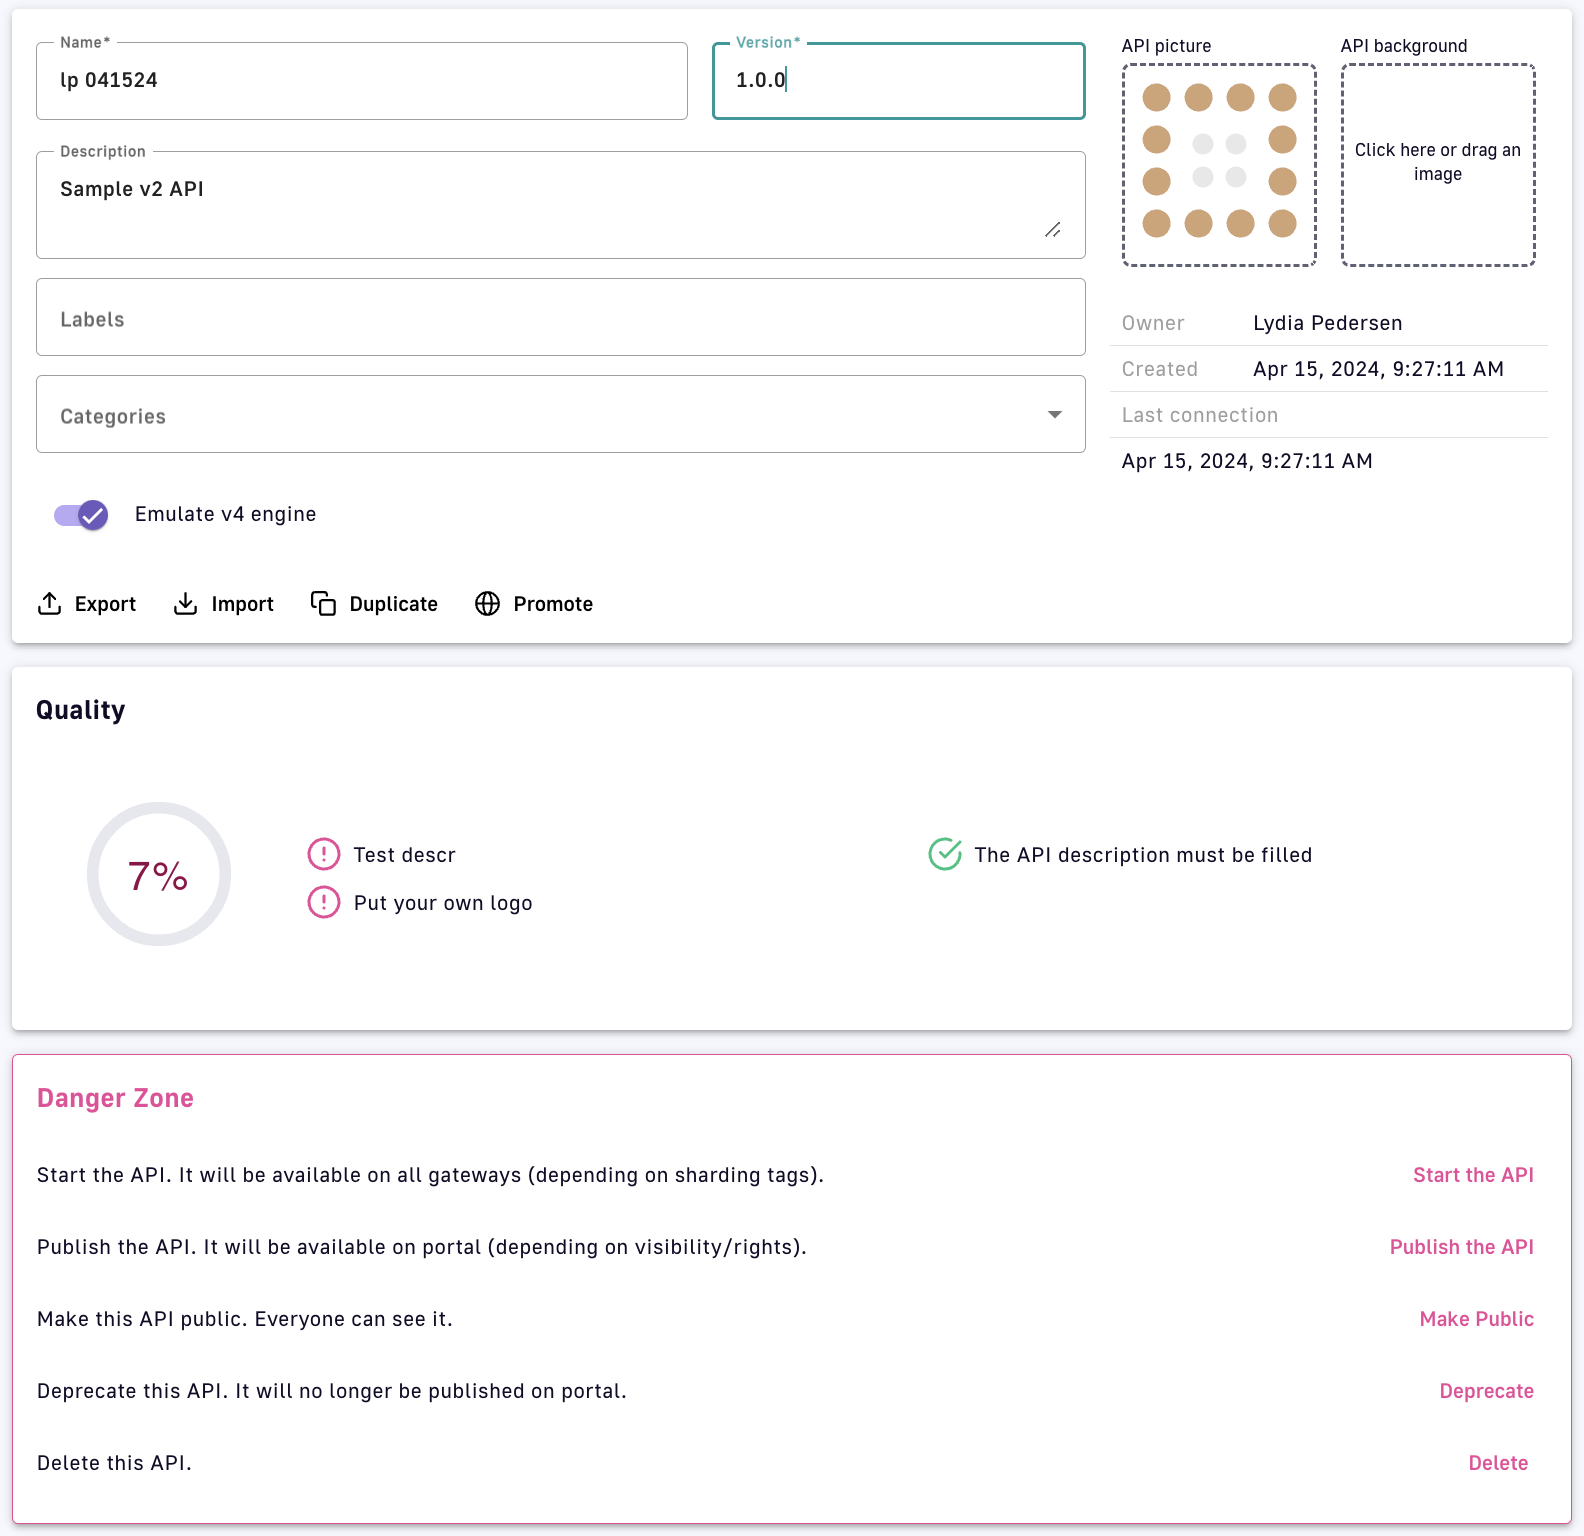
The general settings for a DSAP v2 API are grouped into 3 sections: General Information, Quality, and Danger Zone.
v2 API general settings
General Information
- Name, Version, Description: Editable basic information
- Labels: Enter a label
- Choose one or more Categories from the drop-down menu
- Upload an API picture and/or API background
- Owner, Created, Last connection: Informative only
- Emulate v4 engine: Toggle ON or OFF to use or not use the reactive execution engine
- Export your API definition and/or Import an API definition to update your API
- Duplicate or Promote your API
Quality
The metrics in this section describe how well your API conforms to rules set for the API Quality feature.
Danger Zone
Mission-critical (and potentially dangerous) actions:
- Start the API: Deploy the API to all Gateways, or the Gateways specified using Sharding tags
- Publish the API: Publish the API to the Developer Portal
- Make Public: Make the API public so that everybody can see it
- Deprecate this API: Unpublish it from the Developer Portal
- Delete: Delete the API
Access and Edit General Settings
To access the general settings of a v2 API:
- Log in to your APIM Console
- Select APIs from the left navigation
- Select your API
- From the inner left navigation, select Info under the General section
- Modify editable settings as desired
- Click Save
Proxy Settings
Introduction
To configure the Proxy settings for a v2 API:
- Log in to your APIM Console
- Select APIs from the left nav
- Select your API
- Under the Proxy section of the inner left nav, select from the following:
Entrypoints
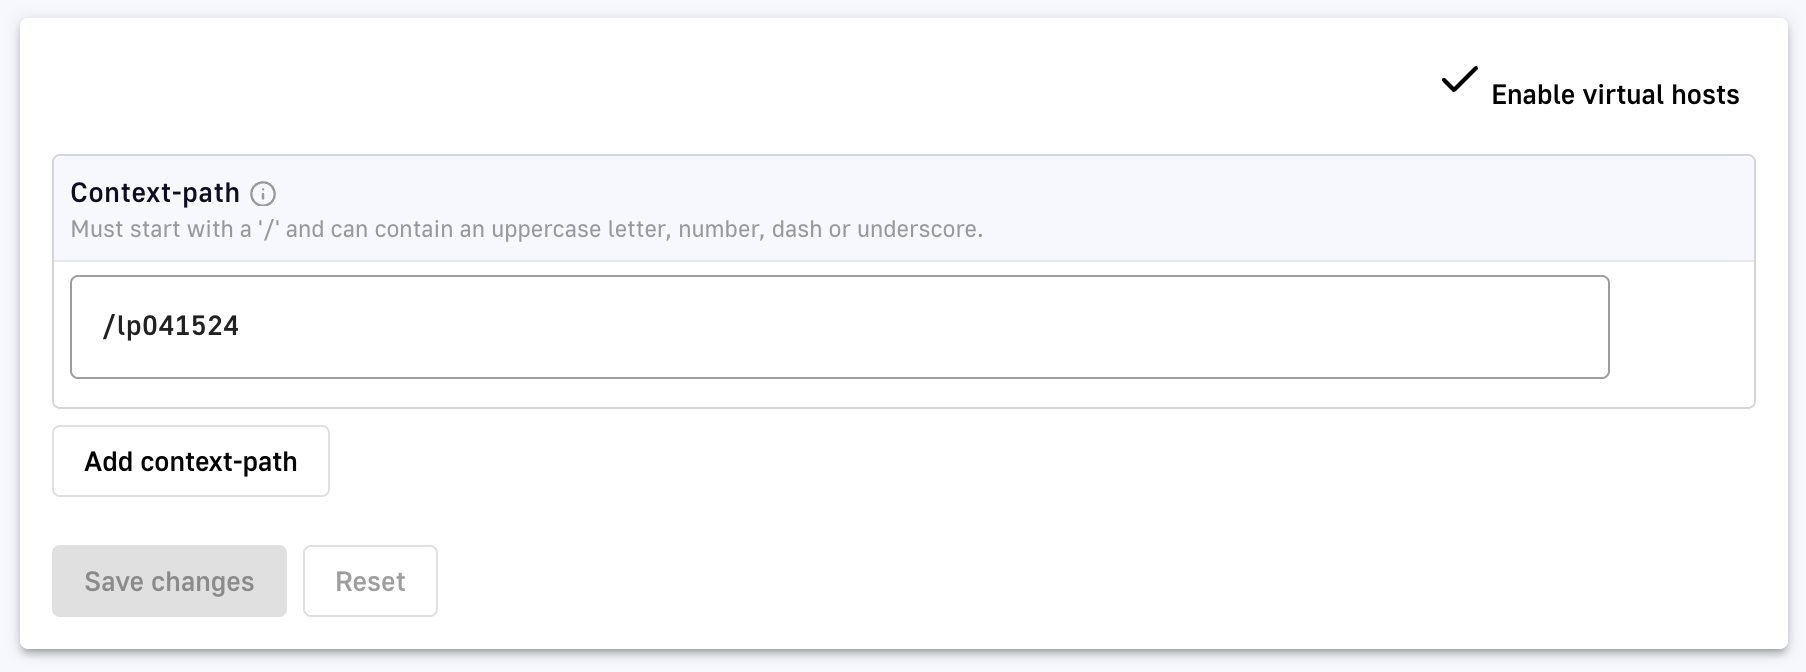
To configure the API entrypoints:
- Select Entrypoints from the inner left nav
- Edit your Context-path or create a new one via Add context-path
- Toggle Enable virtual hosts ON or OFF
- Click Save
CORS
CORS is a mechanism that allows resources on a web page to be requested from another domain. To configure CORS for your API:
- Select CORS from the inner left nav
- Set the following parameters:
- Enable CORS: Toggle to ON to enable CORS.
- Access-Control-Allow-Origin: Define a URI that can access the resource. Enter * to allow all requests.
- Access-Control-Allow-Methods: Select the allowed methods.
- Access-Control-Allow-Headers: Define allowed headers.
- Access-Control-Allow-Credentials: Toggle ON or OFF.
- Max Age: Specify caching time in seconds.
- Access-Control-Expose-Headers: Define exposed headers.
- Run policies for preflight requests: Toggle ON if required.
- Click Save
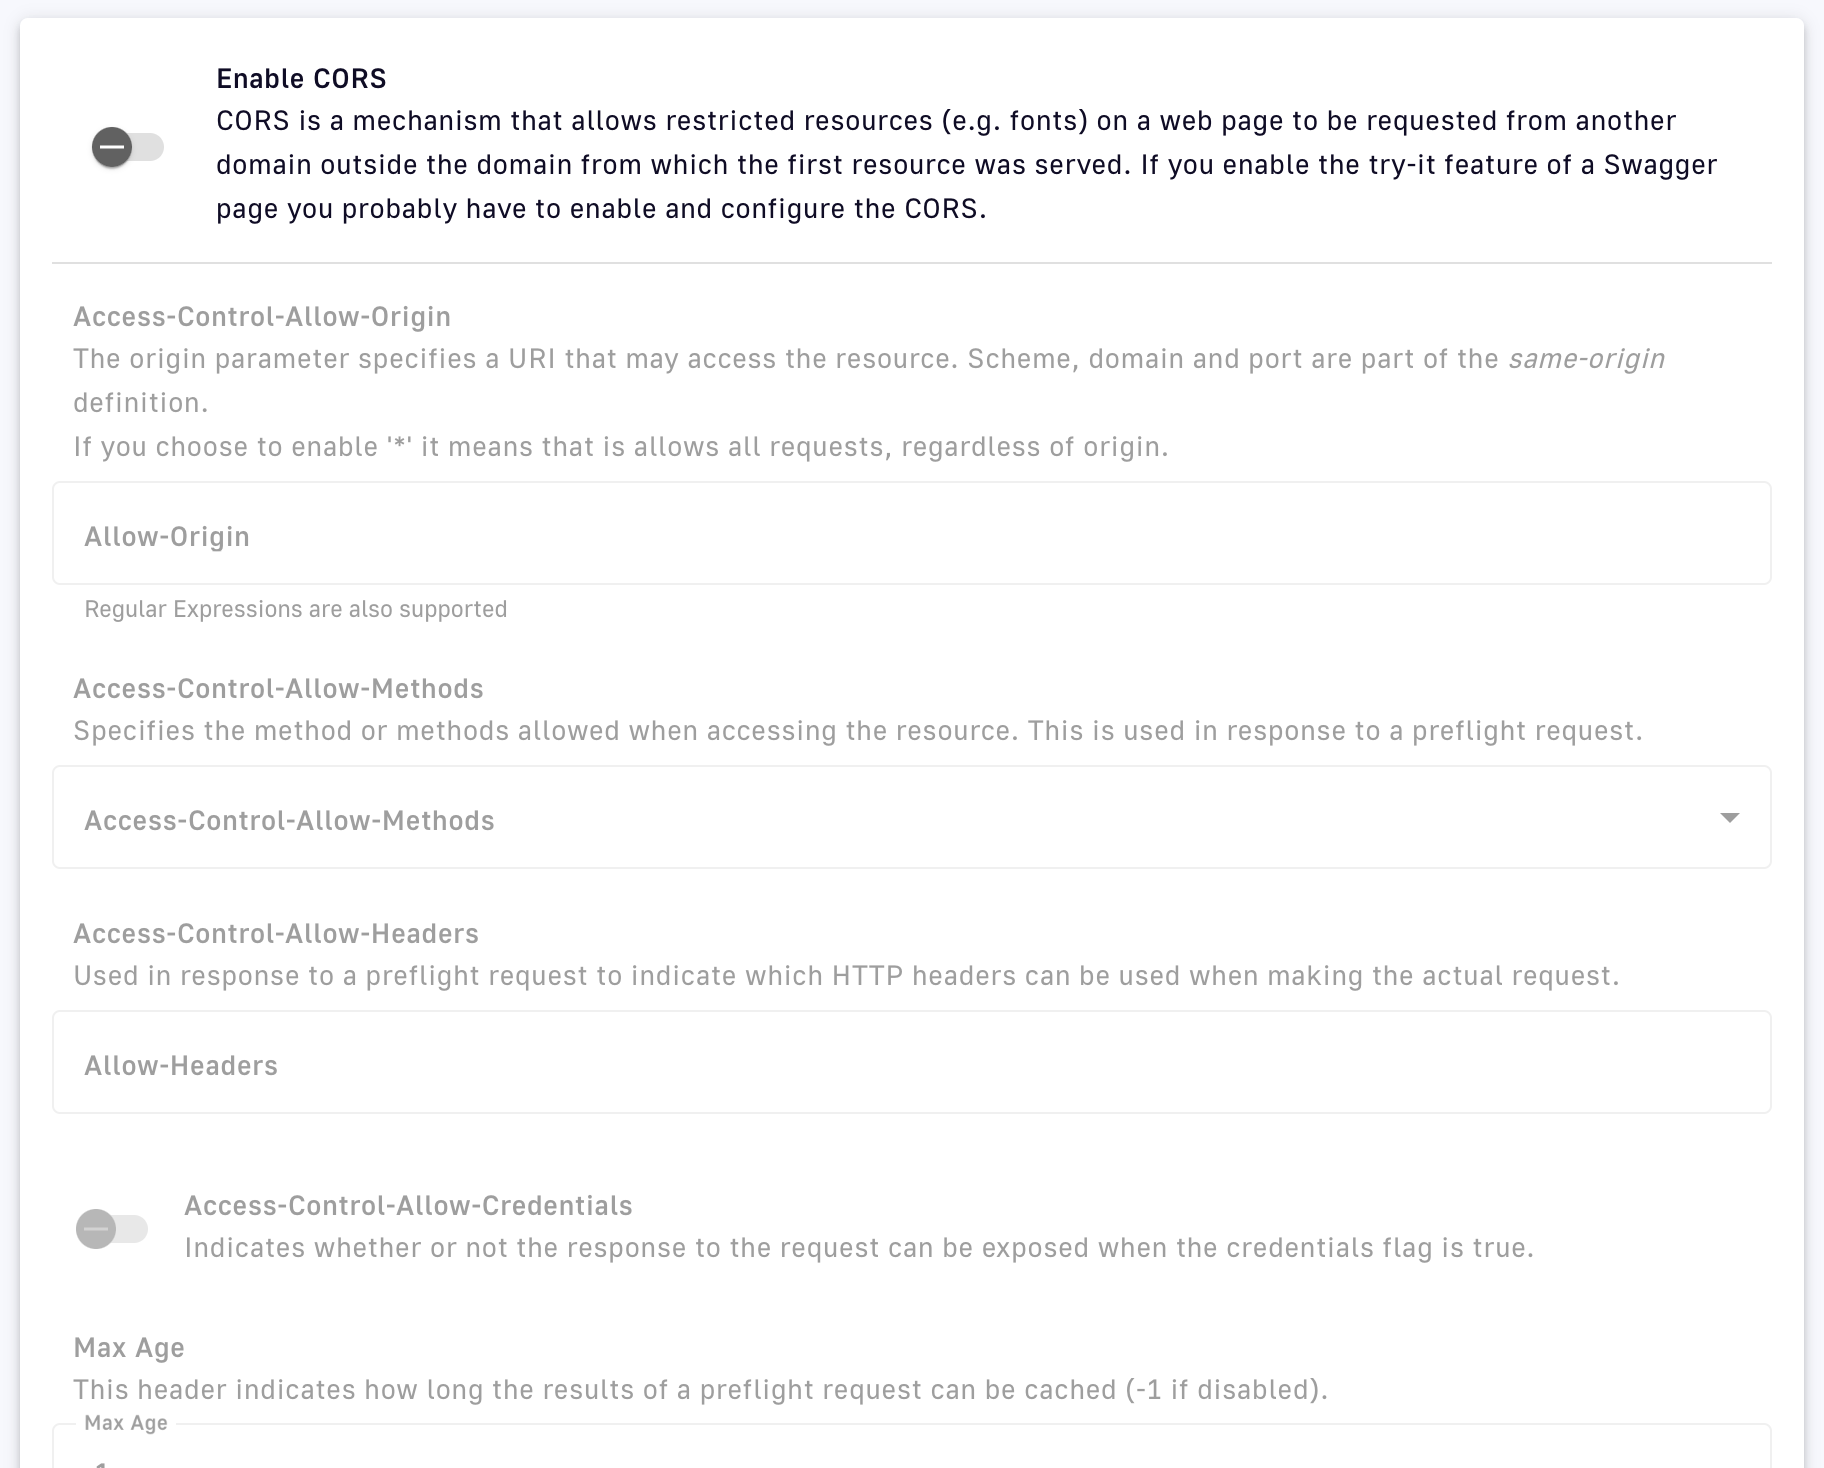
Warning: A value of * is not recommended for production environments.
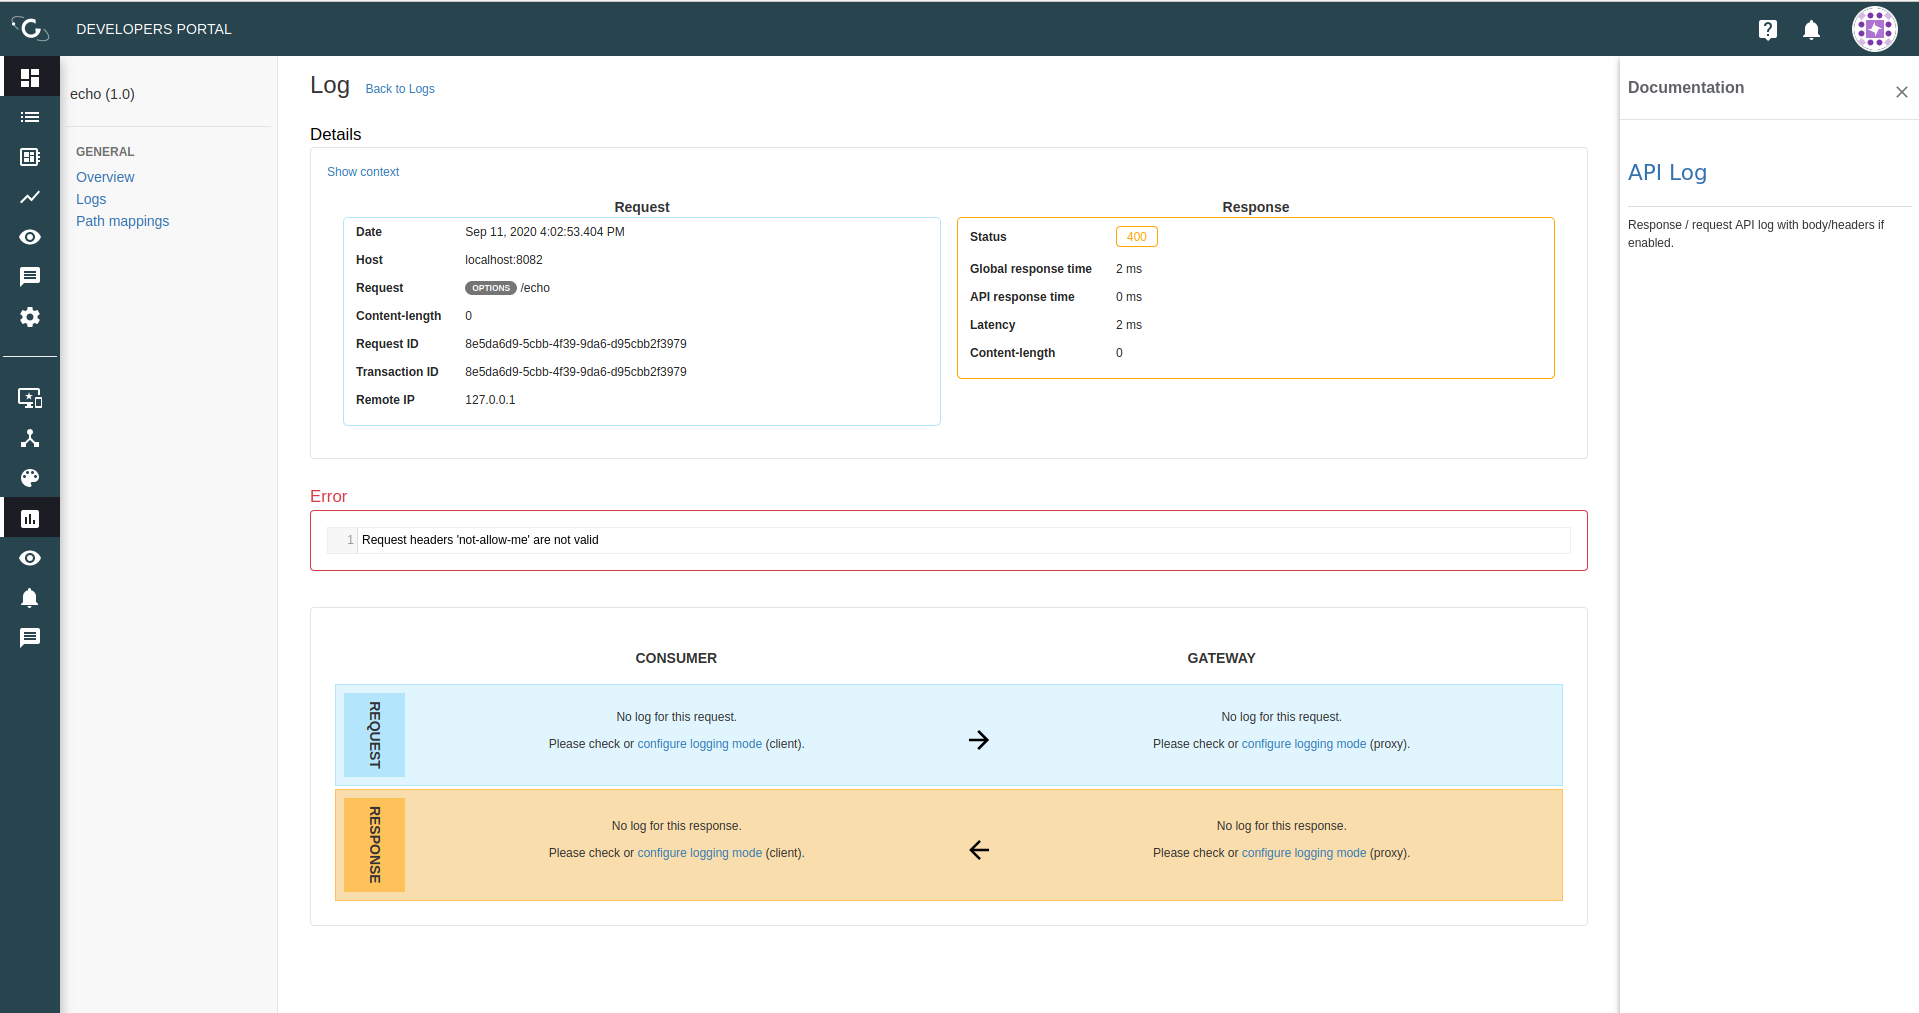
Troubleshooting CORS
All requests rejected because of CORS issues will generate logs that you can view in the Analytics section of your API logs.
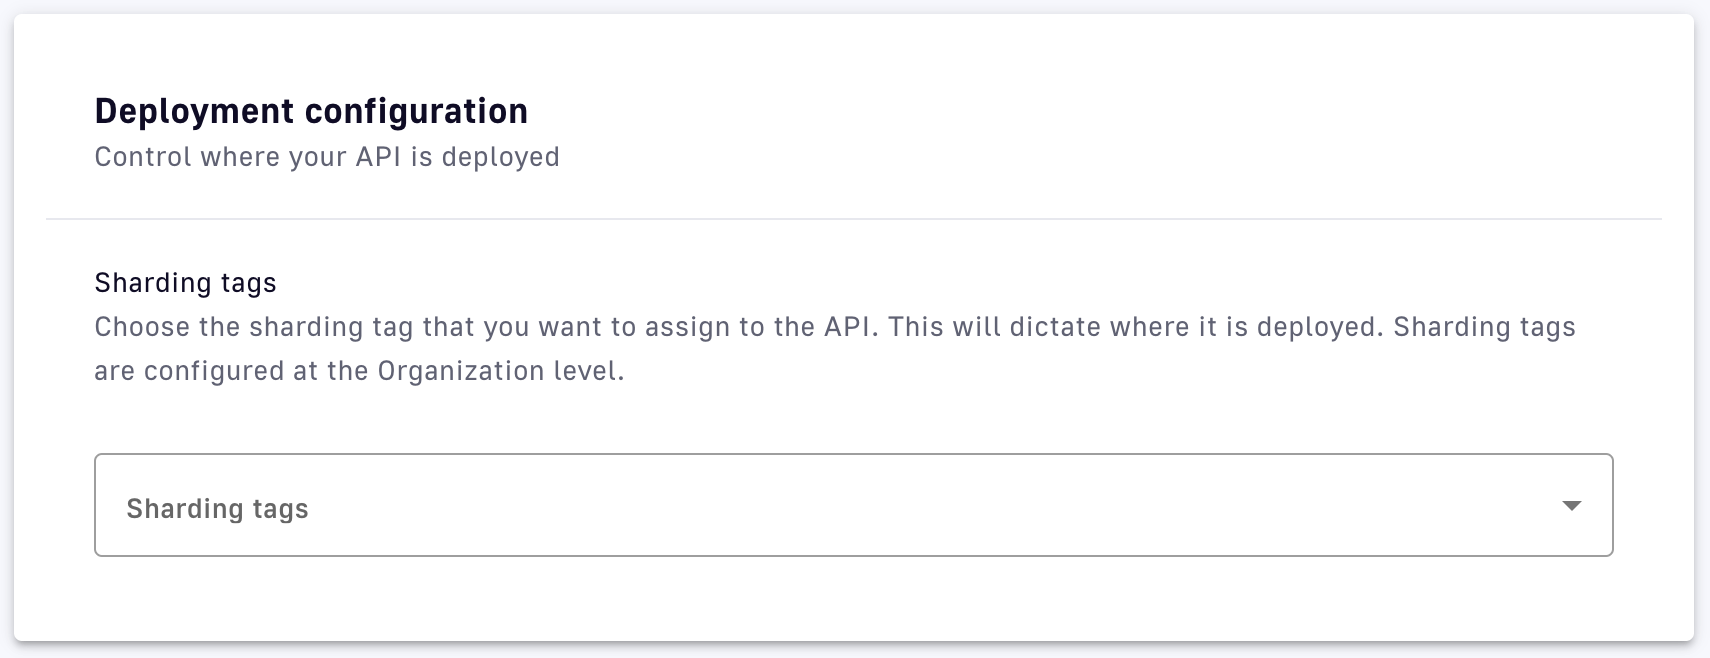
Deployments
Deployments allow you to control where your API is deployed using sharding tags.
- Select Deployments from the inner left nav
- Select sharding tags from the drop-down menu
- Click Save
Create a Response Template
When creating response templates, you can define:
- Multiple templates for one API (for multiple policies and/or multiple error keys sent by the same policy)
- Multiple template definitions for the same error key in a single template (for different content types or status codes)
To configure a response template:
- Select Response Templates from the inner left nav
- Click on the Add new Response Template button
- Customize the Create a new Response Template form
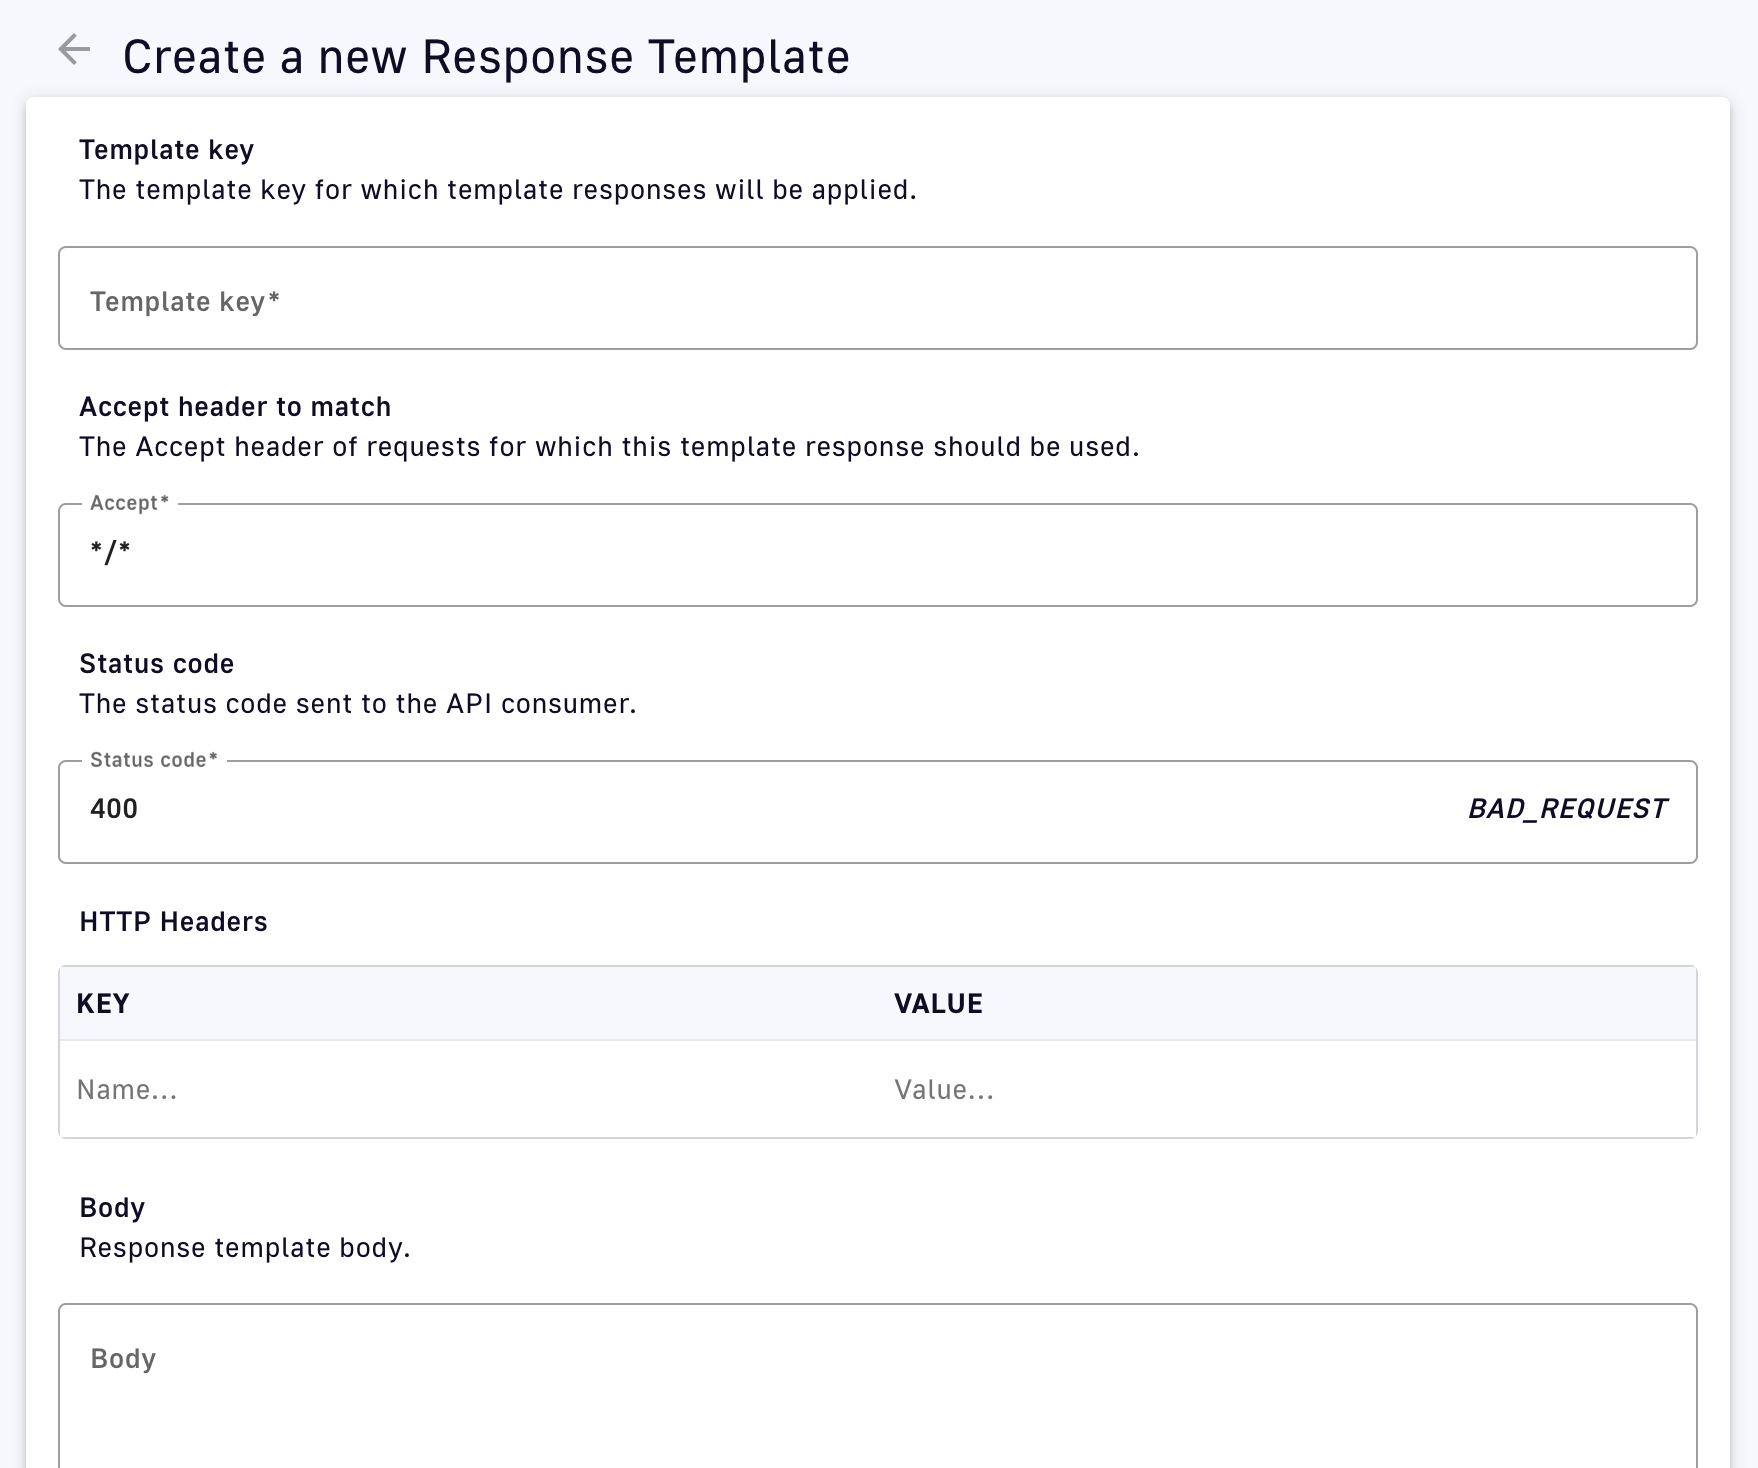
- Template key: Choose the template key via the Template key drop-down.
- Accept header to match: Specify the requests header that should trigger use of the response template. The default value is
*/*. To send the template override values only for JSON or XML requests, specifyJSONorXML. - Status code: Specify the status code that to send to the API consumer via the Status code drop-down.
- Specify the override values to send to the API consumer. These can either be:
- One or more HTTP headers to include in the response
- A response template body
Click Create
Properties
Properties are read-only during the Gateway's execution of an API transaction. They can be accessed from within flows using DSAPI's Expression Language (EL) and the #api.properties statement.
To configure API properties:
- Select Properties from the inner left nav
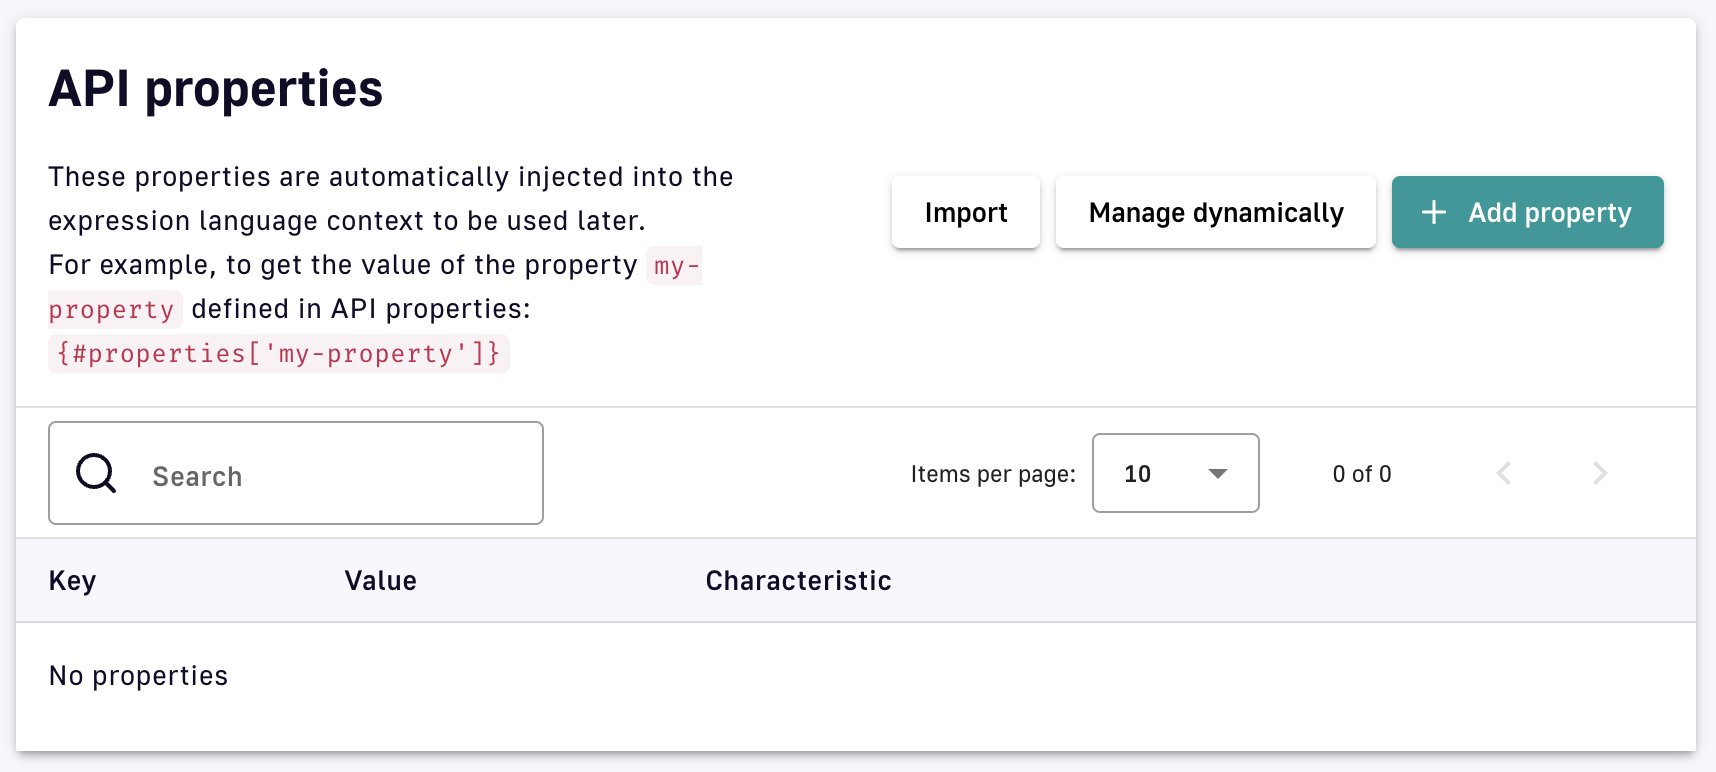
- To add hardcoded properties, either:
- Click Add property and enter property definitions one at a time as a key-value pair
- Click Import and enter property definitions as a list in
<key>=<value>format
Encryption
Warning: Encrypted values can be used by API policies, but encrypted data should be used with care. APIM Gateway will automatically decrypt these values.
To encrypt a hardcoded API property value:
- Reset the default secret key in
DSAPI.yml. The secret must be 32 bytes in length.
    # Encrypt API properties using this secret:
    api:
      properties:
        encryption:
             secret: vvLJ4Q8Khvv9tm2tIPdkGEdmgKUruAL6
- Enable the Encrypt toggle when adding a property via Add property. Once you click Save, you can no longer edit, modify, or view the value.
Dynamic properties
To configure dynamic properties:
- Click the Manage dynamically button and define the configuration
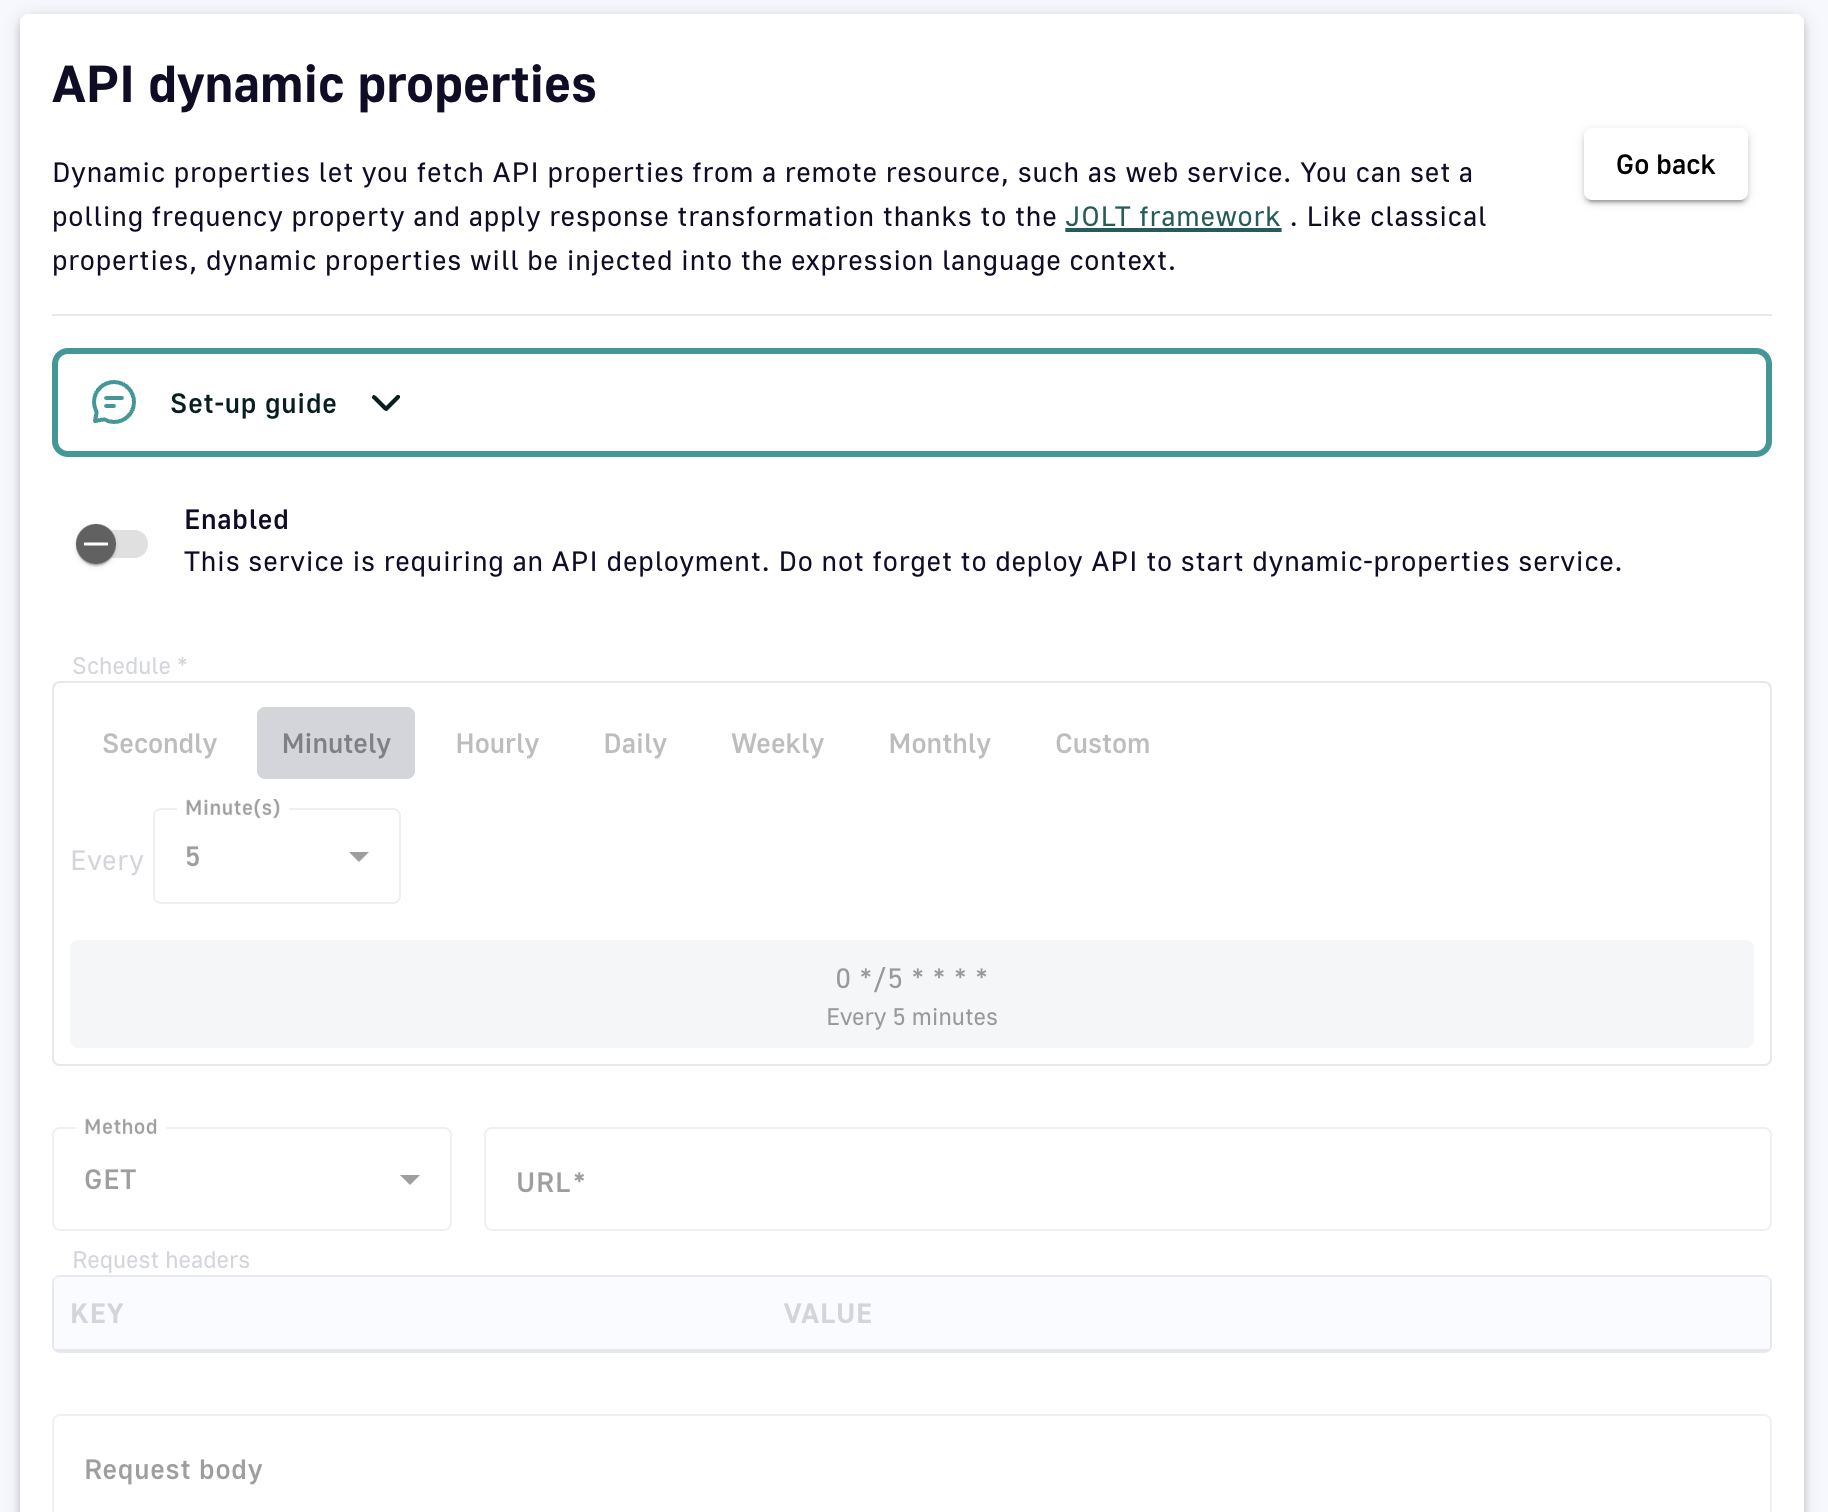
- Toggle Enabled to ON
- Schedule: A cron expression to schedule the health check
- HTTP Method: The HTTP method that invokes the endpoint
- URL: The target from which to fetch dynamic properties
- Request Headers: The HTTP headers to add to the request fetching properties
- Request body: The HTTP body content to add to the request fetching properties
- (Optional) Transformation (JOLT specification): Edit the JOLT transformation if needed
- Toggle Use system proxy ON to use the system proxy configured in APIM installation
Click Save
Resources
Some policies support the addition of resources, which can be used for actions such as authentication and schema registry validation.
| Policy | Description |
|---|---|
| Basic Authentication | Specify an LDAP Authentication Provider resource |
| Cache | Specify a cache resource |
| OAuth2 | Specify a Generic OAuth2 Authorization Server resource |
Info: Global resources are available to all flows associated with the Gateway API.
Documentation
Introduction
With the APIM Console, you can create API documentation, import API documentation, and add API metadata. DSAPI supports ASCIIDOC, AsyncAPI spec, OpenAPI spec, Swagger, and Markdown formats.
You can add the documentation through the API Management (APIM) Console to inform API consumers how to use an API. If the API and documentation are both published to the Developer Portal, the documentation appears in the Portal.
Importing documentation files
To import documentation:
- Sign in to your APIM Console
- From the navigation menu, select APIs
- Select your API.
- From the inner left nav, select Documentation.
- Select the Pages tab.
- To import documentation files, choose either of the following options:
- Click on Import multiple files
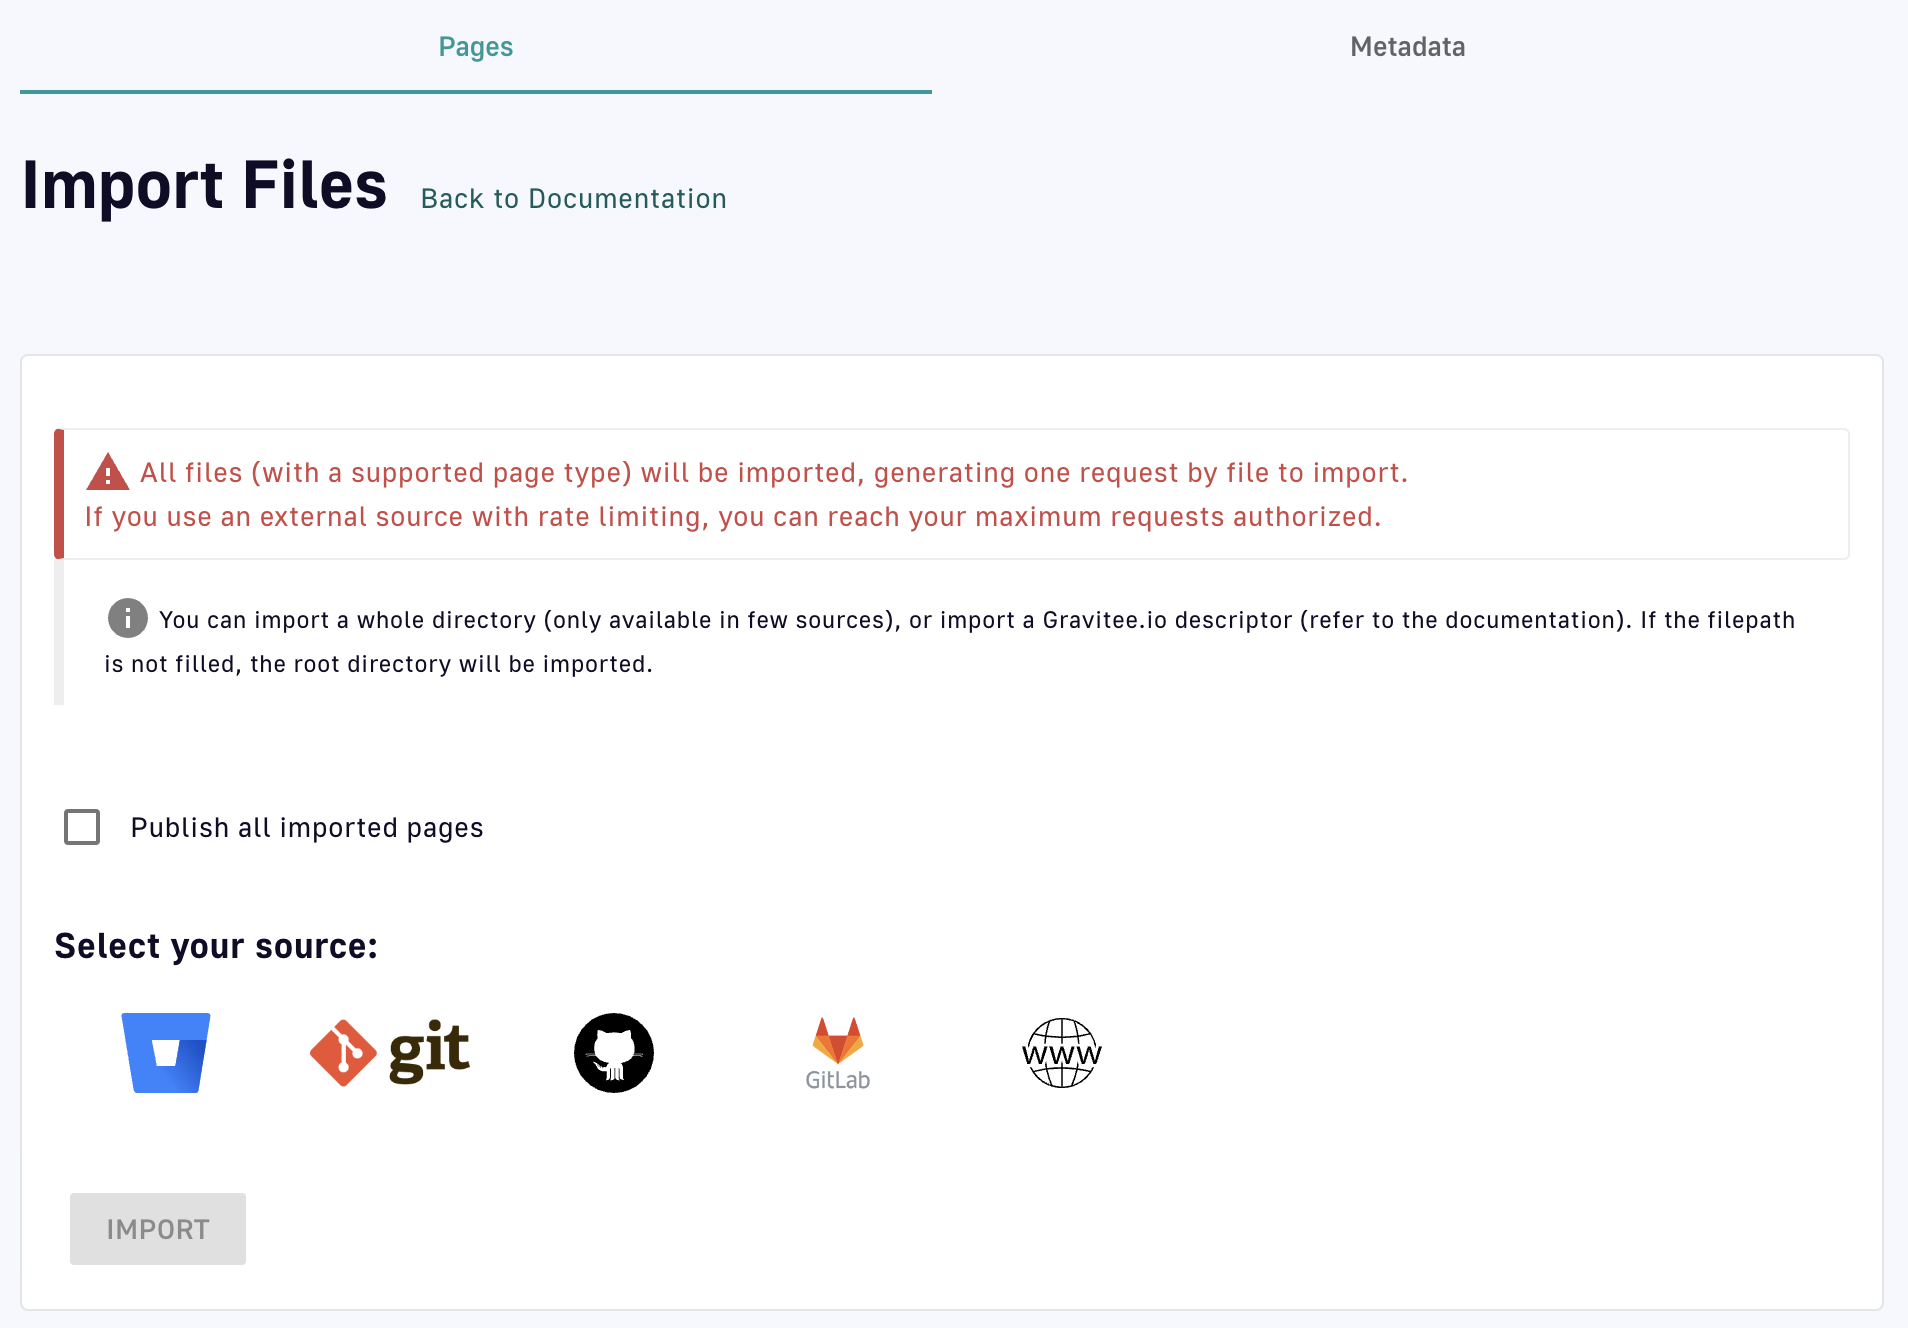
Import multiple files
- Toggle Publish all imported pages ON or OFF
- To Select your source, choose from: Bitbucket, git, GitHub, GitLab, or a URL
- Fill in the information appropriate to and required by your selection
- Click IMPORT
- Import individual files while creating new API documentation:
- Under the Pages tab, click the
 icon
icon
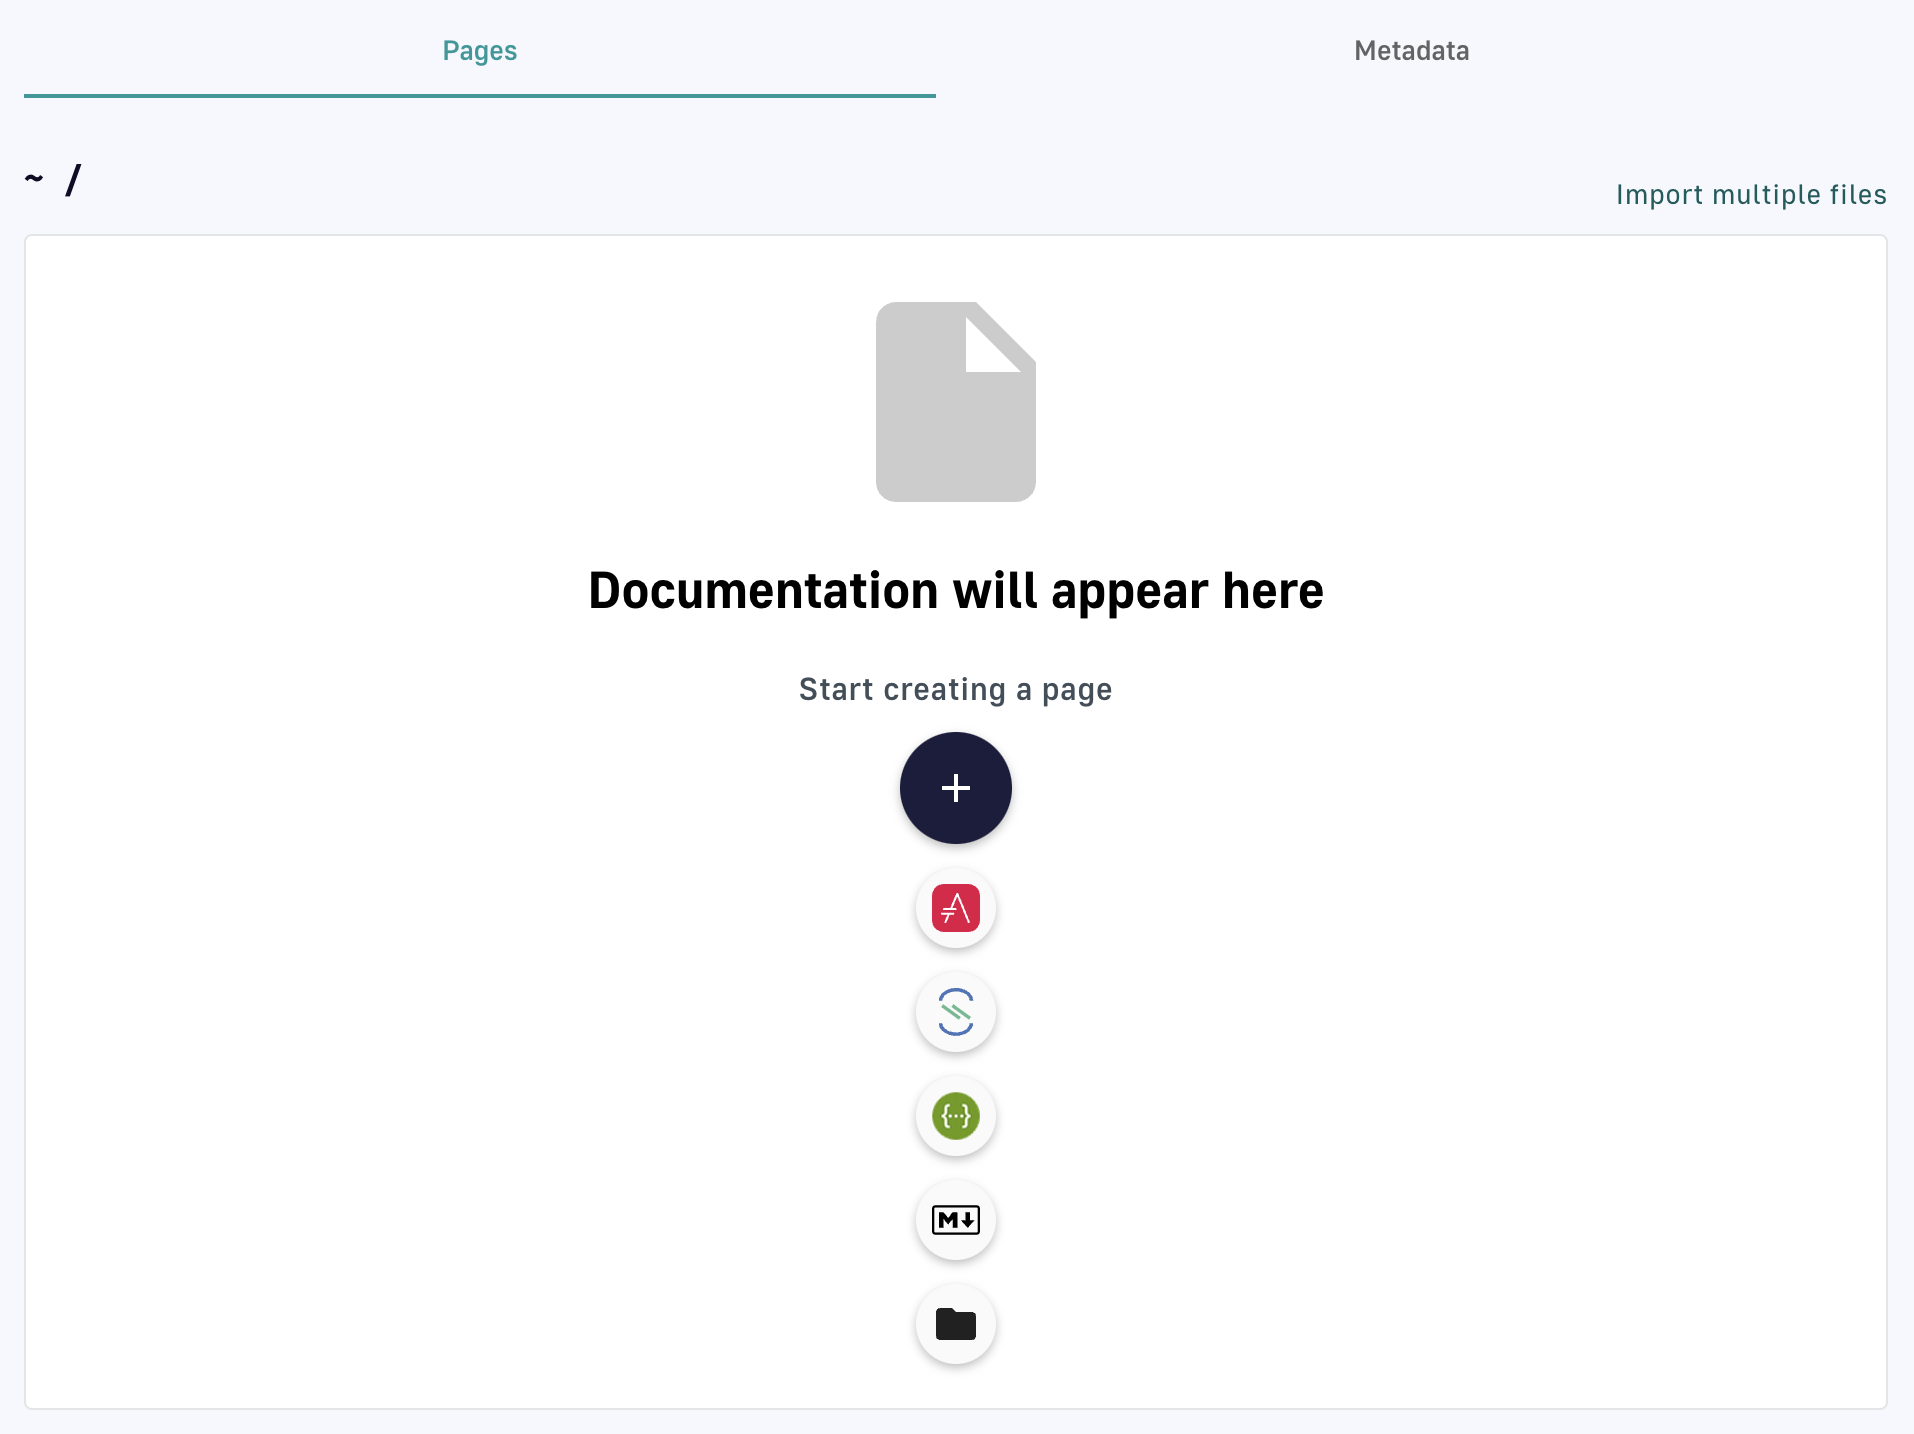
Import via page creation
- Select one of the following options:
- ASCIIDOC
- ASYNCAPI
- SWAGGER
- MARKDOWN
- At the bottom of the configuration page, click Choose File.
- After you select your file, click SAVE.
- Under the Pages tab, click the
Creating API documentation
- Sign in to your APIM Console
- From the left nav, select APIs
- Select the API that you want to add documentation to.
- From the inner left nav, select Documentation.
- Under the Pages tab, select the icon.
- Select your preferred format.
- Create and configure your documentation:
- Give your documentation a name
- Choose whether to:
- Set the documentation as the API homepage
- Publish the documentation page
- Make the documentation private to authorized users
- Define how to create, or get, the documentation content:
- Fill in the documentation inline yourself: If you select this option, you'll be given the option to start typing your documentation
- Import the documentation from a file
- Import documentation from an external source: DSAPI supports Bitbucket, git repository, Github, GitLab, and public URLs
- Click SAVE
Add API metadata
To add metadata:
- Log in to your APIM Console
- Select APIs from the left nav
- Select your API
- Select Documentation from the inner left nav
- Select the Metadata tab
- Click on + Add API Metadata
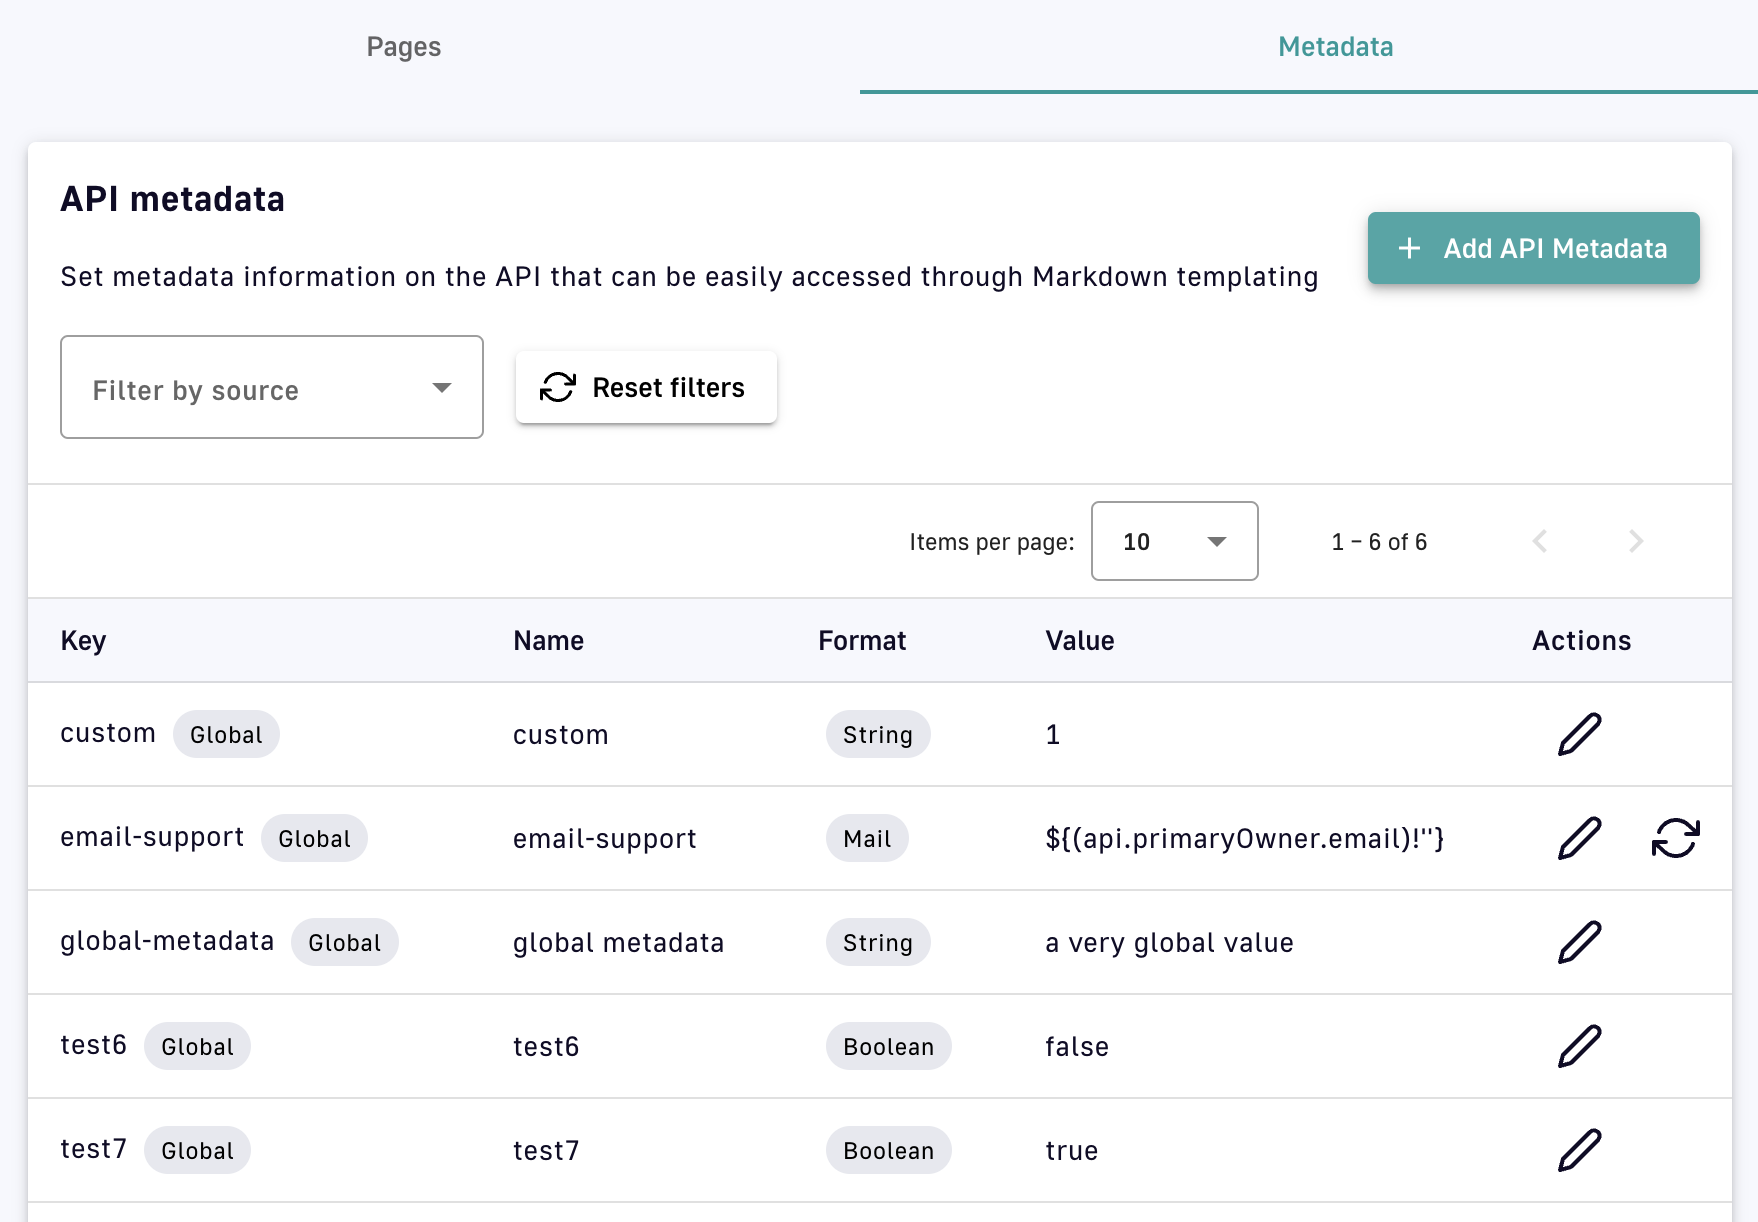
Add API metadata
- Choose a name for your API, select the format (string, numeric, boolean, date, mail, url), and define the value
- Click Save
Load-balancing, Failover, and Health-checks
Overview
APIM offers three main backend services for managing your APIs that are built into the DSAPI platform:
- Load-balancing: A technique that distributes incoming traffic across multiple backend servers to optimize resource utilization, maximize throughput, minimize response time, and avoid overloading any single server.
- Failover: Ensures high availability and reliability by redirecting incoming traffic to a secondary server or backup system in the event of a primary server failure.
- Health-checks: A health check is a mechanism used to monitor the availability and health of your endpoints and/or API Gateways.
Load-balancing
DSAPI load-balancing relies on:
- Endpoint groups: A logical grouping of endpoints that share a load-balancing algorithm.
- Load-balancing types: DSAPI offers four different types of load-balancing: round robin,random, weighted round robin, and weighted random.
Maintains a list of backend servers and assigns each incoming request to the next server on the list. Once the last server has been reached, the algorithm starts again from the beginning of the list, cycling through the servers in a circular manner.
Selects a backend server at random for each incoming request. Each server has an equal chance of being selected, regardless of its current load or processing capacity.
Works similarly to round robin, but instead of assigning incoming requests in a circular manner, requests are assigned based on the specified weight given to each backend server.
Example: If endpoint 1 has a weight of 9 and endpoint 2 has a weight of 1, endpoint 1 is selected 9 times out of 10, whereas endpoint 2 is selected only 1 time out of 10.
Distributes incoming traffic across multiple backend servers based on the predefined weight assigned to each server. The weight represents relative capacity or processing power, where higher weights indicate greater ability to handle incoming requests. The algorithm generates a random number within a defined range based on the total sum of all server weights. This number is used to select one of the backend servers for processing the request.
Example: If three backend servers, A, B, and C, have weights of 1, 2, and 3, respectively, the total weight of all servers is 6. When a request arrives, the load-balancer generates a random number between 1 and 6. If the number is between 1 and 1 (inclusive), server A is selected. If the number is between 2 and 3, server B is selected. If the number is between 4 and 6, server C is selected.
To configure load-balancing:
- Log in to your APIM Console
- Select APIs from the left nav
- Select your API
- From the inner left nav, select Endpoints under Backend services
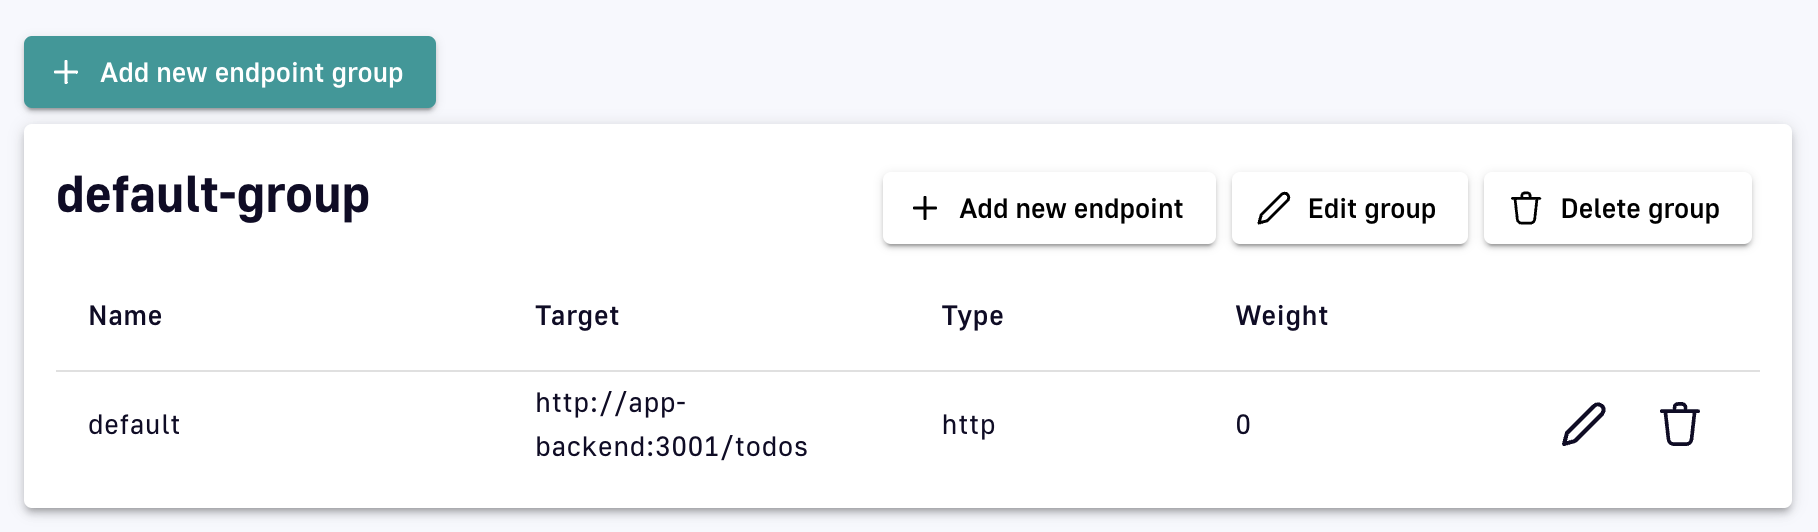
Endpoint configuration
- To confirm the load-balancing algorithm (chosen when your endpoint's group was created), click Edit group and select the General tab. Click the arrow to Go back to the endpoint configuration

Edit endpoint group
- Click the pencil icon for your endpoint and select the General tab to edit the load-balancing weight
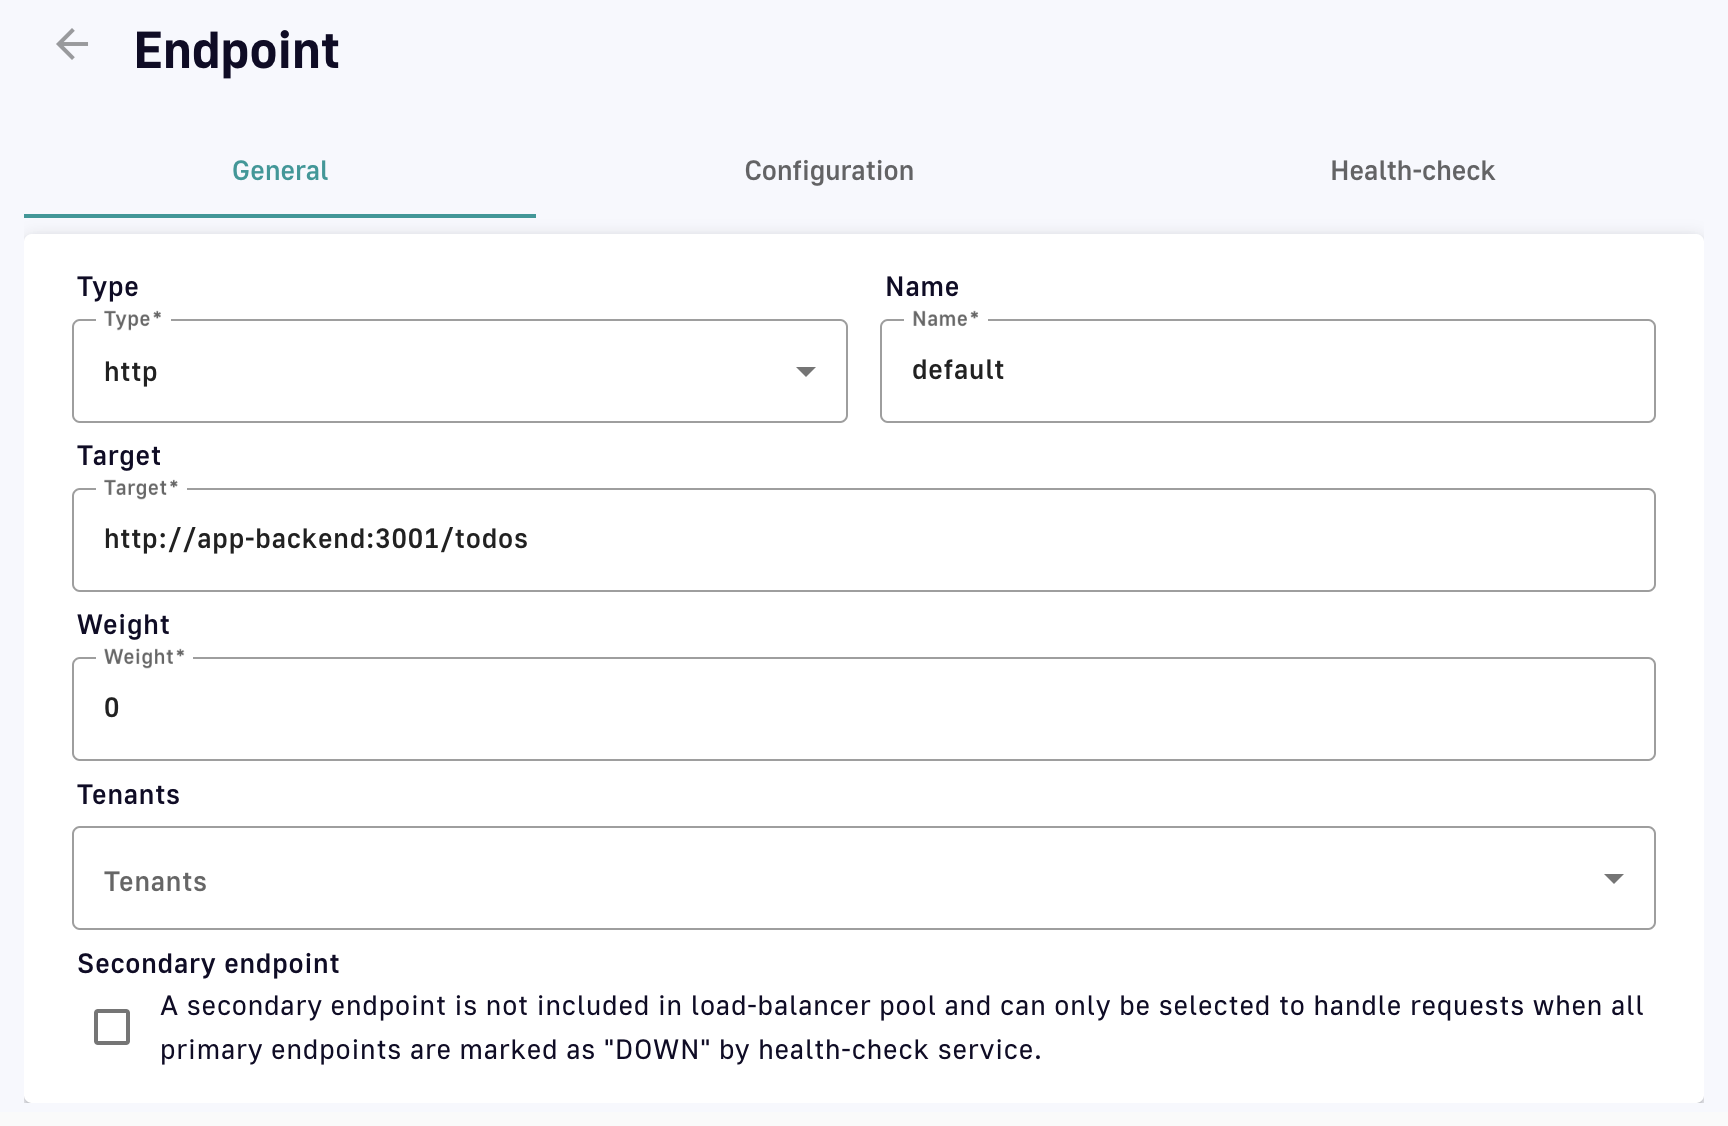
Configure load-balancing weight
- Click Save
Failover
To configure failover:
- Log in to your APIM Console
- Select APIs from the left nav
- Select your API
- From the inner left nav, select Failover under Backend services
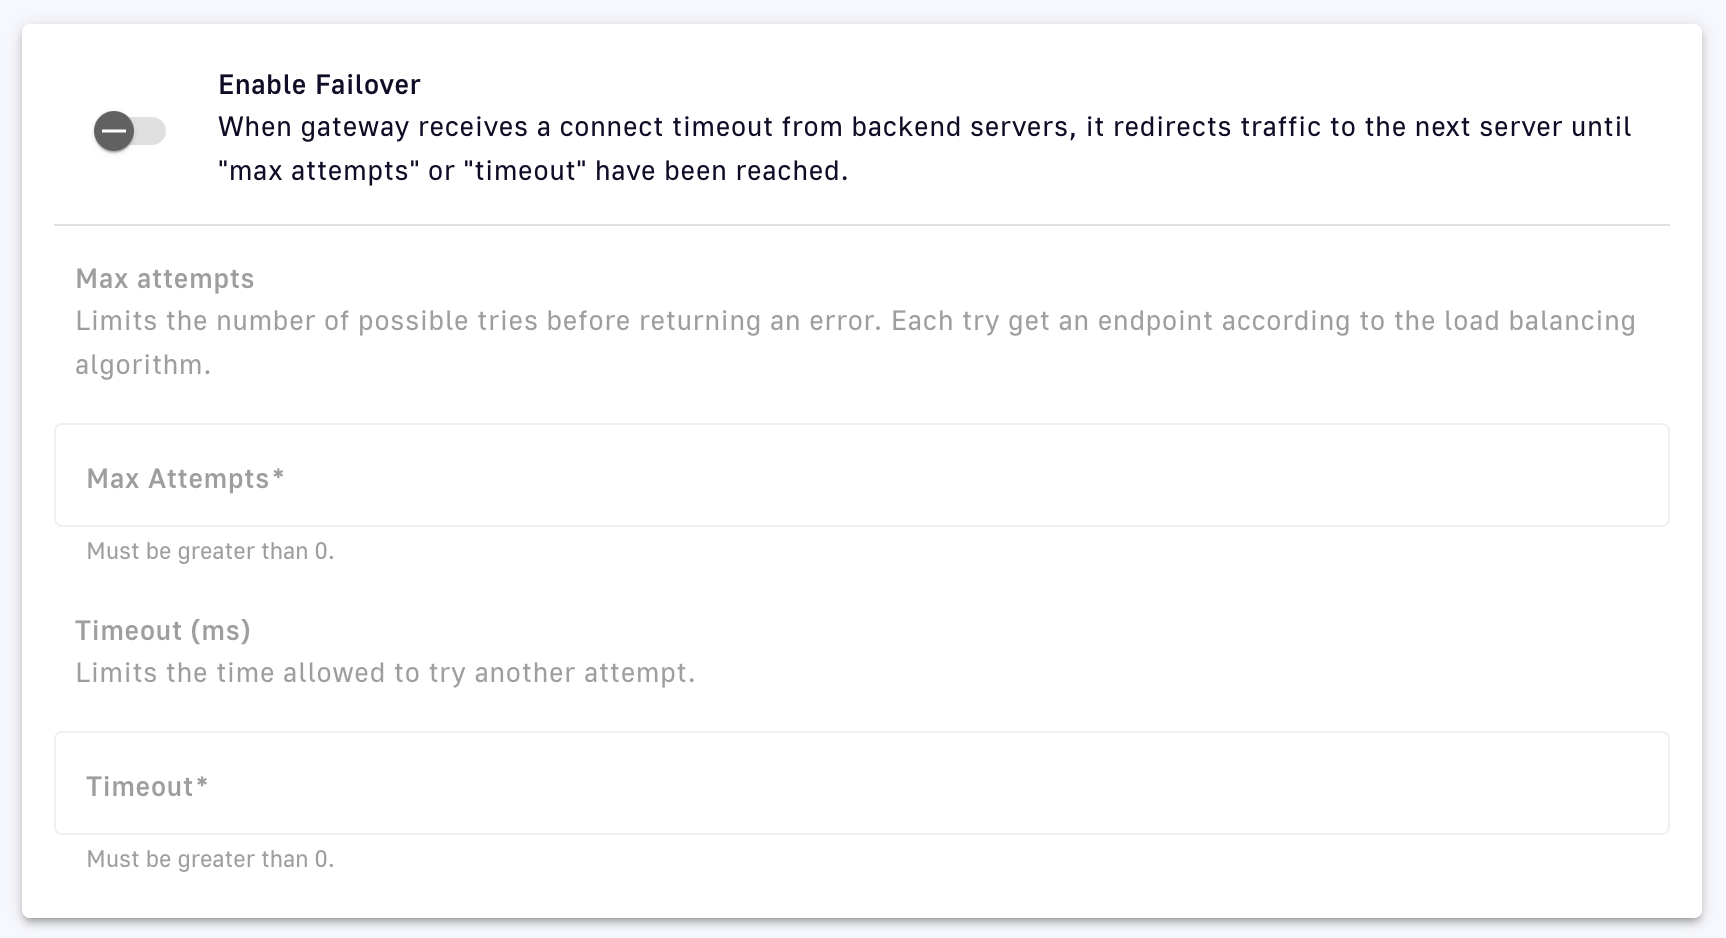
Configure failover
- Configure the following:
- Toggle Enable Failover ON
- Max Attempts: Define the upper limit for the number of possible DSAPI API Gateway attempts to find a suitable endpoint, according to the load-balancing algorithm, before returning an error
- Timeout: Defines the upper limit for time (in ms) between successive attempts before timing out
- Click Save
Health-checks
To configure health-checks:
- Log in to your APIM Console
- Select APIs from the left nav
- Select your API
- From the inner left nav, select Health-check under Backend services
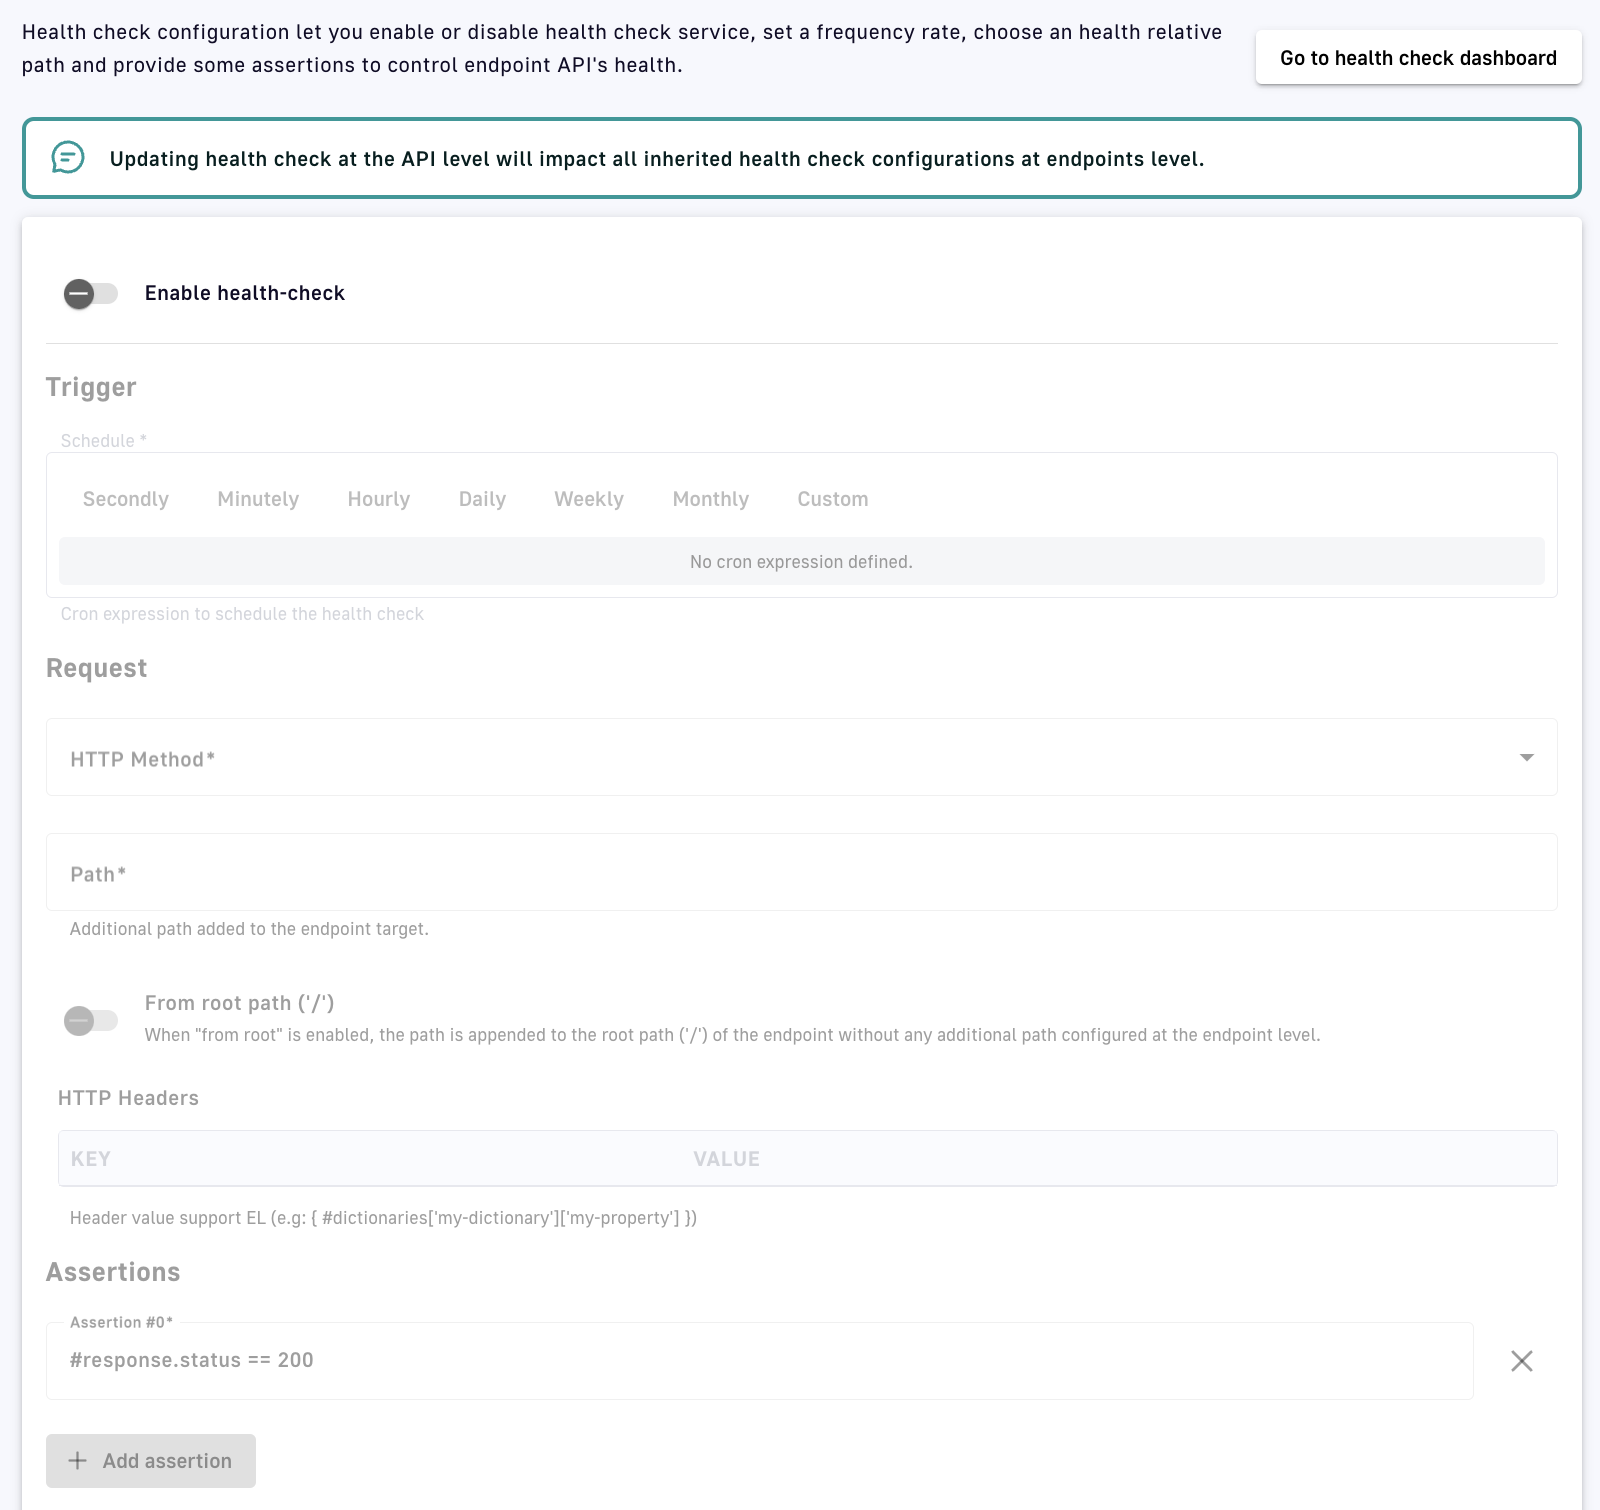
Configure health-checks
- Configure the following:
- Toggle Enable health-check ON
- Define the Trigger Schedule to establish the time interval between successive health-checks
- Select the HTTP Method that will trigger the health-check
- Define the Path that will trigger the health check
- Toggle From root path ('/') ON to apply the path specified at the root URL level, e.g., for the endpoint URL `www.test.com/api`, this option removes `/api` before appending the path
- Specify the HTTP Headers that will trigger a health check (supports DSAPI Expression Language)
- Use DSAPI Expression Language to define an Assertion that specifies conditions to test for in the API response that will trigger a health-check, then click + Add assertion
- Click Save, which also generates a visual summary of the health-check configuration
Service Discovery
Introduction
DSAPI service discovery for HashiCorp Consul allows you to bind the backend endpoints of your API to a service dynamically managed by HashiCorp Consul so that API requests are always routed to the proper, healthy backend service. By integrating the Gateway with HashiCorp Consul, dynamic load-balancer configuration changes are pulled directly from Consul’s service discovery registry.
The following sections describe how to:
- Configure HashiCorp Consul
- Establish secondary endpoints
- Verify service discovery and traffic routing
Configure HashiCorp Consul
1. Install a HashiCorp Consul server
Consul agents that run in server mode become the centralized registry for service discovery information in your network. Services registered with Consul clients are discoverable, and Consul servers can answer queries from other Consul agents about where a particular service is running, e.g., returning IP addresses and port numbers.
Refer to the official Consul documentation to learn how to install a Consul server.
To use docker-compose to set up an integration between DSAPI APIM and HashiCorp Consul:
1. Edit the docker-compose.yml used to install DSAPI and declare an additional service for the Consul server. The example below declares a read-only volume to mount the directory containing Consul configuration files.
        consul-server:
            image: hashicorp/consul:1.15.4
            container_name: consul-server
            restart: always
            volumes:
             - ./consul/server.json:/consul/config/server.json:ro
            ports:
             - "8500:8500"
             - "8600:8600/tcp"
             - "8600:8600/udp"
            command: "agent"
            networks:
             - storage
2. Consul containers load their configuration from /consul/config/ at startup. Use the server.json below to initialize the Consul server:
        {
          "node_name": "consul-server",
          "server": true,
          "bootstrap" : true,
          "ui_config": {
              "enabled" : true
          },
          "data_dir": "/consul/data",
          "addresses": {
              "http" : "0.0.0.0"
          }
        }
- server=true indicates that this Consul agent should run in server mode
- Consul’s web UI is enabled by setting the
enabledsub-key of theui_configattribute totrue - Once Consul server’s container is running, Consul’s web UI is accessible at port
8500 - The
addressesfield specifies the address that the agent will listen on for communication from other Consul members. By default, this is0.0.0.0, meaning Consul will bind to all addresses on the local machine and will advertise the private IPv4 address to the rest of the cluster.
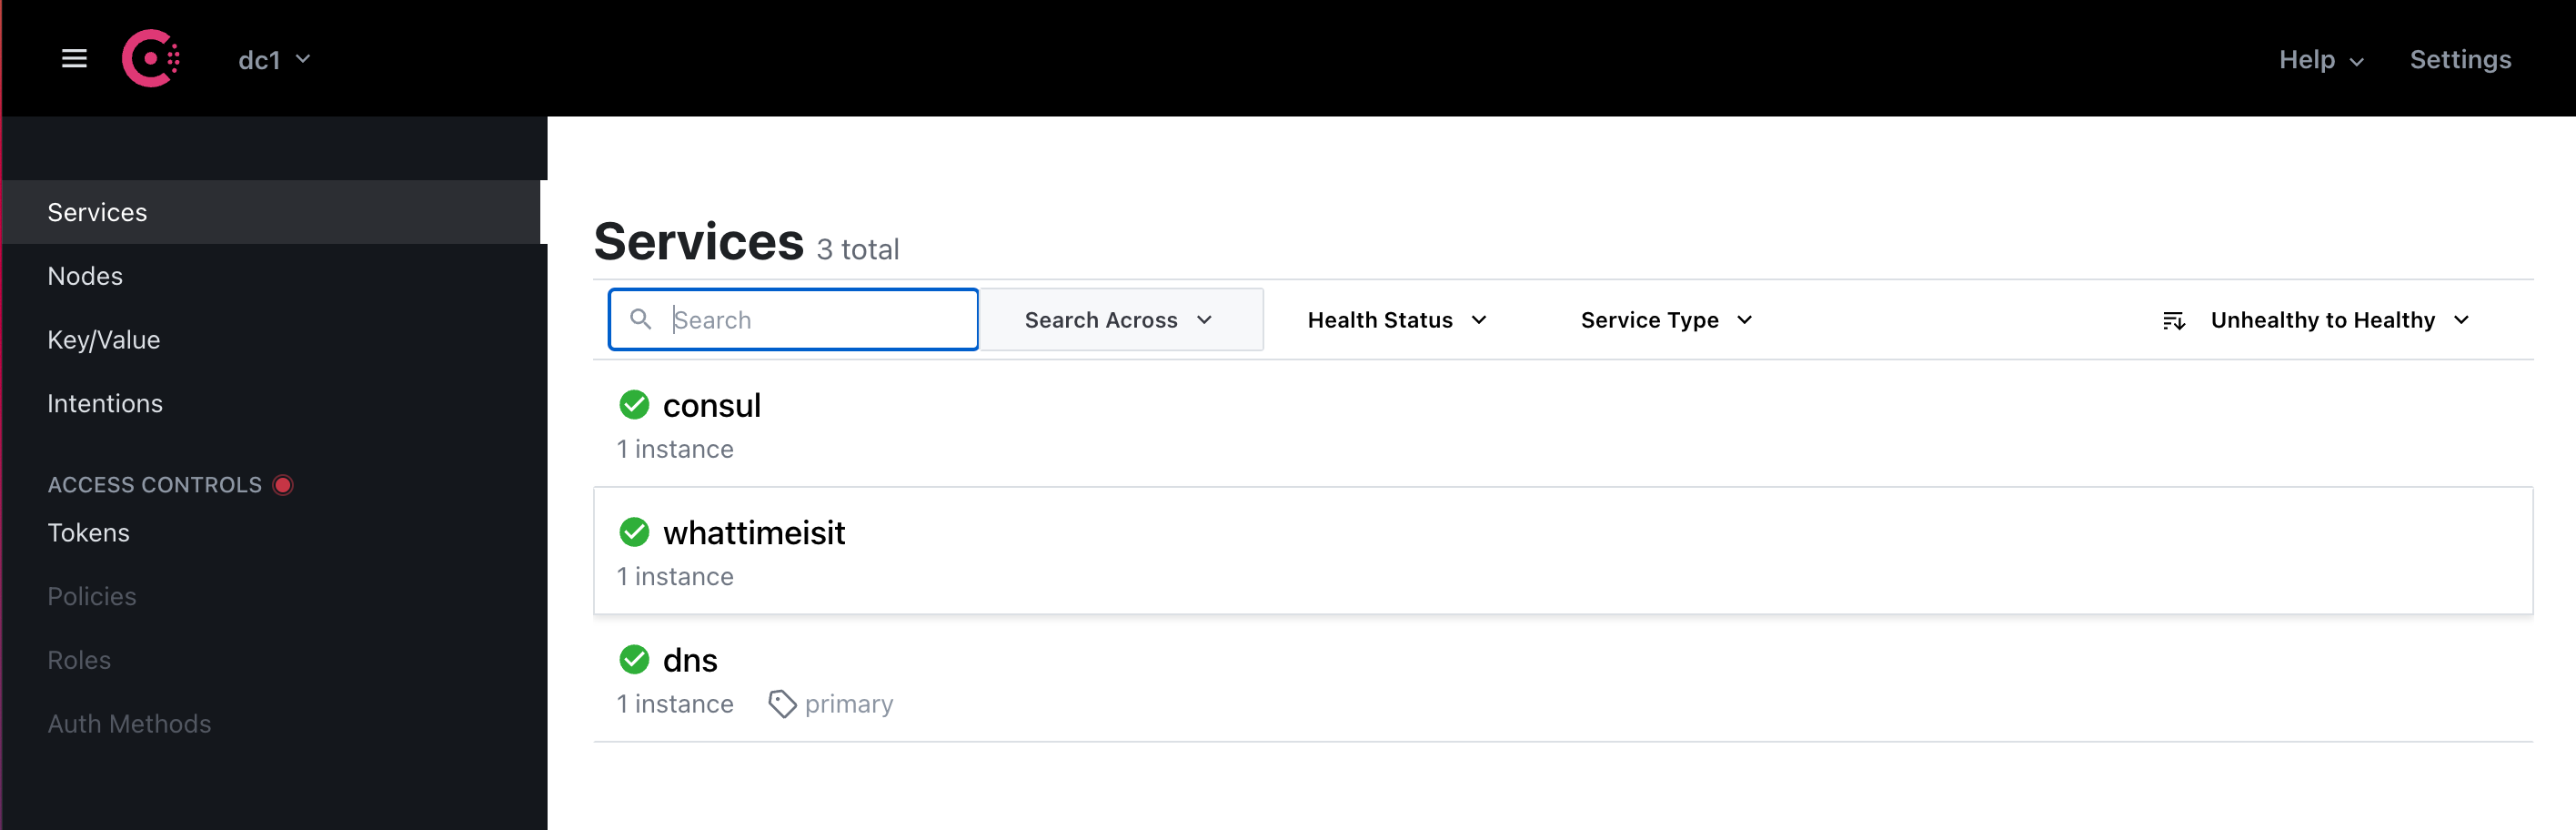
2. Register a service with HashiCorp Consul
An easy way to register a service in Consul is to request the /v1/agent/service/register endpoint of Consul’s Catalog HTTP API.
Consul does not allow you to directly specify an extra path of your service when registering it. To overcome this limitation, DSAPI supports extra Meta attributes in addition to the standard Address attribute.
Example: Register a service
curl -X PUT -d '{ "ID": "whattimeisit_1", "Name": "whattimeisit", "Address": "api.DSAPI.io", "Meta": {"DSAPI_path":"/whattimeisit", "DSAPI_ssl":"true" }, "Port": 443}' http://localhost:8500/v1/agent/service/register
The Consul web UI should display a new service named whattimeisit:
You can also verify that your service is successfully registered in Consul by interacting with the Consul Agent API:
curl "http://localhost:8500/v1/agent/services"
        {
          "whattimeisit_1": {
            "ID": "whattimeisit_1",
            "Service": "whattimeisit",
            "Tags": [],
            "Meta": {
              "DSAPI_path": "/whattimeisit",
              "DSAPI_ssl": "true"
            },
            "Port": 443,
            "Address": "api.DSAPI.io",
            "Weights": {
              "Passing": 1,
              "Warning": 1
            },
            "EnableTagOverride": false,
            "Datacenter": "dc1"
          }
        }
3. Enable Consul service discovery in APIM
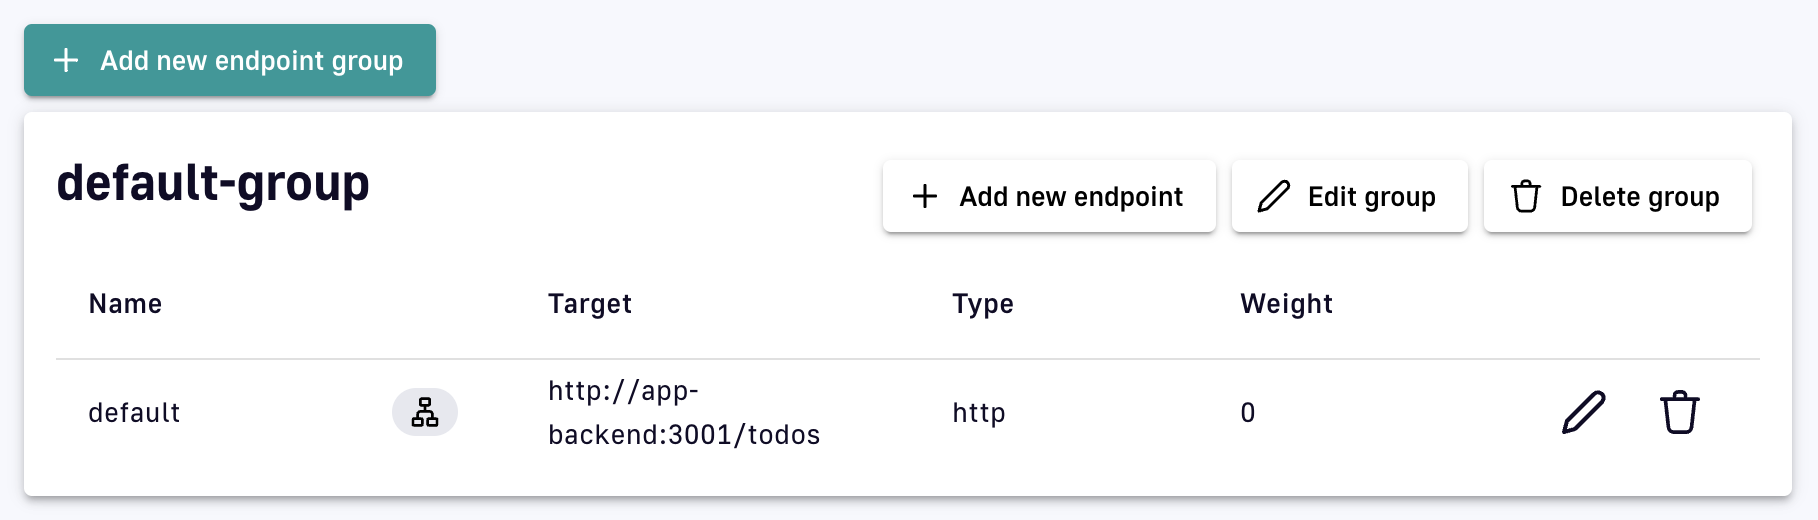
The service discovery feature is enabled at the EndpointGroup level of an API definition. The service field lists a service instance that has been successfully registered in HashiCorp Consul.
        "endpointGroups": [
            {
                "name": "default-group",
                "type": "http-proxy",
                "services": {
                    "discovery": {
                        "enabled": true,
                        "type": "consul-service-discovery",
                        "configuration": {
                            "url": "http://consul-server:8500",
                            "service": "whattimeisit"
                        }
                    }
                },
                "endpoints": []
            }
        ],
To enable HashiCorp Consul service discovery in your APIM Console:
- Log in to your APIM Console
- Select APIs from the left nav
- Select your API
- Select Endpoints from the Backend services section of the inner left nav
- Click Edit group
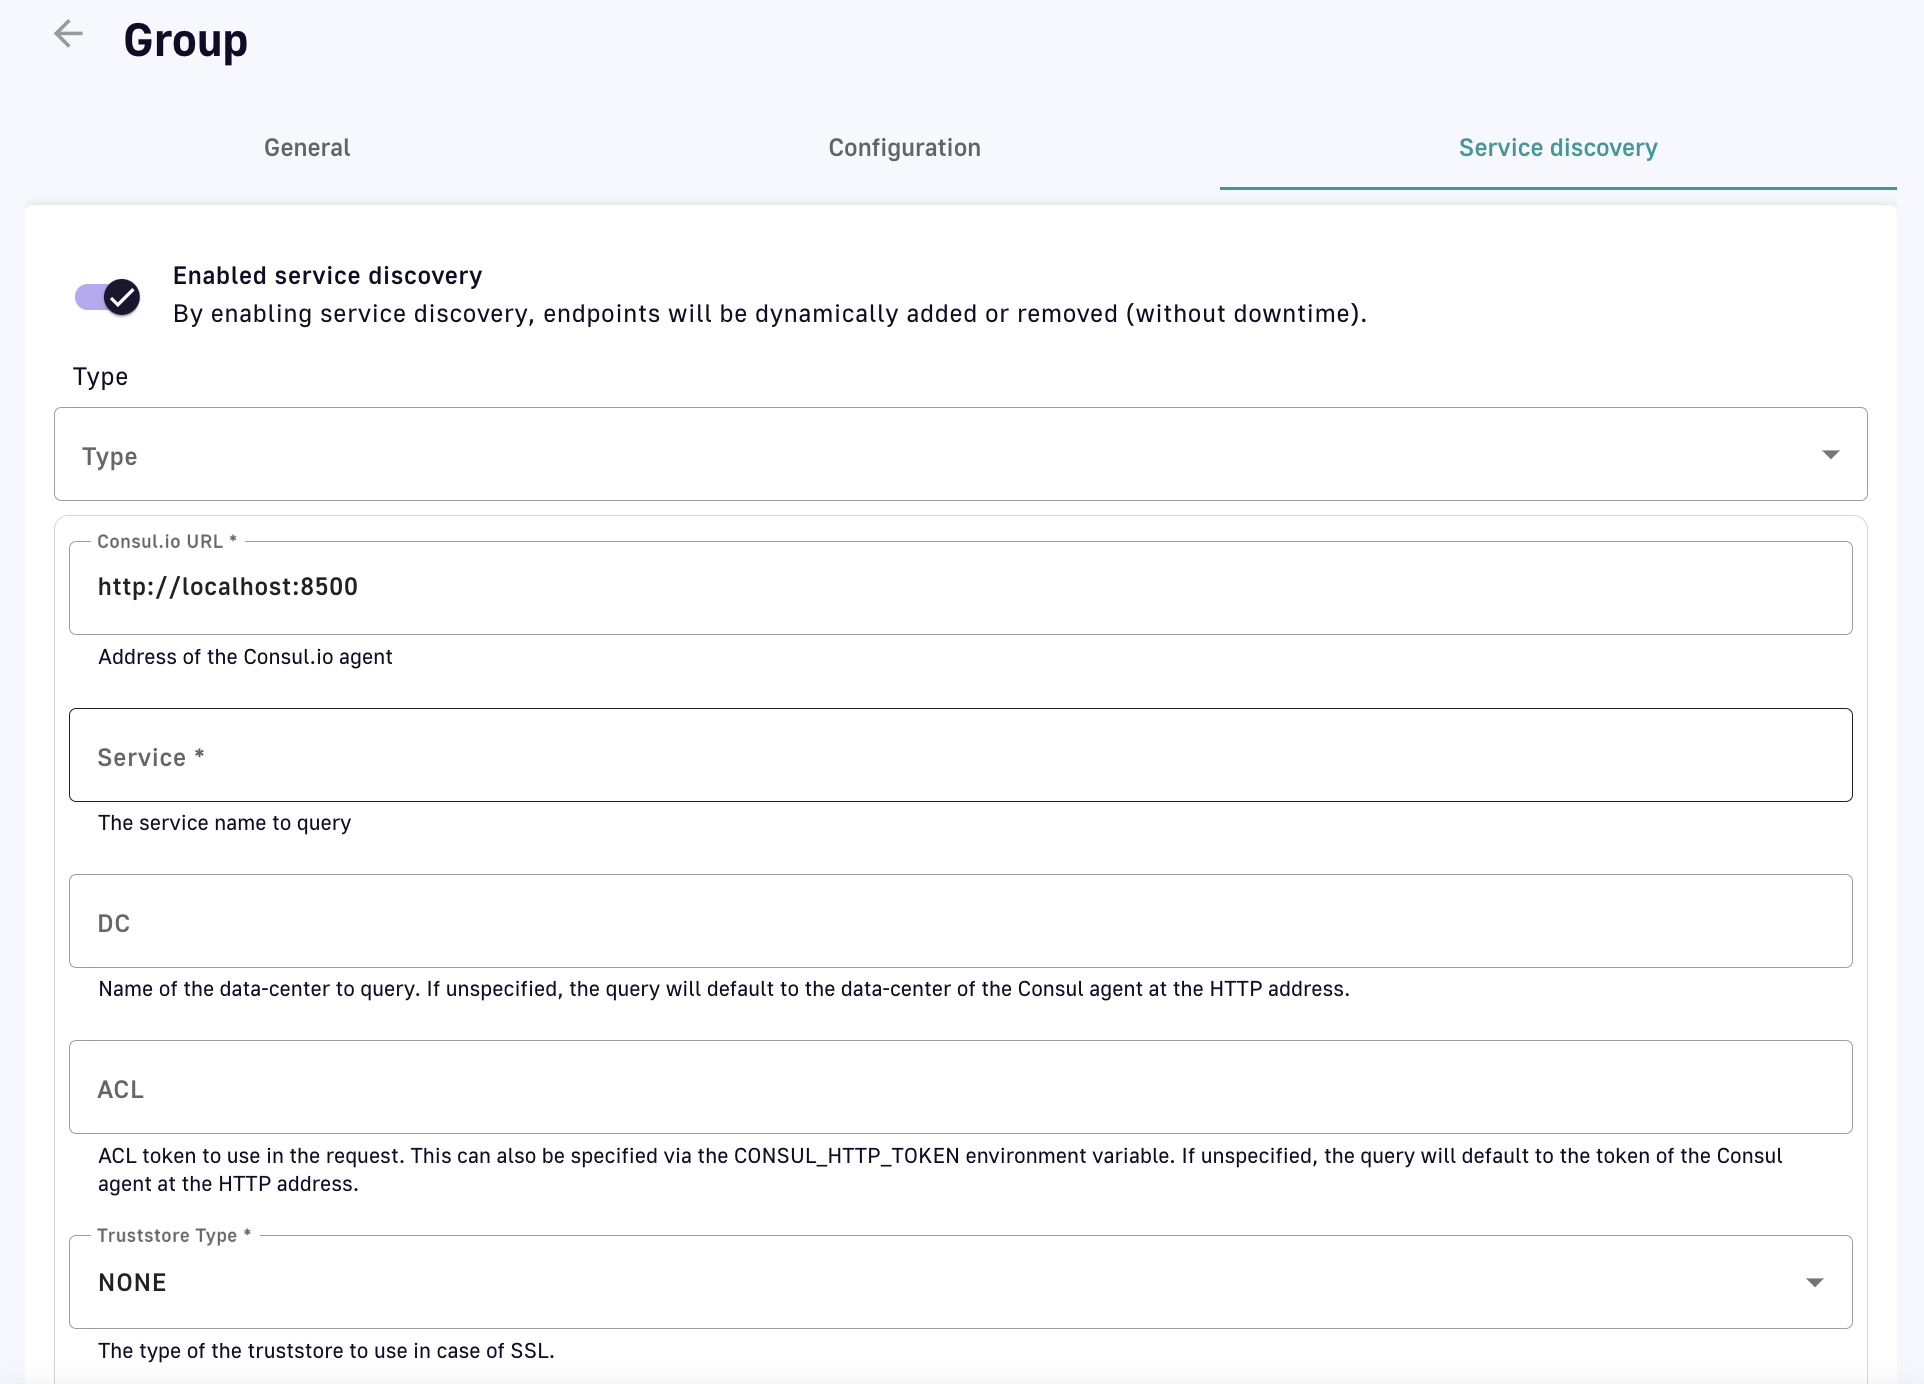
- Click on the Service discovery tab
- Toggle Enabled service discovery ON, then configure the following:
- Type: Select Consul.io Service Discovery from the drop-down menu
- Service: Enter the name of the service registered in Consul, e.g., "whattimeisit"
- DC: Enter the Consul data center name. This is an optional part of the Fully Qualified Domain Name (FQDN).
- ACL: Provide the ACL token if you’ve secured the access to Consul.
- Truststore Type: Use the drop-down menu to configure DSAPI to trust all certificates presented by Consul.
- KeyStore Type: Select the type of keystore DSAPI will present to the Consul agent during the secure connection handshake.
- Click Save
- Redeploy your API
The endpoints dynamically discovered through Consul are not displayed in the APIM Console and do not replace endpoints that were previously configured. The Gateway will continue to use pre-existing endpoints in addition to those discovered via Consul.
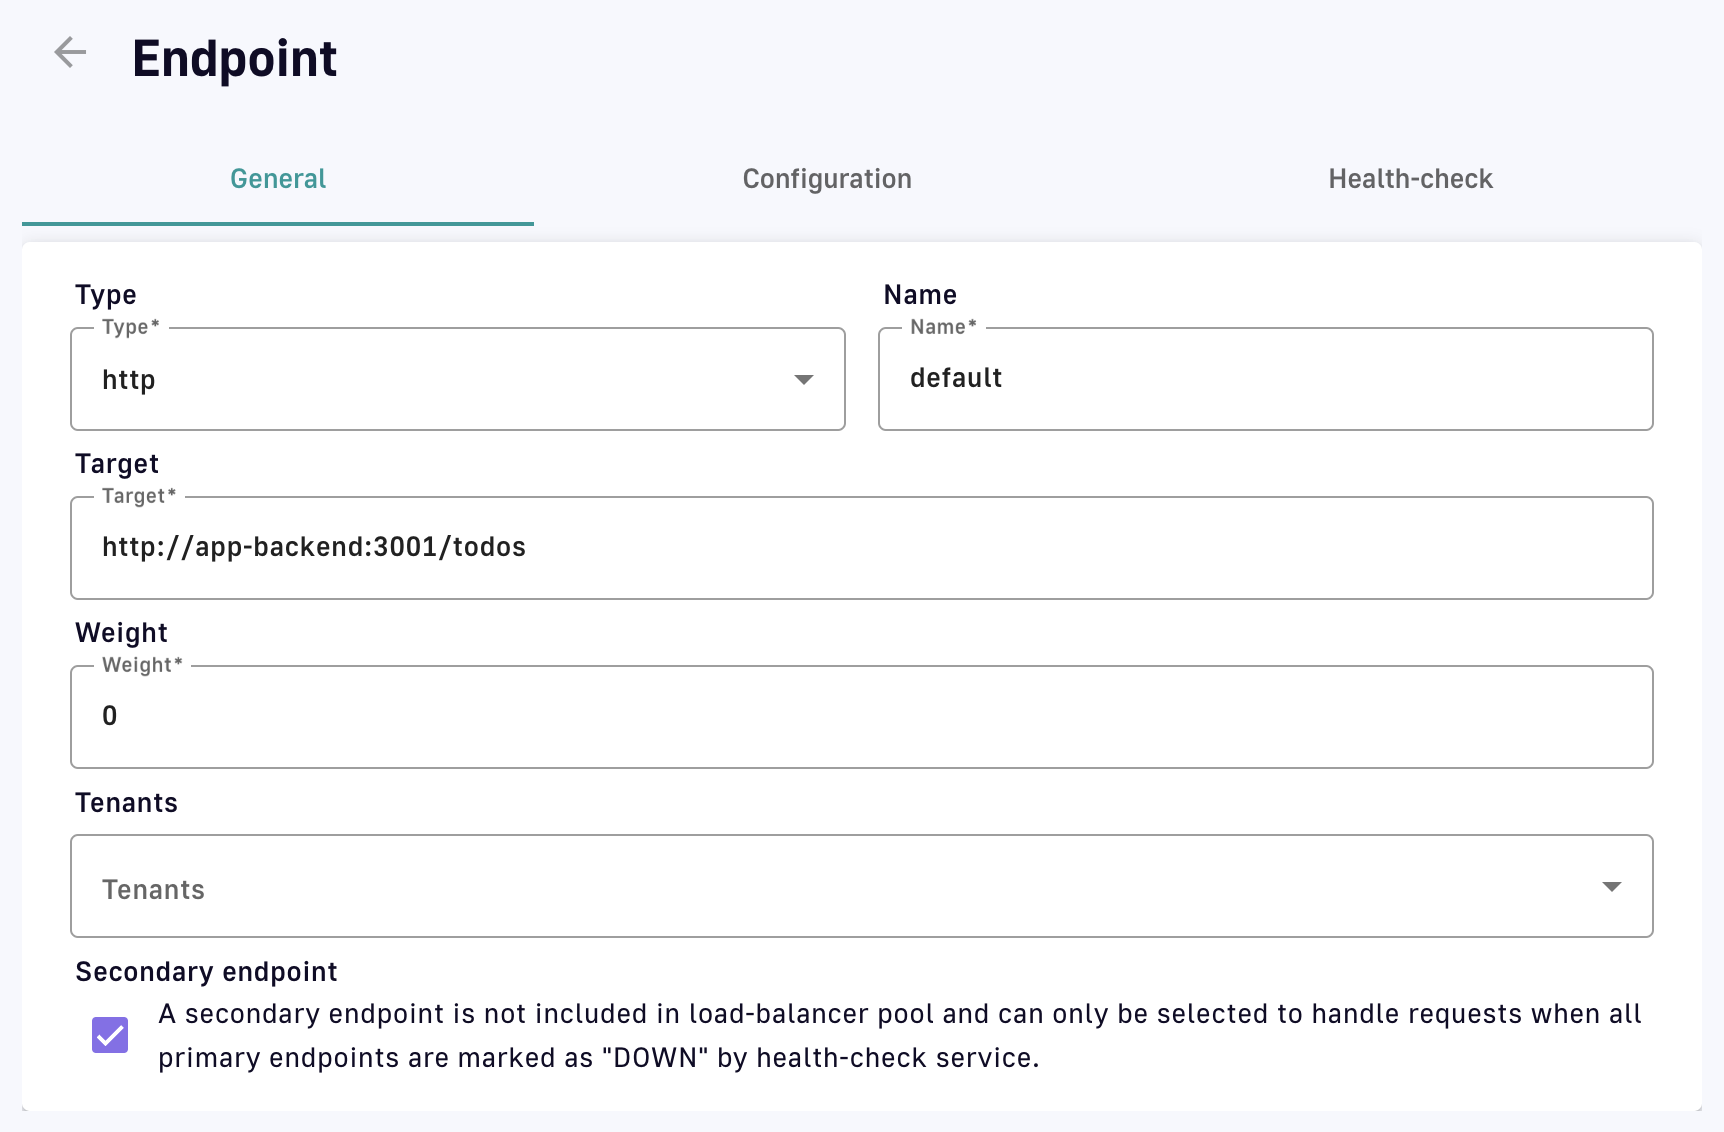
Secondary endpoints
APIM requires that at least one endpoint is defined in the Console, but this endpoint can be declared as secondary. Secondary endpoints are not included in the load-balancer pool and are only selected to handle requests if Consul is no longer responding.
To declare an endpoint as secondary:
- Log in to your APIM Console
- Select APIs from the left nav
- Select your API
- Select Endpoints from the Backend services section of the inner left nav
- Click the pencil icon next to the endpoint you want to make secondary
- Under the General tab, click the box next to Secondary endpoint
- Click Save
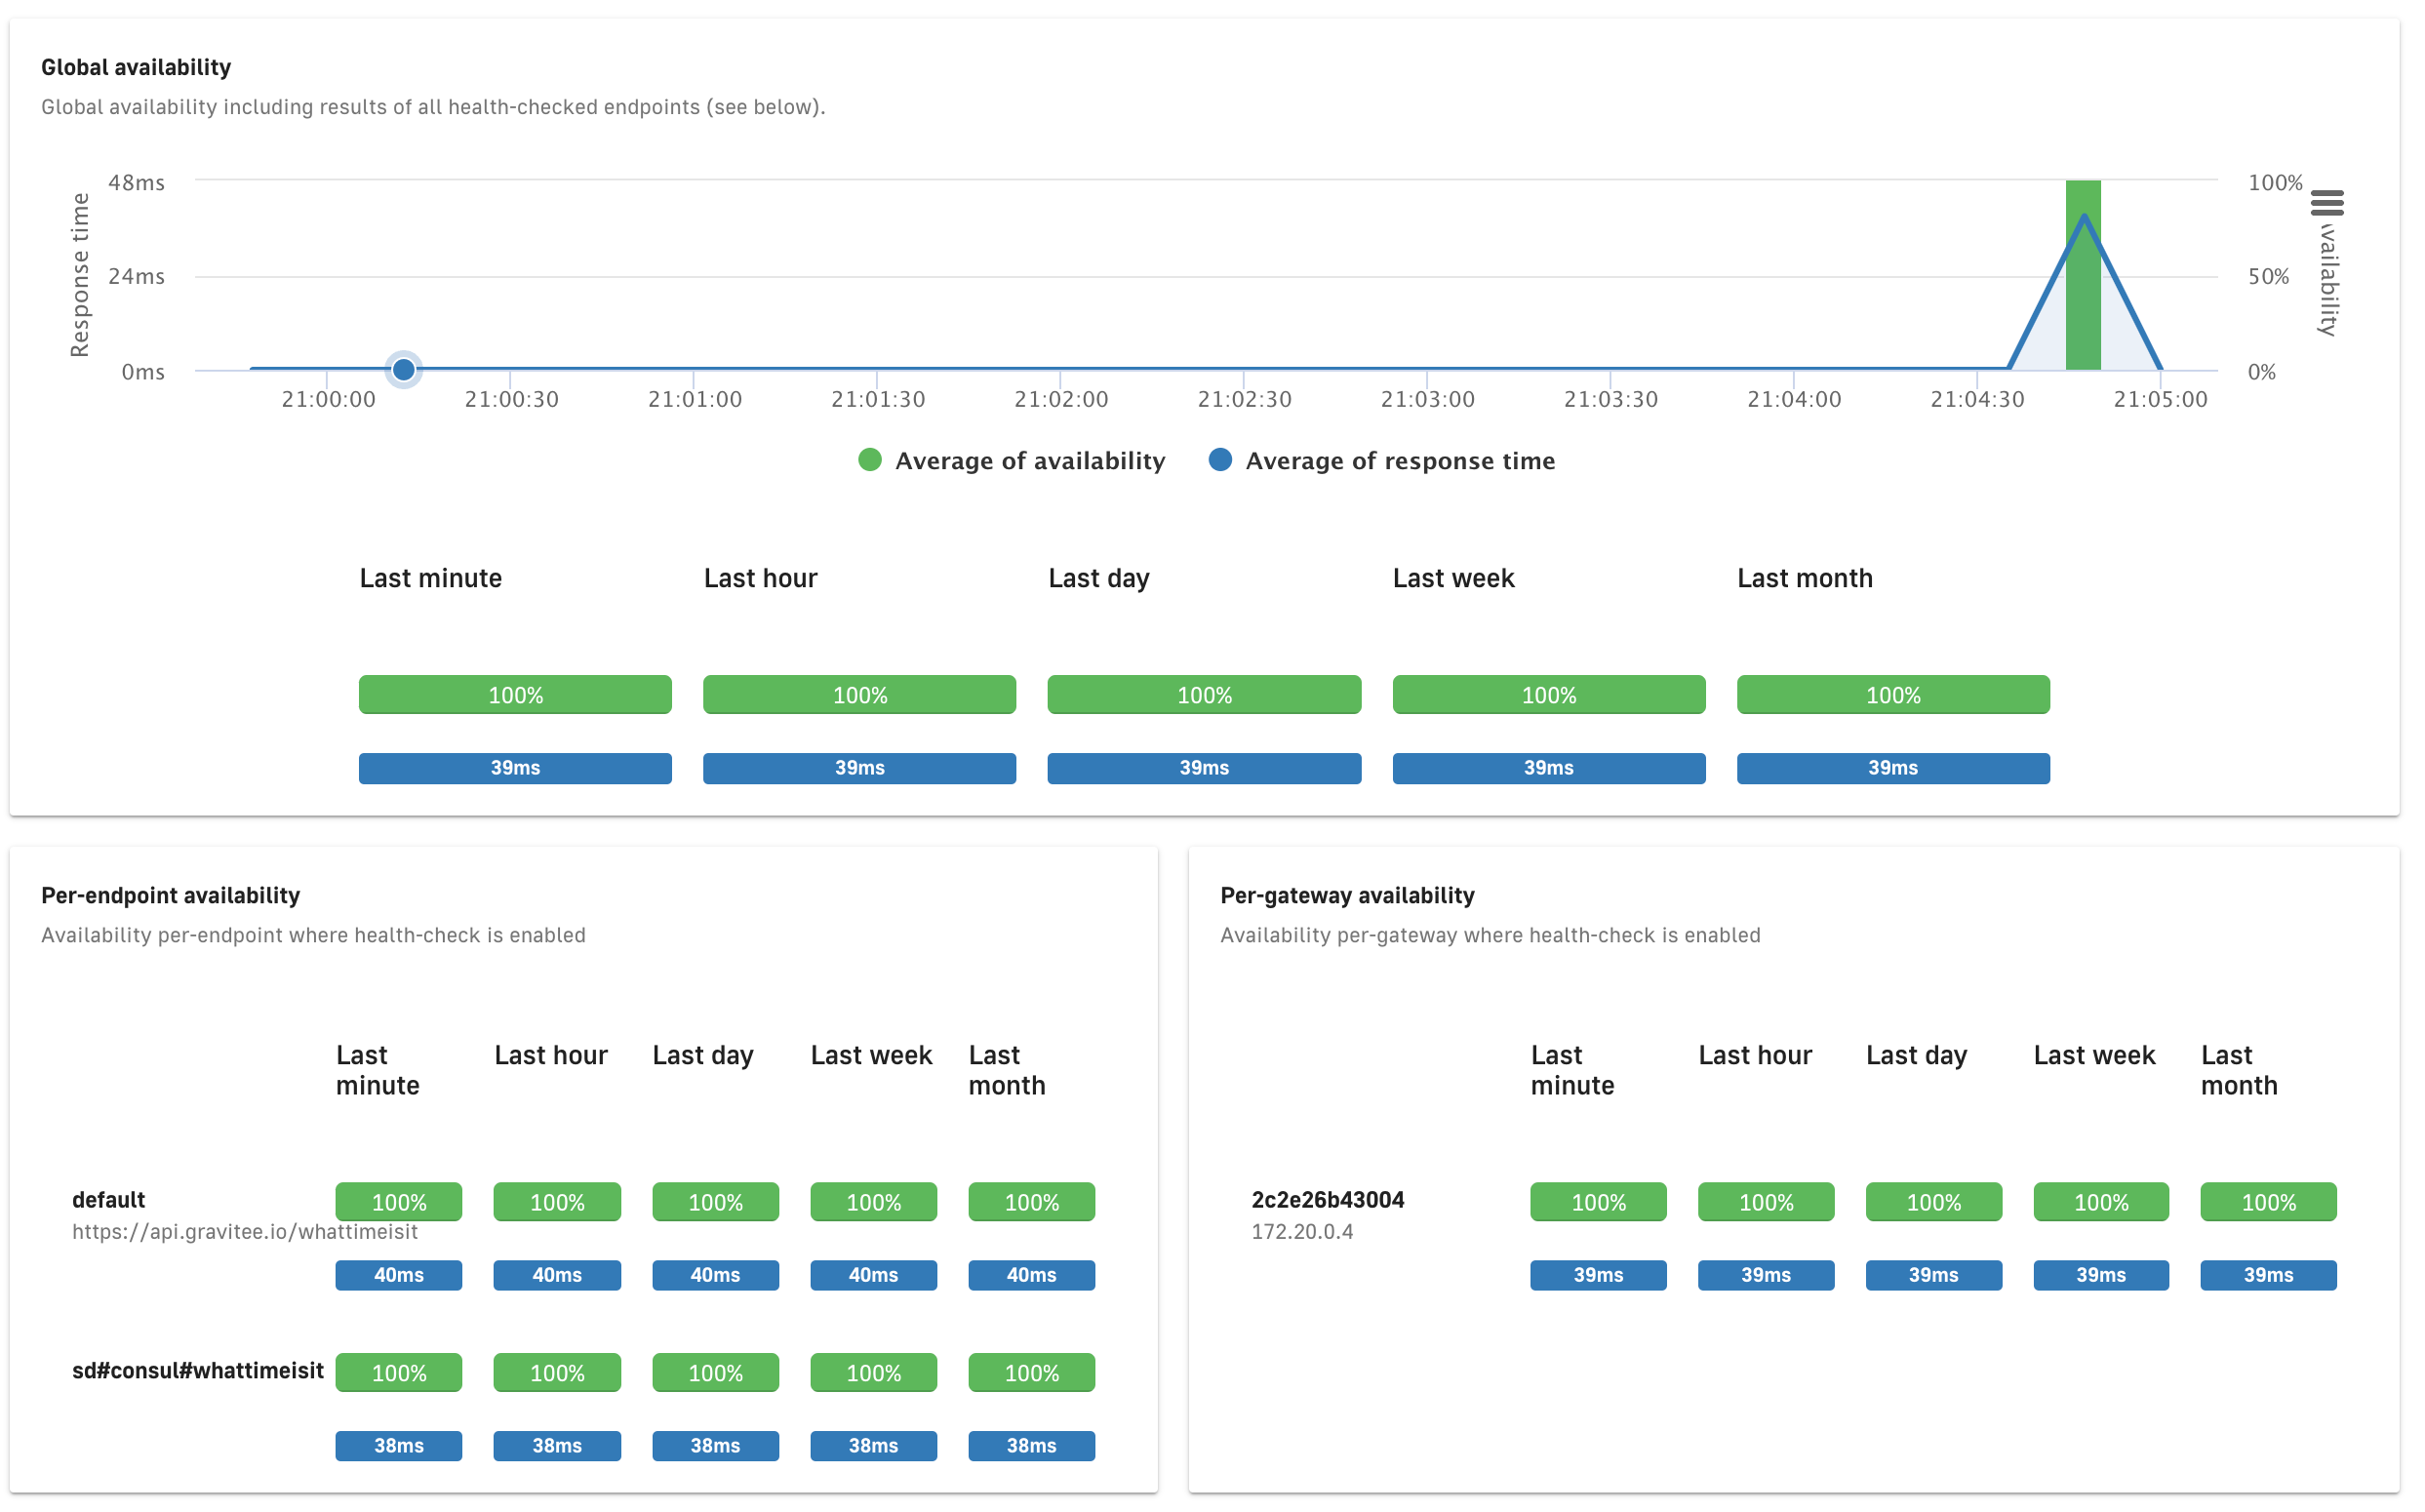
Verification
Confirm service discovery
To confirm service discovery:
- Check the API Gateway’s logs to verify that your service has been successfully found by HashiCorp Consul:
- Try to call your API to ensure incoming API requests are routed to the appropriate backend service.
                INFO  i.g.a.p.a.s.c.ConsulServiceDiscoveryService - Starting service discovery service for api my-api.
                INFO  i.g.g.r.c.v.e.DefaultEndpointManager - Start endpoint [consul#whattimeisit_1] for group [default-group]
Observe traffic routing
To observe how APIM dynamically routes traffic based on Consul’s Service Catalog:
- Deregister your service instance from Consul by referring to its ID:
- Call your API
curl -X PUT -v "http://localhost:8500/v1/agent/service/deregister/whattimeisit_1"
Additional considerations
Consider enabling health-checks for your API to view the status of all endpoints, including the endpoints managed by HashiCorp Consul. For more information on how to enable DSAPI health-checks.
User and Group Access
Introduction
The sections below detail how to manage user and group access to individual APIs:
See User Management and Permissions to learn more about user and group creation and administration.
Configure API user and group access
To configure user and group access for your APIs:
- Log in to APIM Console
- Select APIs from the left nav
- Select your API
- From the inner left nav, select User and group access
Configure user and group access
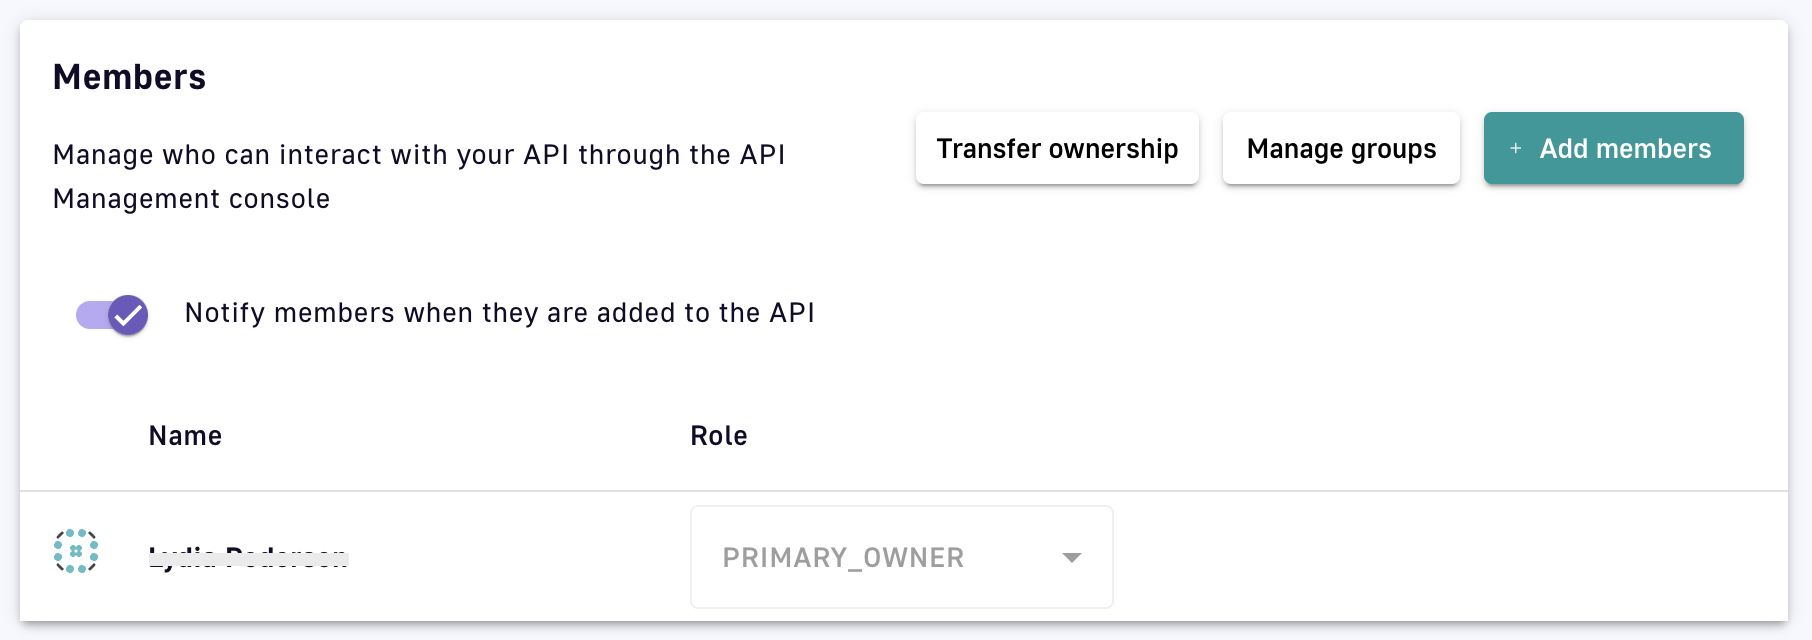
Add members to an API
Click + Add members to add members to your API or alter member roles, which grant specific permissions. For more information on roles, please refer to the roles documentation.
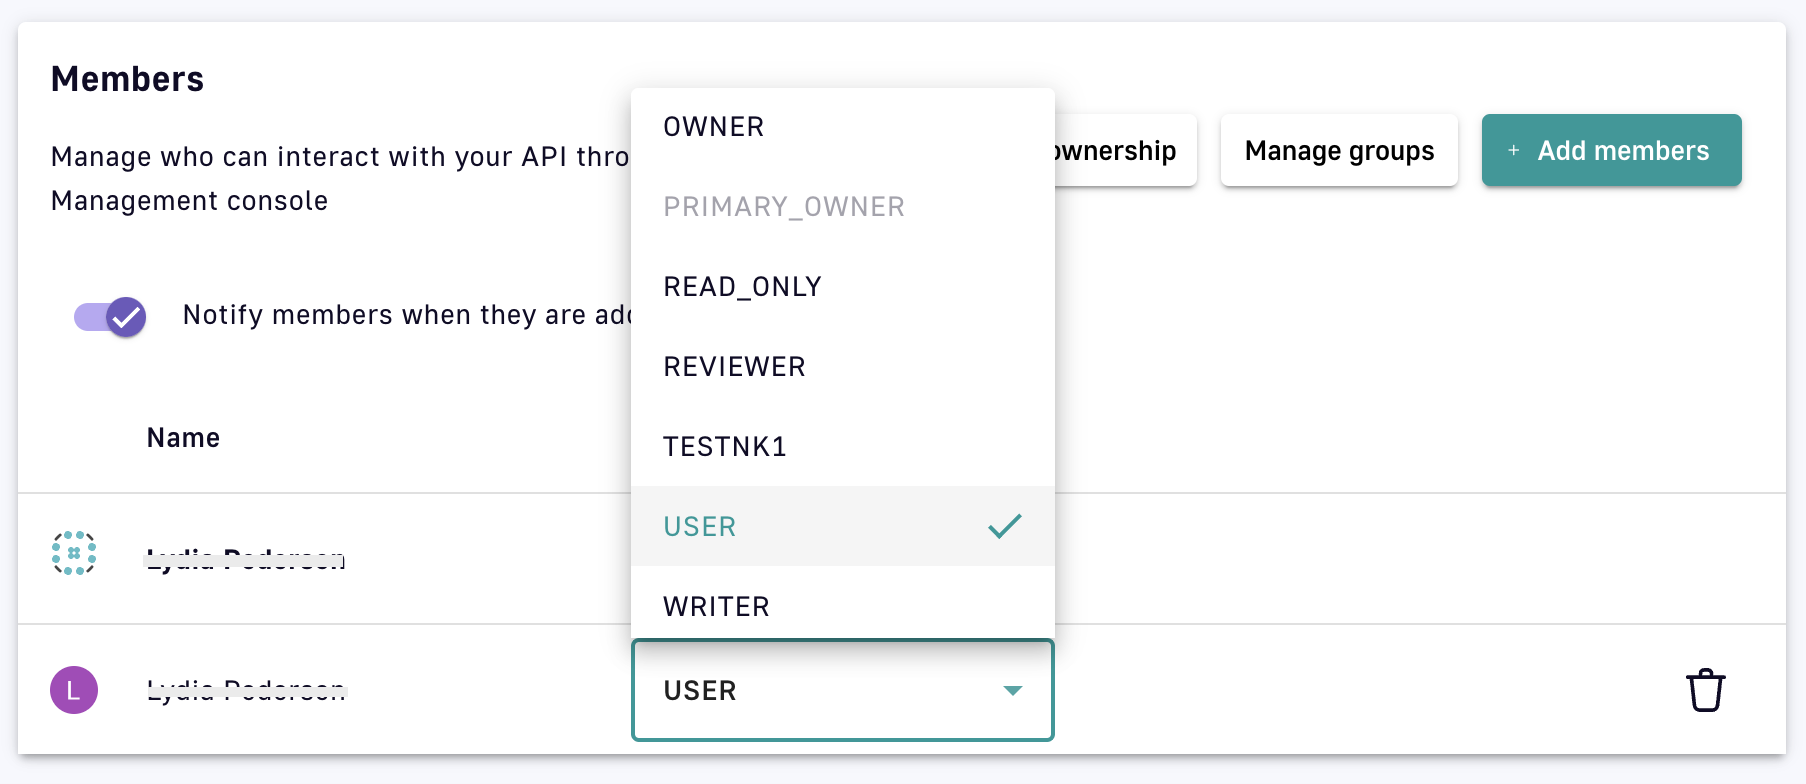
Add members and alter roles
Add groups to an API
To give groups access to your API, click Manage groups and select the desired group(s) from the drop-down menu. This will give all members of that group access to your API.
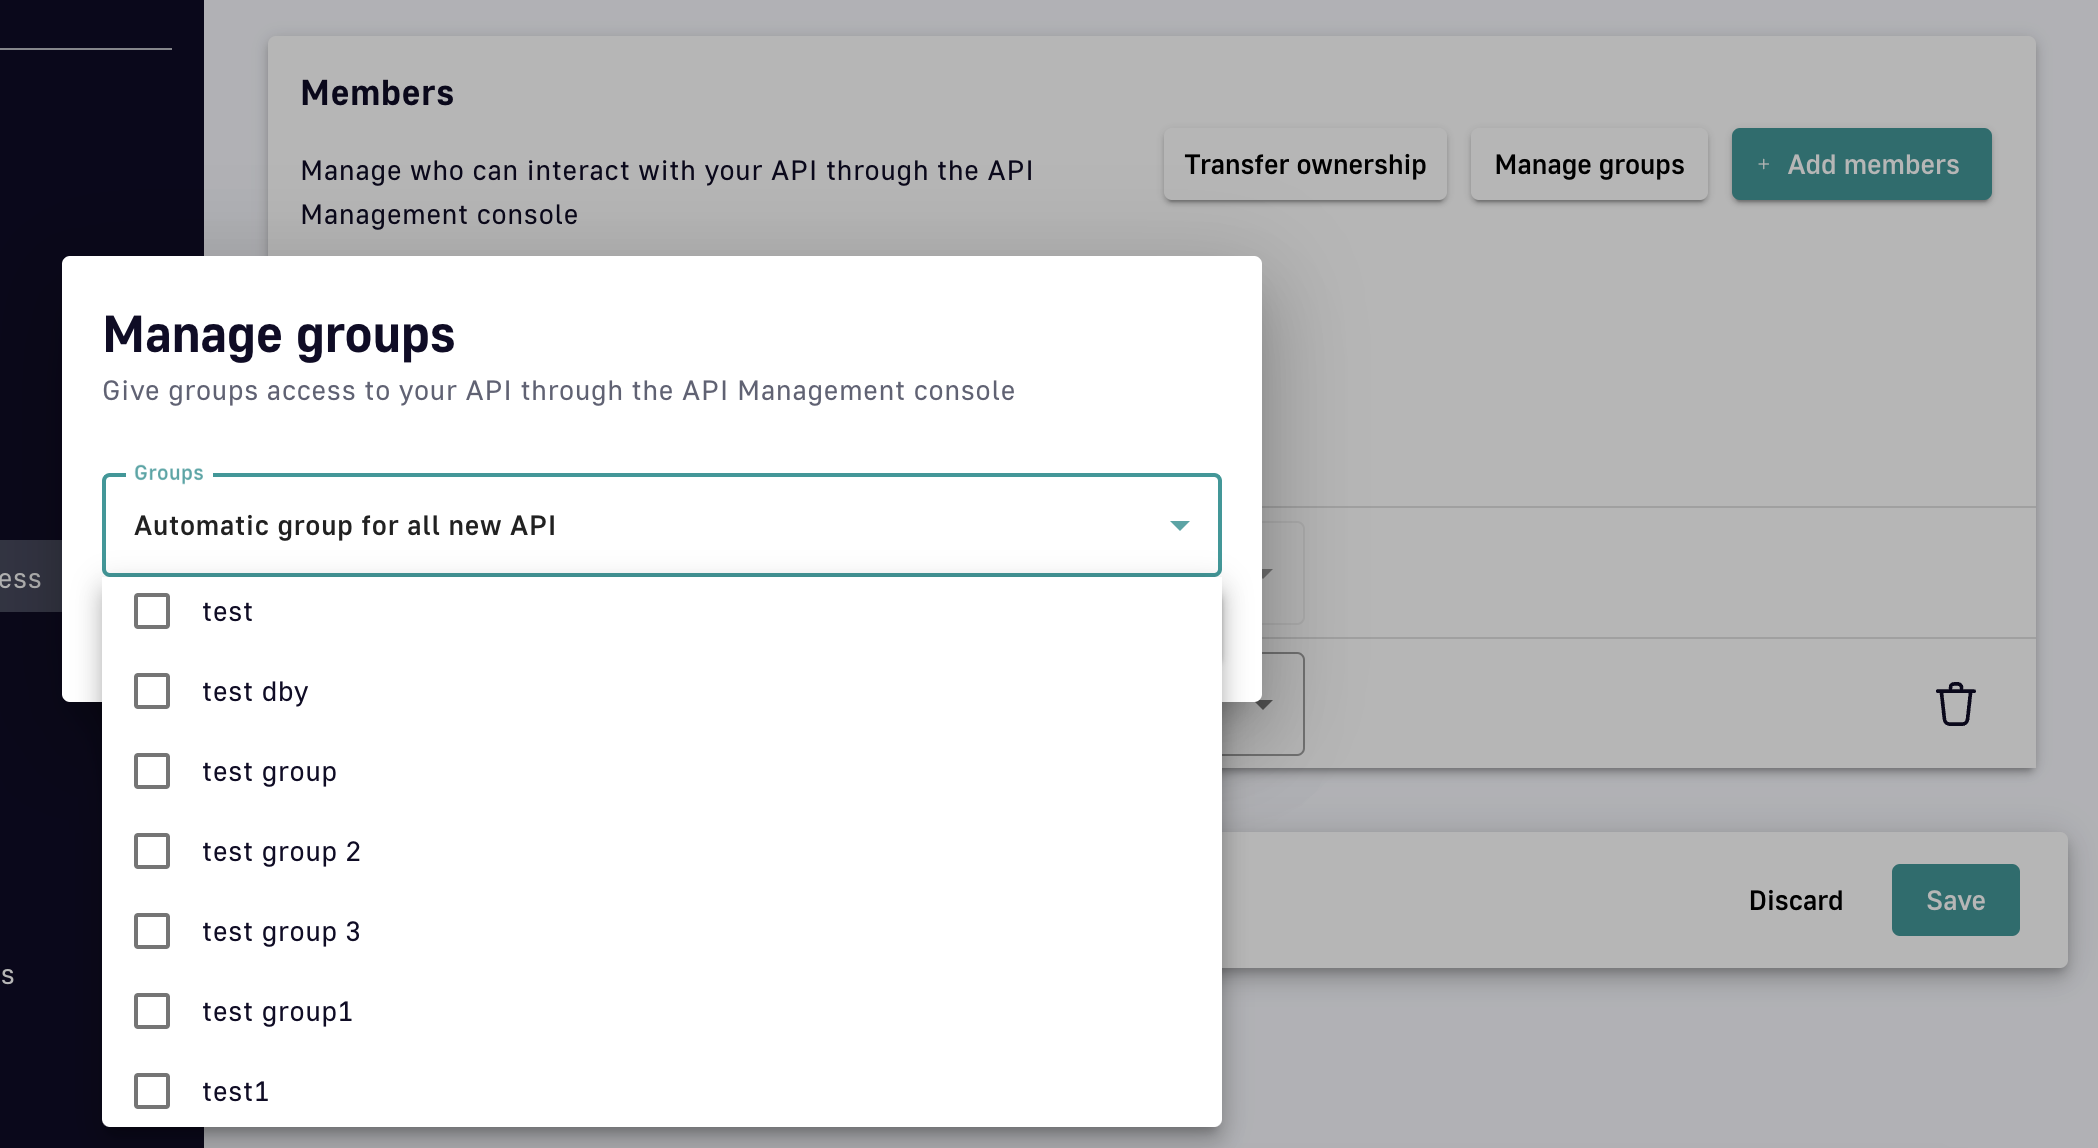
Give groups access to your API
Transfer API ownership
If you are the owner of the API, you can transfer ownership to another member, user, or group. Click Transfer ownership, then select API member, Other user, or Primary owner group. Next, define the stakeholder to which you want to transfer API ownership and assign that stakeholder a role.
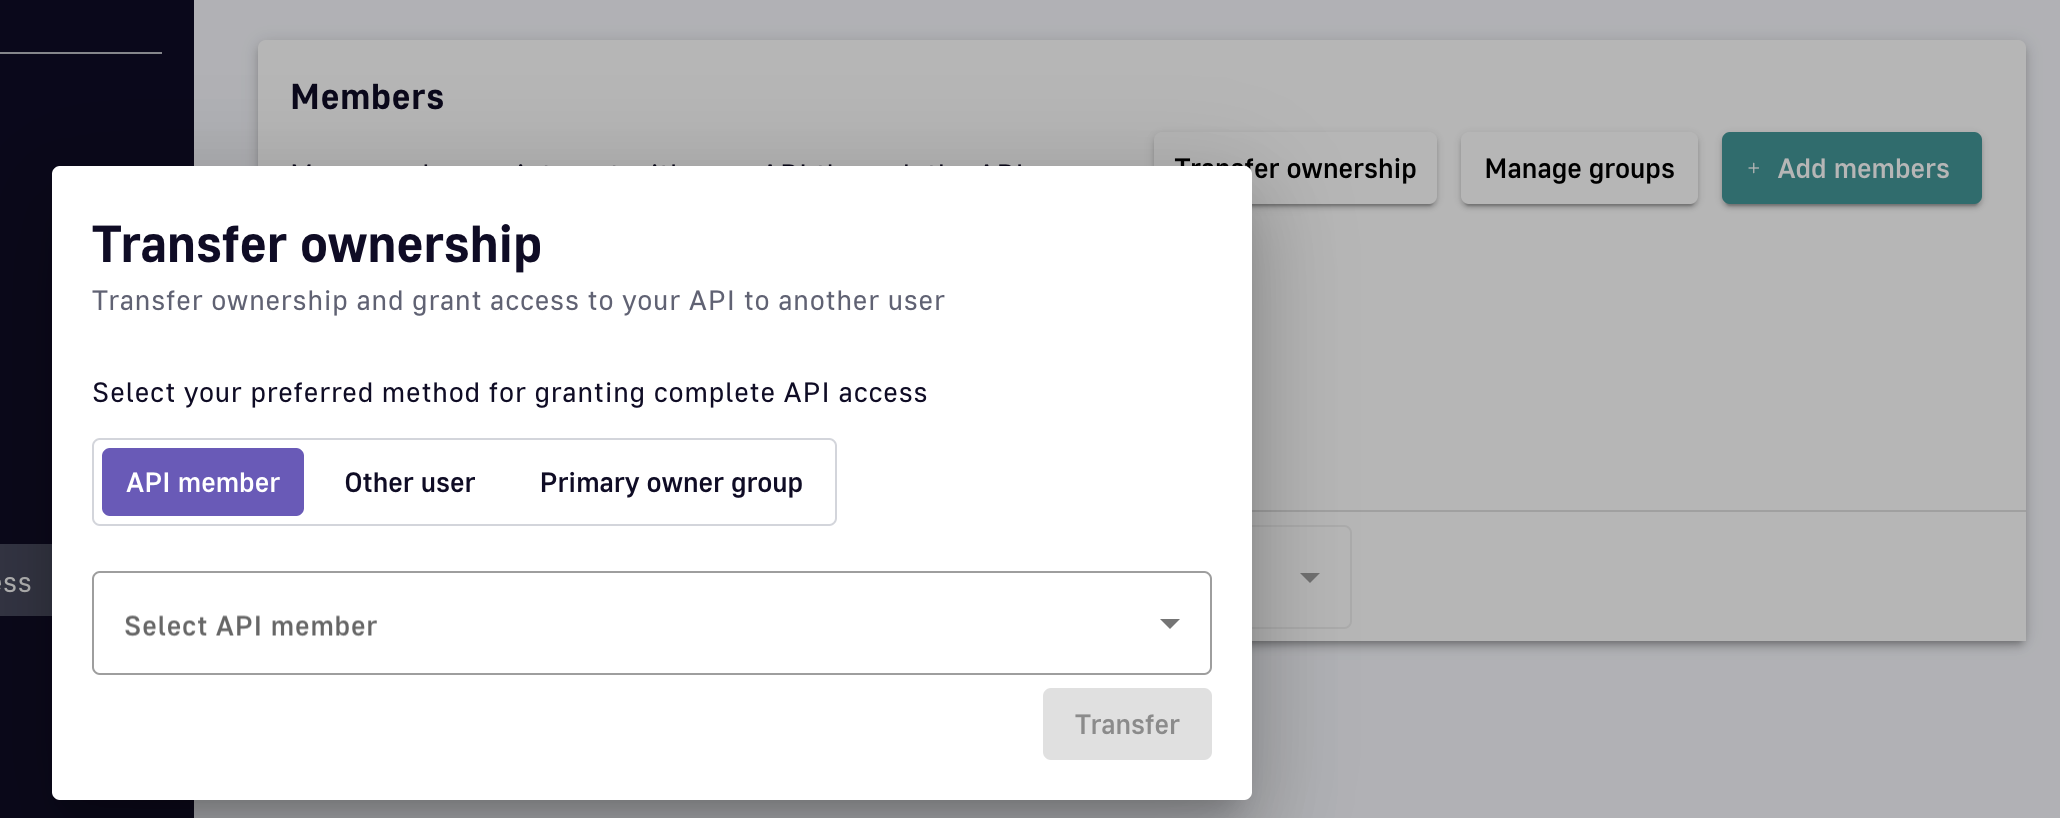
Transfer API ownership
Configuring v4 APIs
Configuring your Entrypoints
Configuring v4 Proxy API Entrypoints
To configure v4 proxy API entrypoints:
- Select APIs from the left nav
- Select your API
- Select Entrypoints from the inner left nav
Refer to the following sections for step-by-step configuration details per proxy type.
HTTP proxy APIs
Edit the entrypoint's settings under the Entrypoints tab.
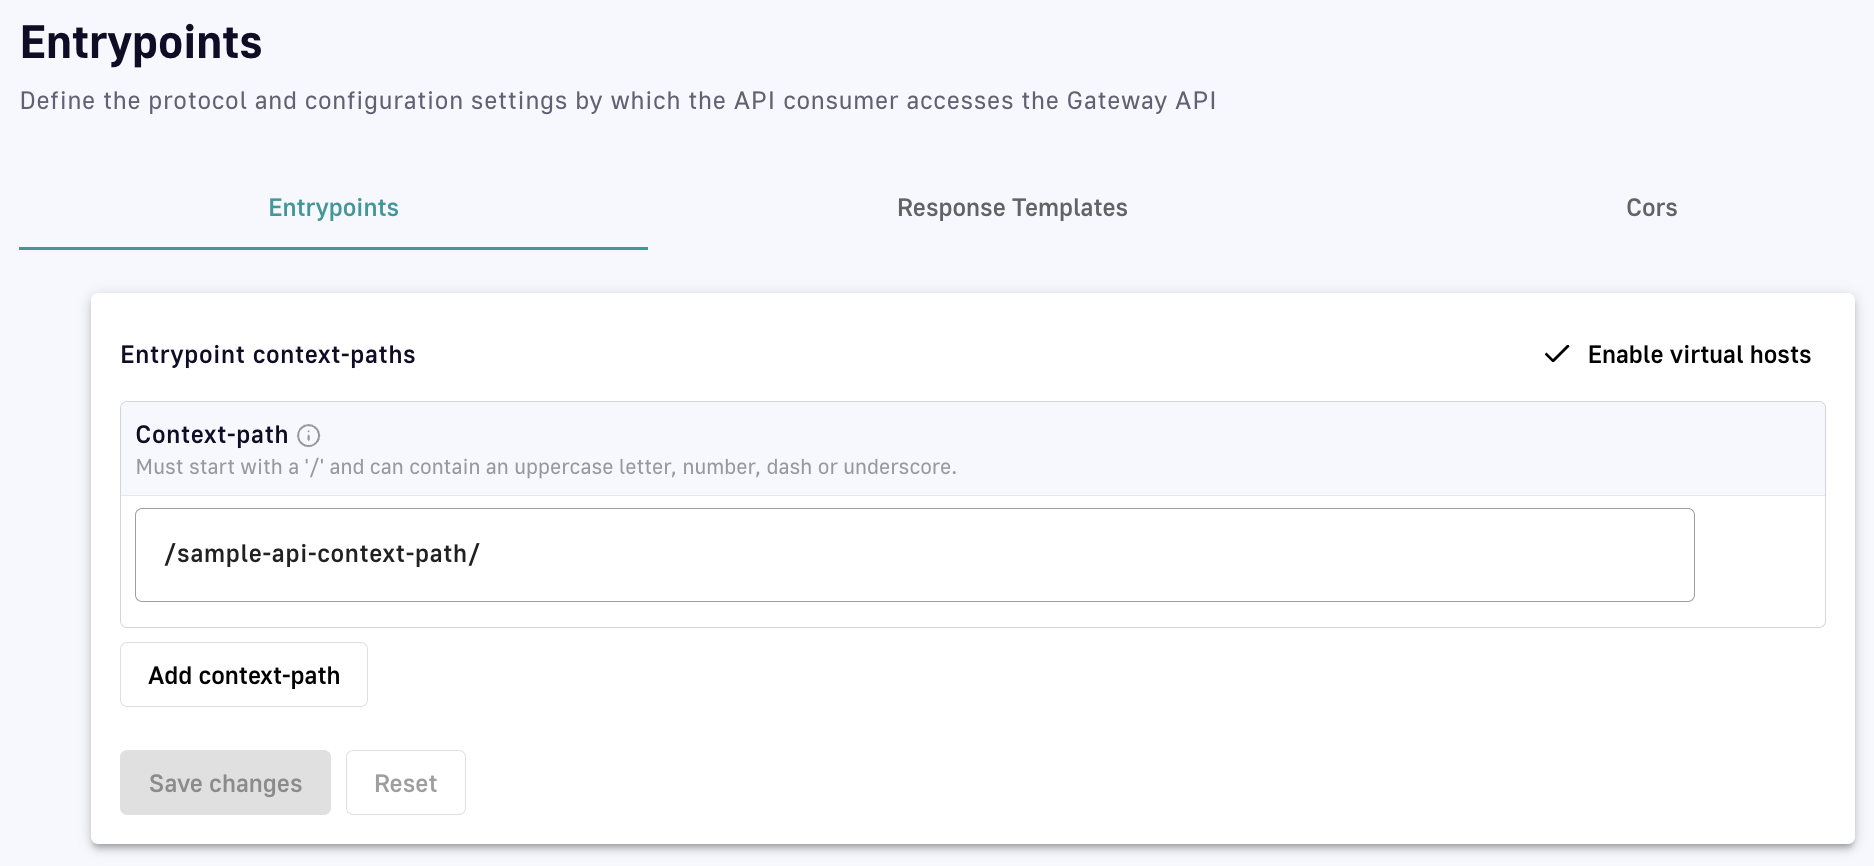
v4 HTTP proxy API entrypoint configuration
You have the option to:
- Alter existing entrypoints by changing the context path
- Add a new entrypoint by clicking Add context path and adding a new context path
- Enable or disable virtual hosts. Enabling virtual hosts requires you to define your virtual host and optionally enable override access.
Redeploy the API for your changes to take effect.
TCP proxy APIs
Edit the entrypoint's settings under the Entrypoints tab.
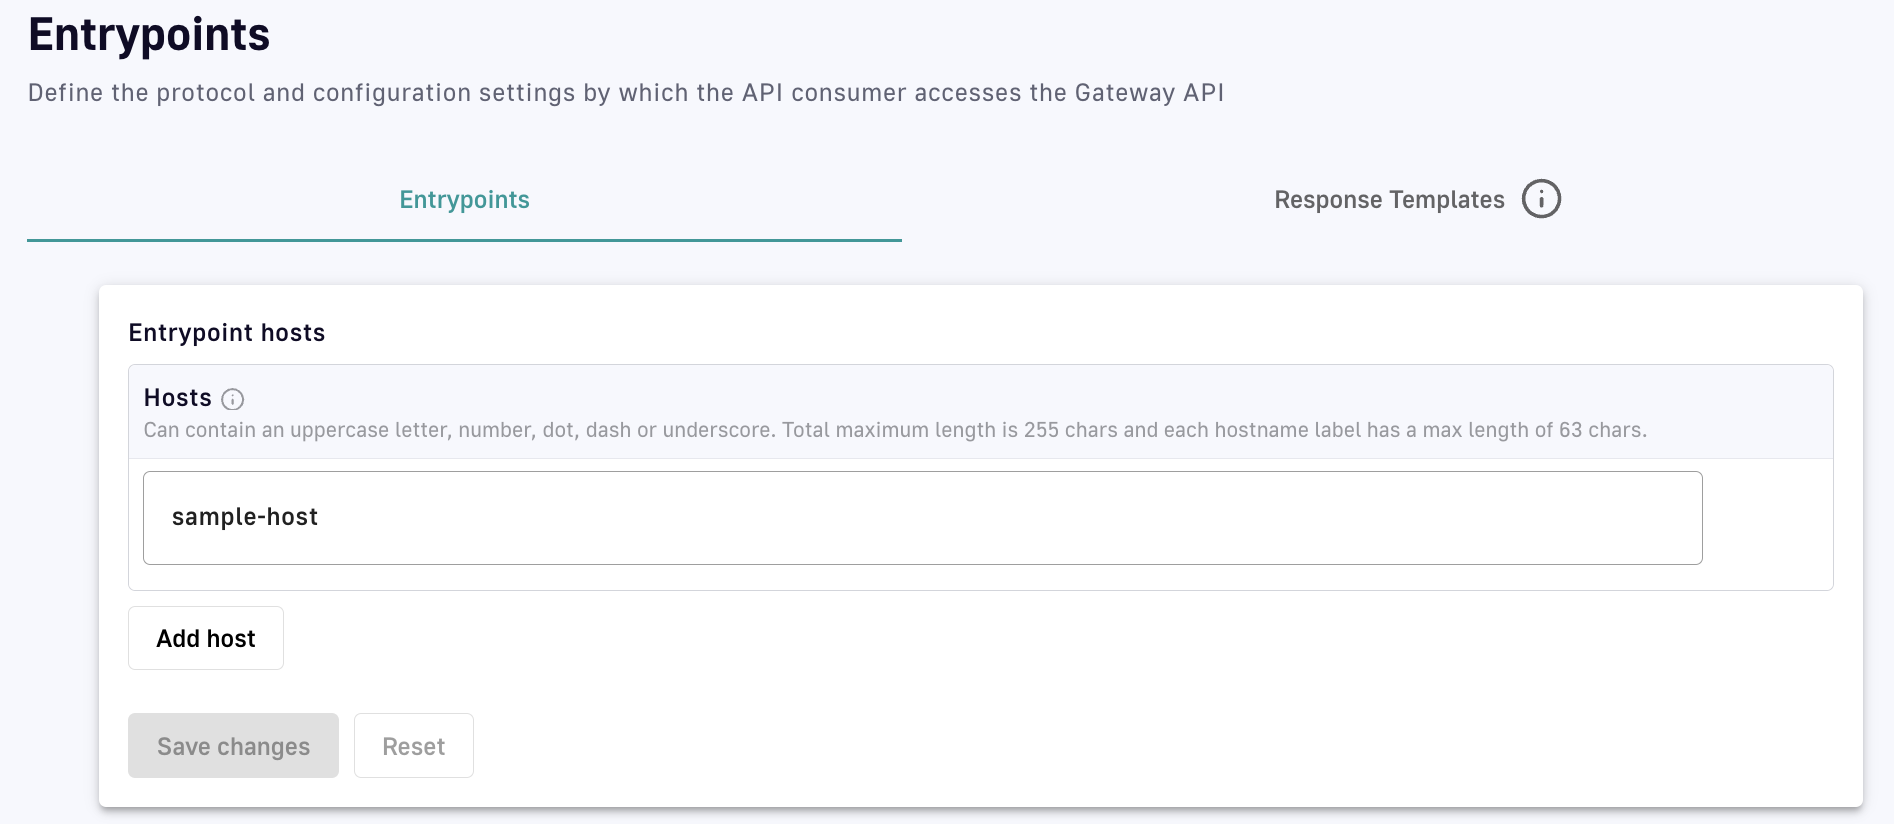
v4 TCP proxy API entrypoint configuration
You have the option to:
- Alter existing entrypoints by changing the host
- Add a new entrypoint by clicking Add host and adding a new host
Redeploy the API for your changes to take effect.
Configuring v4 Message API Entrypoints
Overview
v4 APIs support the following entrypoints:
- HTTP GET: Exposes a backend resource via the HTTP GET method
- HTTP POST: Exposes a backend resource via the HTTP POST method
- WebSocket: Exposes a backend resource via a WebSocket stream
- Webhook: Exposes a backend resource via a Webhooks subscription
- Server-sent events (SSE): Exposes a backend resource via a unidirectional SSE stream
Configuration
To access your entrypoint configuration, go to the API page in the Console, select your API, then select Entrypoints from the inner the left nav.
At the top right of the page, you can choose to enable or disable virtual hosts. Enabling virtual hosts requires you to define your virtual host and optionally enable override access.
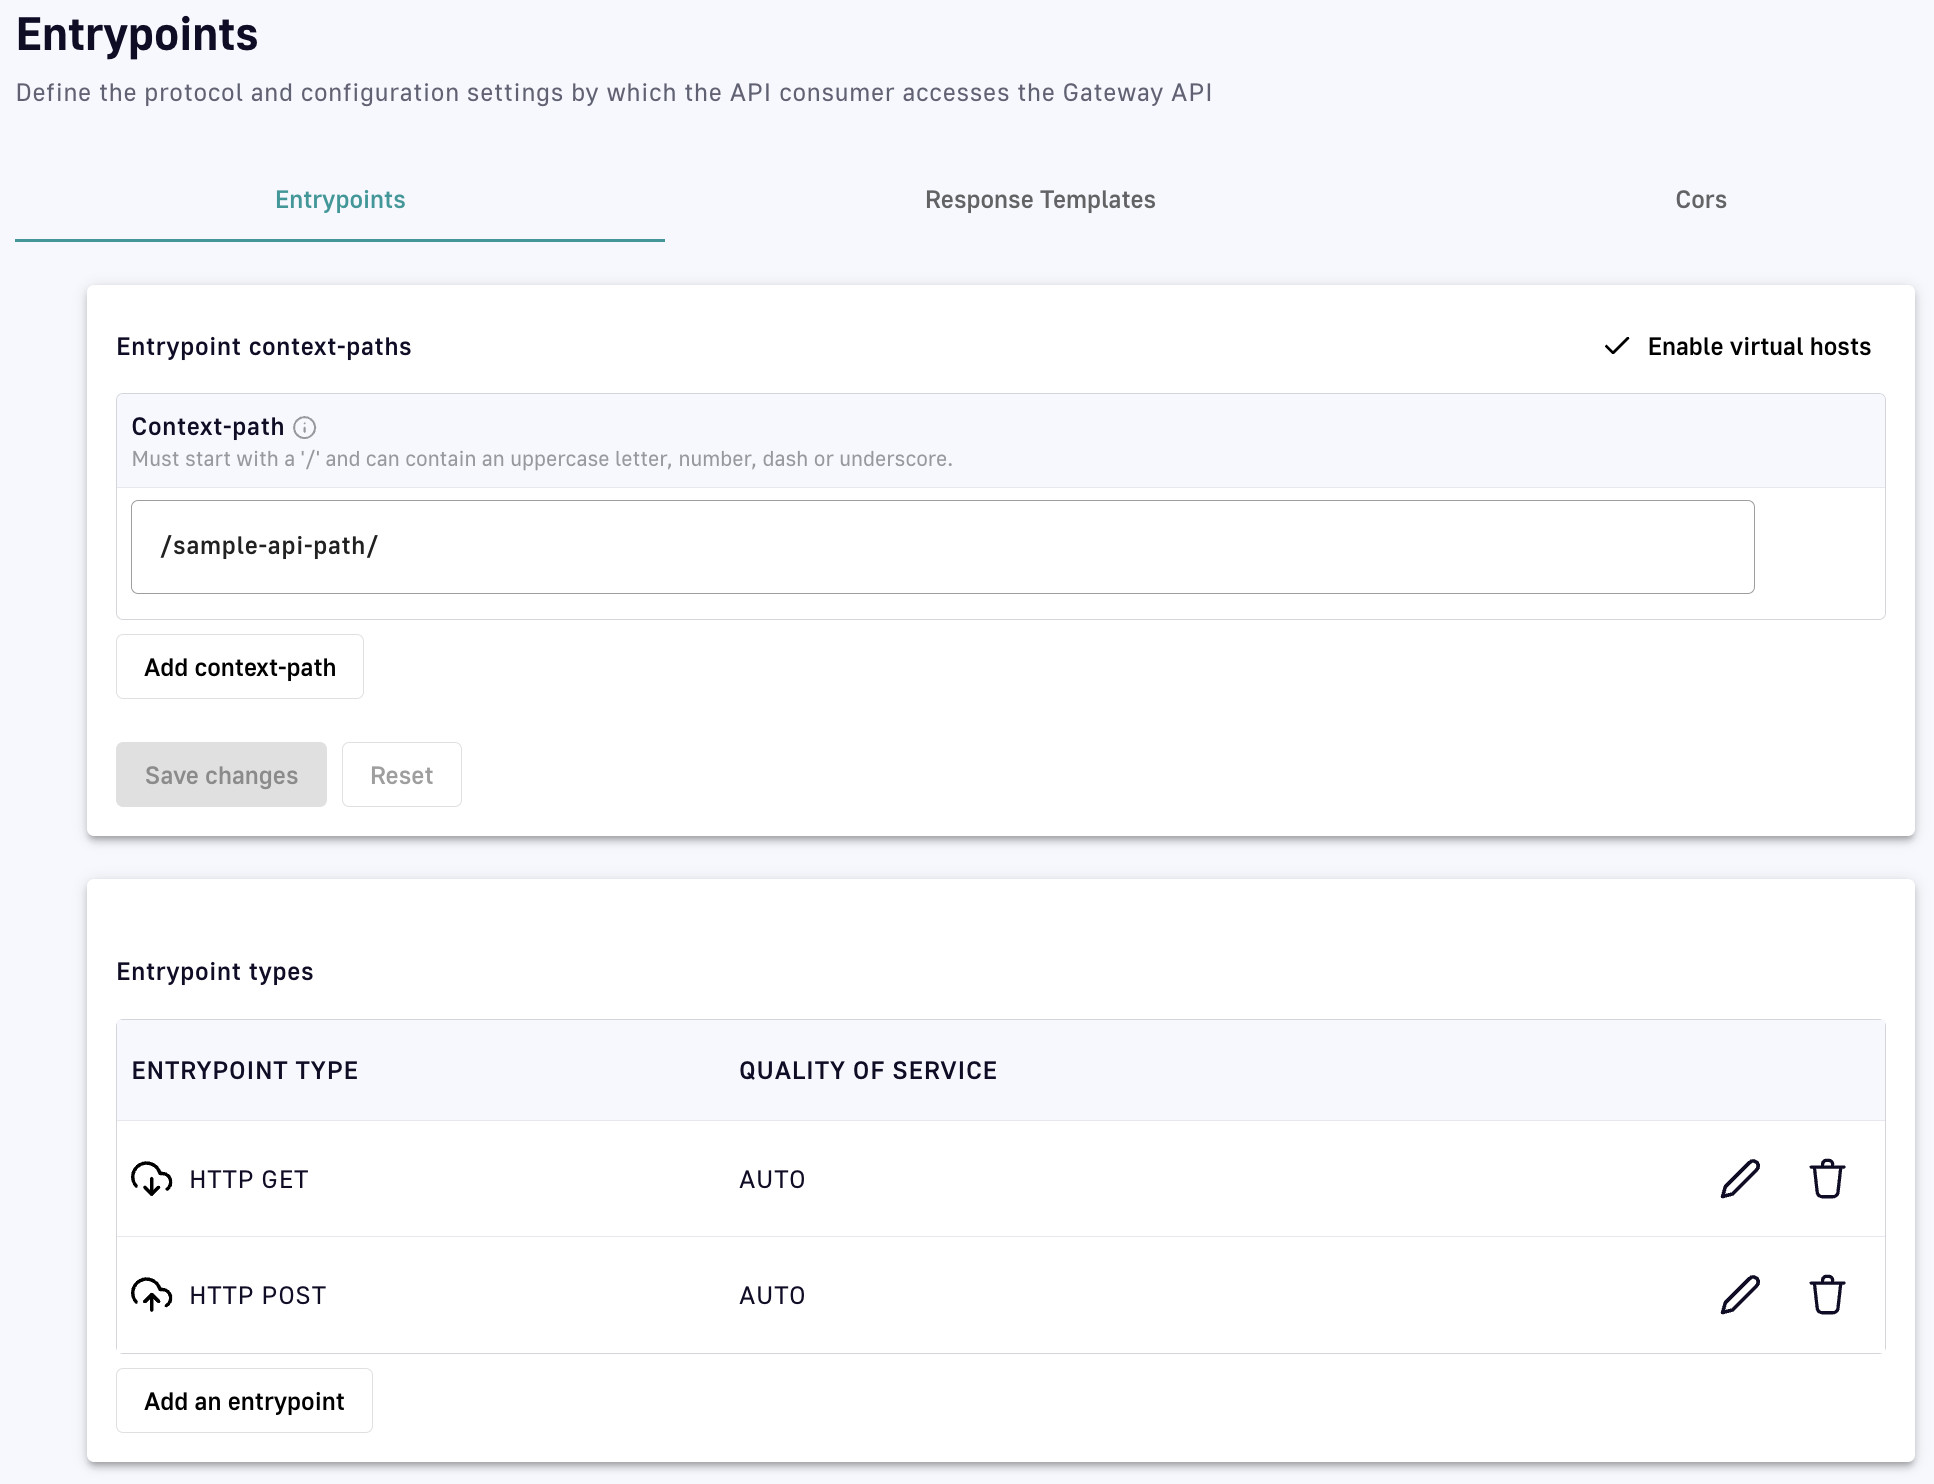
v4 message API entrypoint configuration
You can also add an entrypoint to your API by clicking Add an entrypoint. Configuration is entrypoint-specific (see the tiles above).
When you are done configuring your entrypoints, click Save changes.
HTTP GET
Configuration
If you chose HTTP GET as an entrypoint, you will be brought to a page where you can configure:
- Limit messages count: Defines the maximum number of messages to retrieve via HTTP GET. The default is 500. To set a custom limit, enter a numeric value in the Limit messages count text field.
- Limit messages duration: Defines the maximum duration, in milliseconds, to wait to retrieve the expected number of messages (see Limit messages count). To set a custom limit, enter a numeric value in the Limit messages duration text field. The actual number of retrieved messages could be less than expected if maximum duration is reached before all messages are retrieved.
- HTTP GET permissions: Allow or disallow Allow sending messages headers to client in payload and Allow sending messages metadata to client in payload by toggling these actions ON or OFF.
- Quality of service: Use the drop-down menu to choose between the available options. QoS compatibility is detailed here.
HTTP POST
Configuration
If you chose HTTP POST as an entrypoint, you will be brought to a page where you can configure:
- HTTP POST permissions: Allow or disallow add request Headers to the generated message by toggling Allow add request Headers to the generated message ON or OFF.
- Quality of service: Use the drop-down menu to choose between the available options. QoS compatibility is detailed here.
WebSocket
Configuration
If you chose WebSocket as an entrypoint, you will be brought to a page where you can configure:
- Publisher configuration: Choose to either enable or disable the publication capability by toggling Enable the publication capability ON or OFF. Disabling it assumes that the application will never publish any message.
- Subscriber configuration: Choose to enable or disable the subscription capability by toggling Enable the subscription capability ON or OFF. Disabling it assumes that the application will never receive any message.
- Quality of service: Use the drop-down menu to choose between the available options. QoS compatibility is detailed here.
Webhook
Configuration
If you chose Webhook as an entrypoint, you will be brought to a page where you can configure:
HTTP Options
- Connect timeout: The maximum time, in milliseconds, to connect to the Webhook. Either enter a numeric value or use the arrows to the right of the text field.
- Read timeout: The maximum time, in milliseconds, allotted for the Webhook to complete the request (including response). Either enter a numeric value or use the arrows to the right of the text field.
- Idle timeout: The maximum time, in milliseconds, a connection will stay in the pool without being used. Once this time has elapsed, the unused connection will be closed, freeing the associated resources. Either enter a numeric value or use the arrows to the right of the text field.
Proxy Options
Use the drop-down menu to select a proxy option: No proxy, Use proxy configured at system level, or Use proxy for client connections. If you chose Use proxy for client connections, define the following settings:
- Proxy type: Choose between HTTP, SOCKS4 and SOCKS5. A SOCKS proxy is a type of proxy server that uses the SOCKS protocol to tunnel traffic through an intermediary server.
- Proxy host: Enter your proxy host in the text field.
- Proxy port: Enter your proxy port in the text field.
- (Optional) Proxy username: Enter your proxy username in the text field.
- (Optional) Proxy password: Enter your proxy password in the text field.
Quality of service
Use the drop-down menu to choose between the available options. QoS compatibility is detailed here.
Dead Letter Queue
Toggle Dead Letter Queue ON to define an external storage where each unsuccessfully pushed message will be stored and configure a replay strategy. Use the drop-down menu to select a pre-existing and supported endpoint or endpoint group to use for the DLQ.
DLQ Configuration using the API definition
To configure DLQs and secure callbacks for your Webhook via the API definition:
1. Set up DLQ
To enable DLQ, declare another endpoint that will be used to configure the DLQ object in the Webhook entrypoint definition:
{
        "type": "webhook-advanced",
        "dlq": {
            "endpoint": "dlq-endpoint"
        },
        "configuration": {}
    }
The endpoint used for the dead letter queue:
- Must support PUBLISH mode
- Should be based on a broker that can persist messages, such as Kafka
Once configured and deployed, any message rejected with a 4xx error response by the Webhook will be automatically sent to the DLQ endpoint and the consumption of messages will continue.
2. Set up secure callbacks
Callbacks can be secured using basic authentication, JWT, and OAuth2.
To secure a callback, add an auth object to the configuration section of your API definition. The following example shows how to configure basic authentication:
{
        "configuration": {
            "entrypointId": "webhook-advanced",
            "callbackUrl": "https://example.com",
            "auth": {
                "type": "basic",
                "basic": {
                    "username": "username",
                    "password": "a-very-secured-password"
                }
            }
        }
    }
To use JWT, the auth object should look like this:
        "auth": {
                "type": "token",
                "token": {
                    "value": "eyJraWQiOiJk..."
                }
            }
To use OAuth2, the auth object should look like this:
        "auth": {
                "type": "oauth2",
                "oauth2": {
                    "endpoint": "https://auth.DSAPI.io/my-domain/oauth/token",
                    "clientId": "a-client-id",
                    "clientSecret": "a-client-secret",
                    "scopes": ["roles"]
                }
            }
Server-sent Events
Configuration
If you chose SSE as an entrypoint, you will be brought to a page where you can configure:
- Heartbeat intervals: Define the interval in which heartbeats are sent to the client by entering a numeric value into the Define the interval in which heartbeats are sent to client text field or by using the arrow keys. Intervals must be greater than or equal to 2000ms. Each heartbeat will be sent as an empty comment:
''. - Choose to allow or disallow sending message metadata to the client as SSE comments by toggling Allow sending messages metadata to client as SSE comments ON or OFF.
- Choose to allow or disallow sending message headers to the client as SSE comments by toggling Allow sending messages headers to client as SSE comments ON or OFF.
- Quality of service: Use the drop-down menu to choose between the available options. QoS compatibility is detailed here.
Response Templates
Overview
Response templates are used to override the default values sent in response to consumer calls to an API. They can be implemented for all v4 API HTTP entrypoints:
- HTTP GET
- HTTP POST
- HTTP proxy
- SSE
- Webhook
- WebSocket
As of DSAPI 4.3, response templates cannot override message-level errors or be applied to TCP proxy entrypoints.
Response template overrides are triggered by error keys, which are specific to policies. Responses can be templatized if the errors raised during the request/response phase(s) are associated with a policy whose policy keys can be overridden. Each response template defines the new values to be returned for one or more status codes when the template is triggered.
Configuration
Prerequisites
Prior to defining a response template, verify:
- Which policies have been applied to the API. This can be viewed in the API's plan.
- Which error keys can be overridden per policy associated with your API.
Below are the policy error keys that you can override by configuring response templates:
| Key | Policy |
|---|---|
API_KEY_MISSING | API key |
API_KEY_INVALID | API key |
QUOTA_TOO_MANY_REQUESTS | Rate limiting |
RATE_LIMIT_TOO_MANY_REQUESTS | Rate limiting |
REQUEST_CONTENT_LIMIT_TOO_LARGE | Request content limit |
REQUEST_CONTENT_LIMIT_LENGTH_REQUIRED | Request content limit |
REQUEST_TIMEOUT | Mock, Callout HTTP, Request validation |
REQUEST_VALIDATION_INVALID | Request validation |
RESOURCE_FILTERING_METHOD_NOT_ALLOWED | Resource filtering |
RBAC_INVALID_USER_ROLES | Role-based access control |
RESOURCE_FILTERING_FORBIDDEN | Resource filtering |
RBAC_FORBIDDEN | Role-based access control |
RBAC_NO_USER_ROLE | Role-based access control |
OAUTH2_MISSING_SERVER | OAuth2 |
OAUTH2_MISSING_HEADER | OAuth2 |
OAUTH2_MISSING_ACCESS_TOKEN | OAuth2 |
OAUTH2_INVALID_ACCESS_TOKEN | OAuth2 |
OAUTH2_INSUFFICIENT_SCOPE | OAuth2 |
OAUTH2_INVALID_SERVER_RESPONSE | OAuth2 |
OAUTH2_SERVER_UNAVAILABLE | OAuth2 |
HTTP_SIGNATURE_INVALID_SIGNATURE | HTTP Signature |
JWT_MISSING_TOKEN | JWT |
JWT_INVALID_TOKEN | JWT |
JSON_INVALID_PAYLOAD | JSON validation |
JSON_INVALID_FORMAT | JSON validation |
JSON_INVALID_RESPONSE_PAYLOAD | JSON validation |
JSON_INVALID_RESPONSE_FORMAT | JSON validation |
GATEWAY_INVALID_REQUEST | All |
GATEWAY_INVALID_RESPONSE | All |
GATEWAY_OAUTH2_ACCESS_DENIED | All |
GATEWAY_OAUTH2_SERVER_ERROR | All |
GATEWAY_OAUTH2_INVALID_CLIENT | All |
GATEWAY_MISSING_SECURITY_PROVIDER | All |
GATEWAY_PLAN_UNRESOLVABLE | All |
GATEWAY_POLICY_INTERNAL_ERROR | All |
Create a response template
When creating response templates, you can define:
- Multiple templates for one API (for multiple policies and/or multiple error keys sent by the same policy)
- Multiple template definitions for the same error key in a single template (for different content types or status codes)
To configure a response template:
-
Log in to your APIM Management Console
-
Select APIs from the left nav
-
Select your API from the list
-
Select Entrypoints from the inner left nav
-
Click on the Response Templates header
-
Click on the Add new Response Template button
-
Customize the Create a new Response Template form
Configure a new response template
- Template key: Choose the template key via the Template key drop-down.
- Accept header to match: Specify the requests header that should trigger use of the response template. The default value is
*/*. To send the template override values only for JSON or XML requests, specifyJSONorXML. - Status code: Specify the status code that to send to the API consumer via the Status code drop-down.
- Specify the override values to send to the API consumer. These can either be:
- One or more HTTP headers to include in the response
- A response template body
-
Click Create
CORS
Overview
CORS is a mechanism that allows resources on a web page to be requested from another domain. For background information on CORS, take a look at the CORS specification. This article will focus on how to configure CORS for your API.
WebSocket entrypoints do not support CORS. CORS will not be applied if an API does not contain at least one of the following entrypoints: HTTP GET, HTTP POST, HTTP Proxy, or SSE.
Configuration
To configure CORS for an API, follow the steps below.
-
Log in to your DSAPI API Management Console
-
Select APIs from the left nav
-
Select the API for which you want to configure CORS
-
Select the Edit API icon
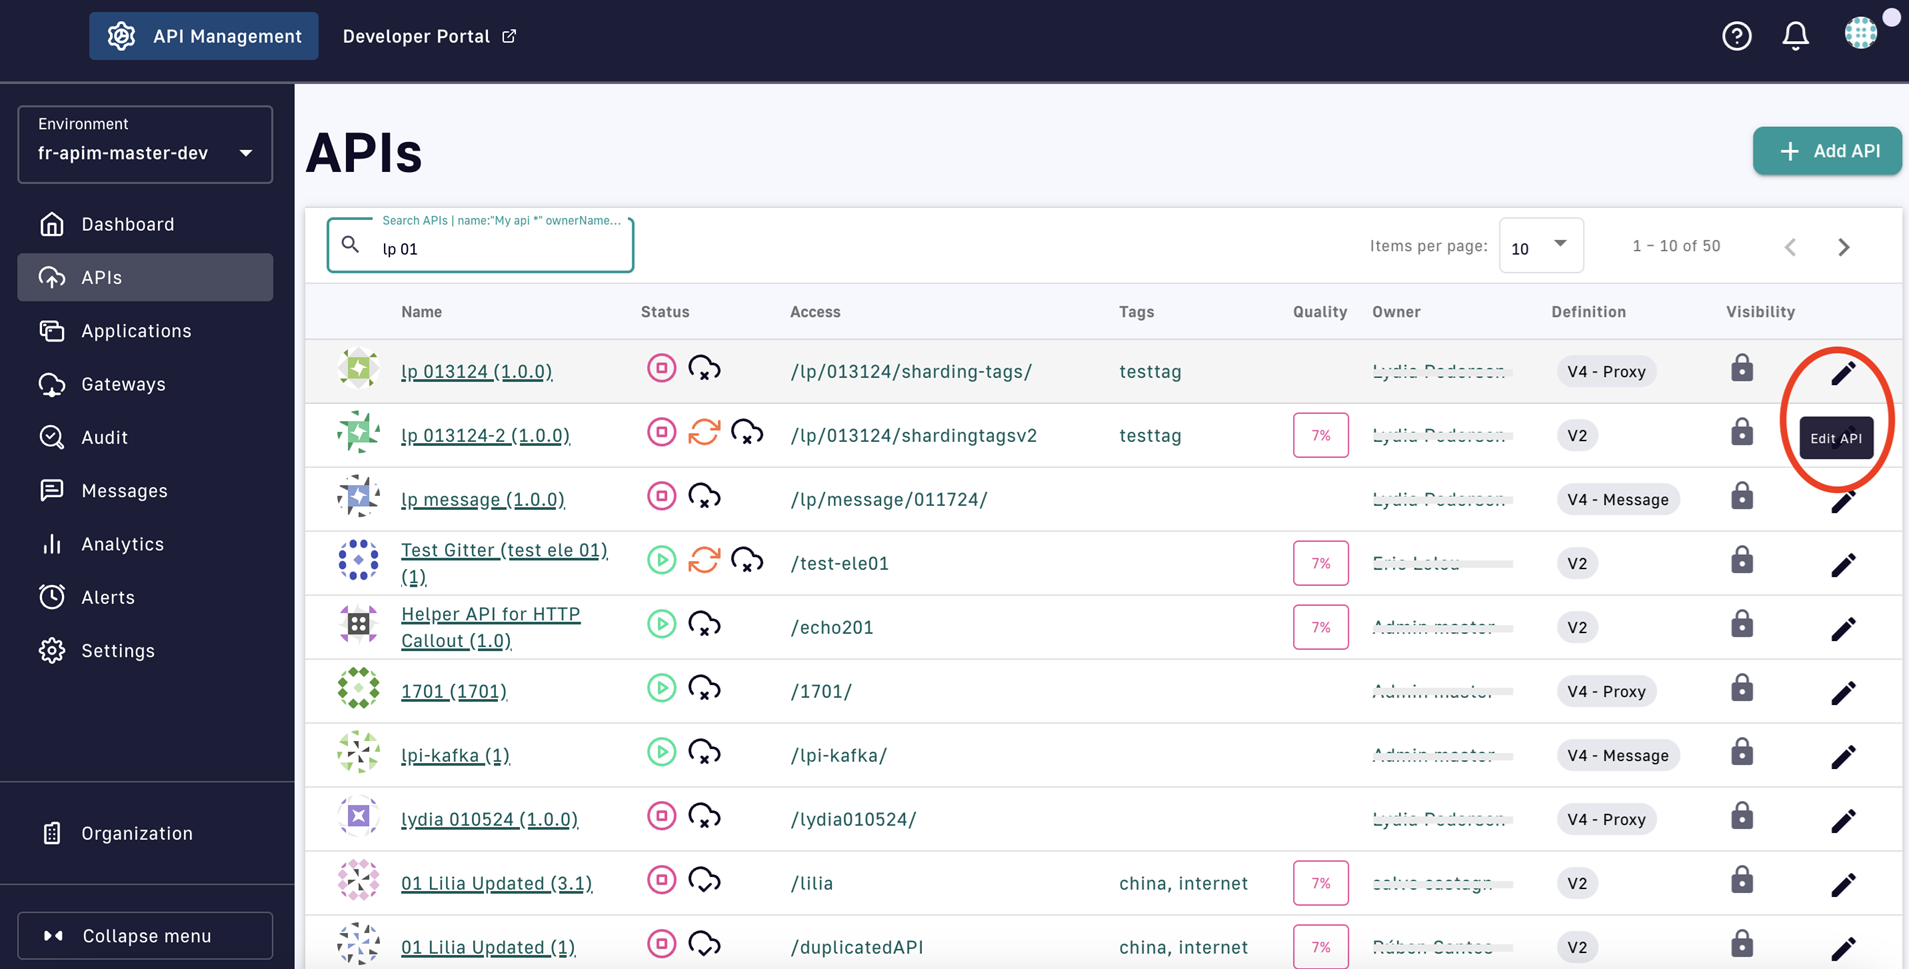
-
Select Entrypoints from the inner left nav
-
Select the Cors tab
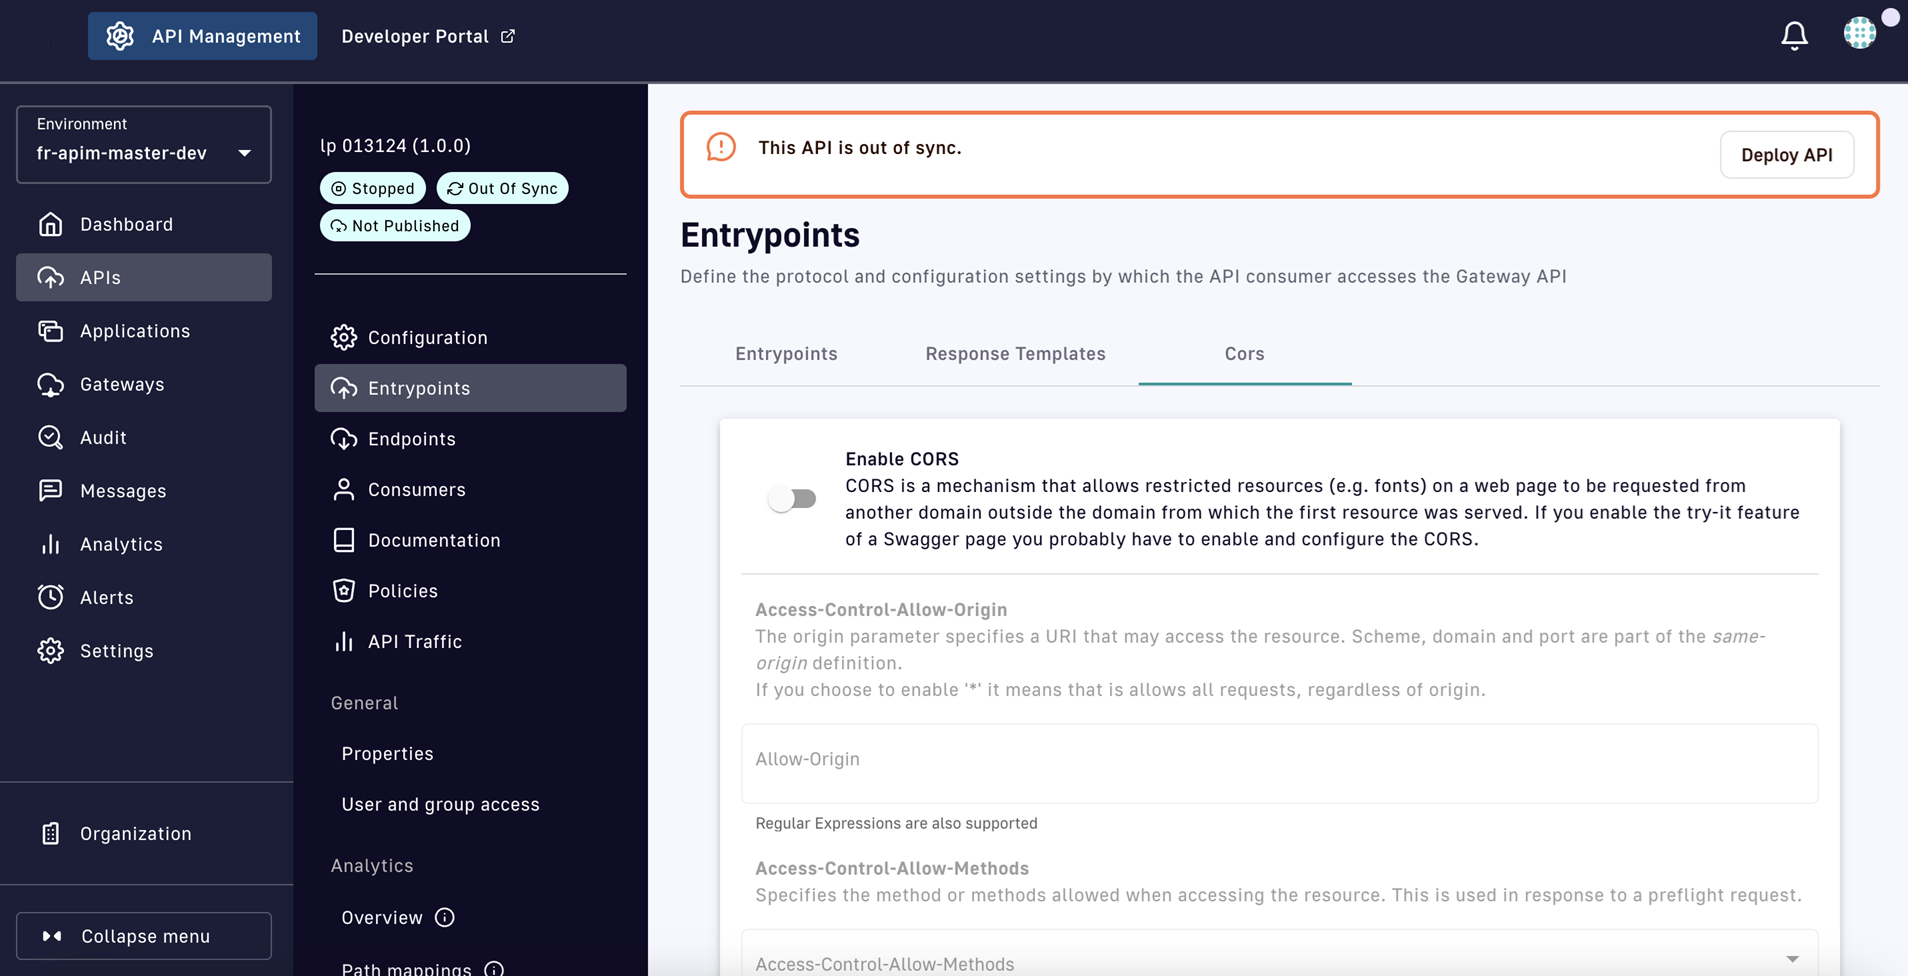
-
Set the following parameters:
- Enable CORS: Toggle to ON to enable CORS.
- Access-Control-Allow-Origin: Define a URI that can access the resource. Enter * to allow all requests, regardless of origin.
{% hint style="danger" %} A value of * is not recommended for production environments. By allowing cross-origin requests, a server may inadvertently expose sensitive information to unauthorized parties. For example, if a server includes sensitive data in a response that is accessible via CORS, an attacker could use a malicious website to extract that data. {% endhint %}
- Access-Control-Allow-Methods: Select the method(s) allowed when accessing the resource, which is used in response to a preflight request:
GET,DELETE,PATCH,POST,PUT,OPTIONS,TRACE, and/orHEAD. - Access-Control-Allow-Headers: Select the HTTP header(s) that can be used when making the actual request, in response to a preflight request. Typically, your request header will include
Access-Control-Request-Headers, which relies on the CORS configuration to allow its values. - Access-Control-Allow-Credentials: Toggle ON or OFF to indicate whether the response to the request can be exposed when the credentials flag is true.
- Max Age: Specify how long (in seconds) the results of a preflight request can be cached. This is optional, and a value of
-1indicates it is disabled. - Access-Control-Expose-Headers: Define a list of headers that browsers are allowed to access.
- Run policies for preflight requests: Toggle ON for the API Gateway to execute policies for preflight-requests. By default, this is not enabled.
-
Click Save
Configuring your Endpoints
Introduction
In DSAPI, Gateway endpoints define the protocol and configuration settings by which the Gateway API will fetch data from, or post data to, the backend API. After you've created your Gateway API and selected your endpoint(s), you can configure them in the API Management Console. The following sections:
- Link to endpoint configuration and implementation
- Describe endpoint management
- Describe endpoint default behavior
Configuration and implementation
Endpoint management
Single endpoints
After you've configured your endpoints, you can modify or delete existing endpoints, or add new ones:

Edit single endpoints
- Modify: To alter an existing endpoint, select the
 icon, and then edit your endpoint configuration.
 - Delete: To delete an existing endpoint, select the
 icon underneath ACTIONS in the Endpoints menu.
 - Add: To add a new endpoint, click Add endpoint. Configure the endpoint per the instructions in the API creation documentation.
When you are done, make sure to redeploy the API for your changes to take effect.
Endpoint groups
After you've configured your endpoints, you can modify or delete existing endpoint groups, or add new ones:
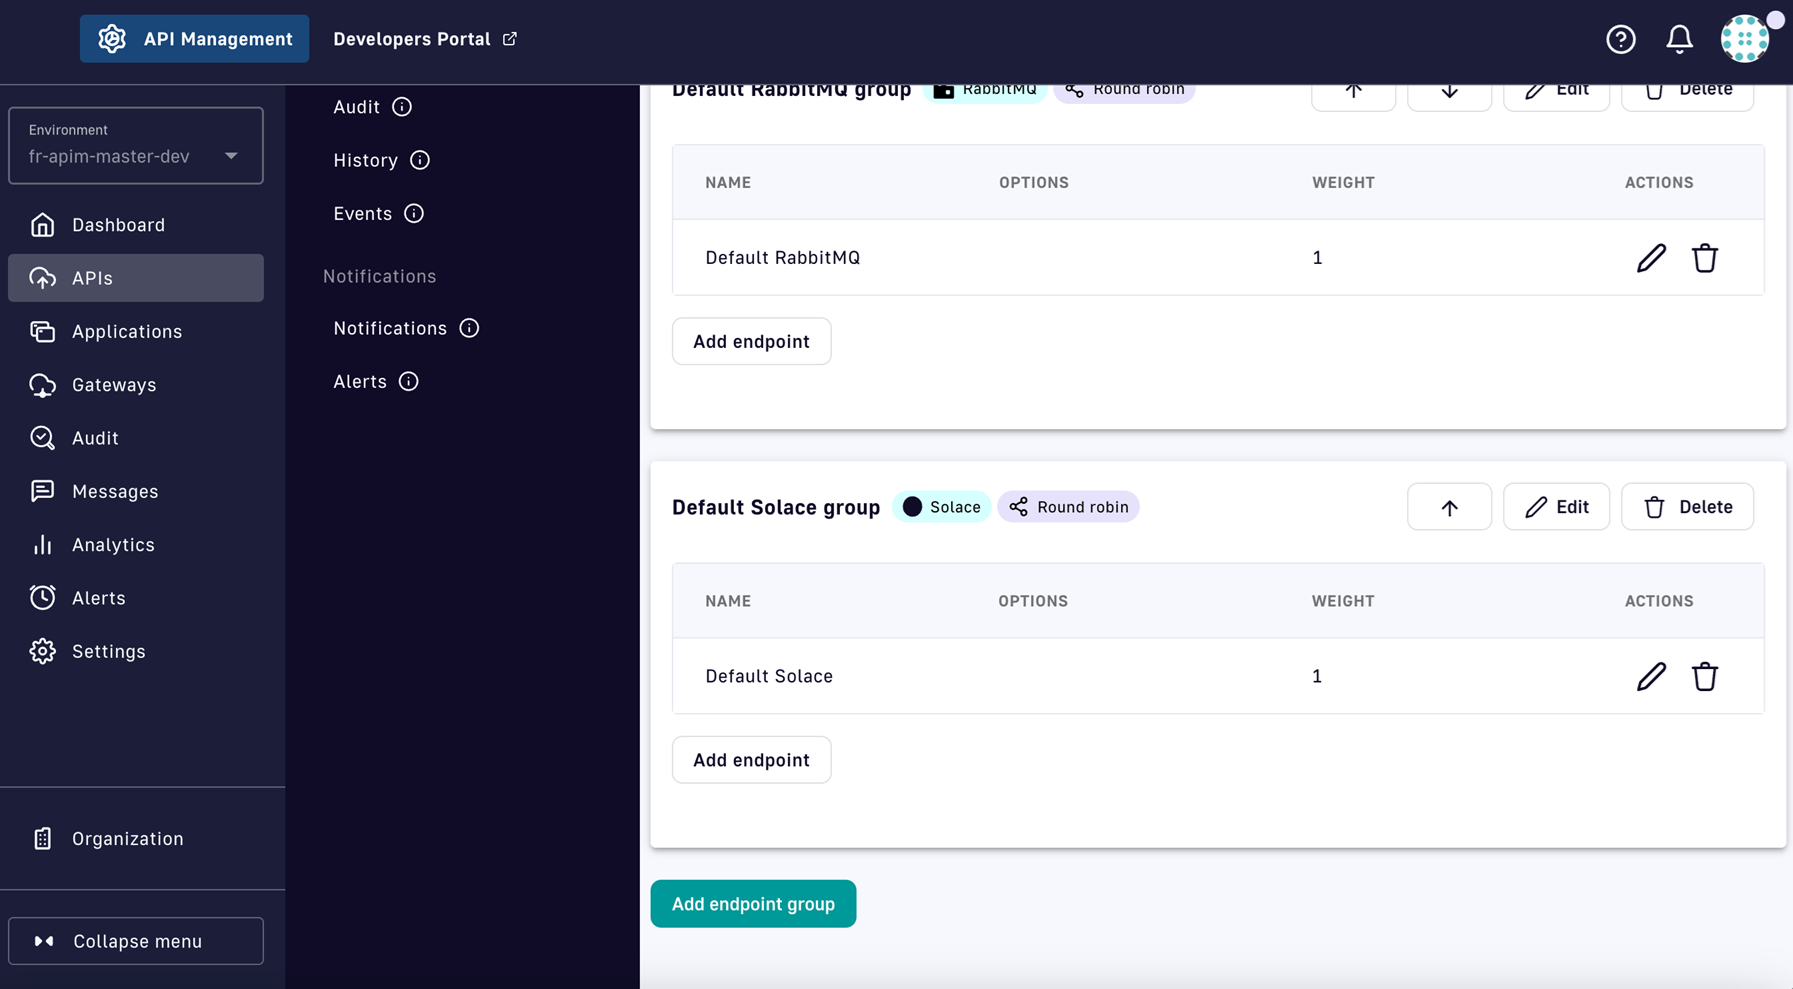
Edit endpoint groups
- Modify: To modify an endpoint group, click Edit to the right of the group name.
- Delete: To delete an endpoint group, click Delete to the right of the group name. You will be prompted to confirm deletion of the endpoint group. If only one endpoint group exists, you will not have the option to delete it.
- Add: To add a new endpoint group, click Add endpoint group at the bottom of the page and configure the group's default values. Only one type of endpoint group can be created at a time. By default, the new endpoint group will contain an endpoint that automatically inherits the group's default configuration.
When you are done, make sure to redeploy the API for your changes to take effect.
Default behavior
Single endpoint
Within an endpoint group, clicking Add Endpoint toggles Inherit configuration from the endpoint group to ON by default:
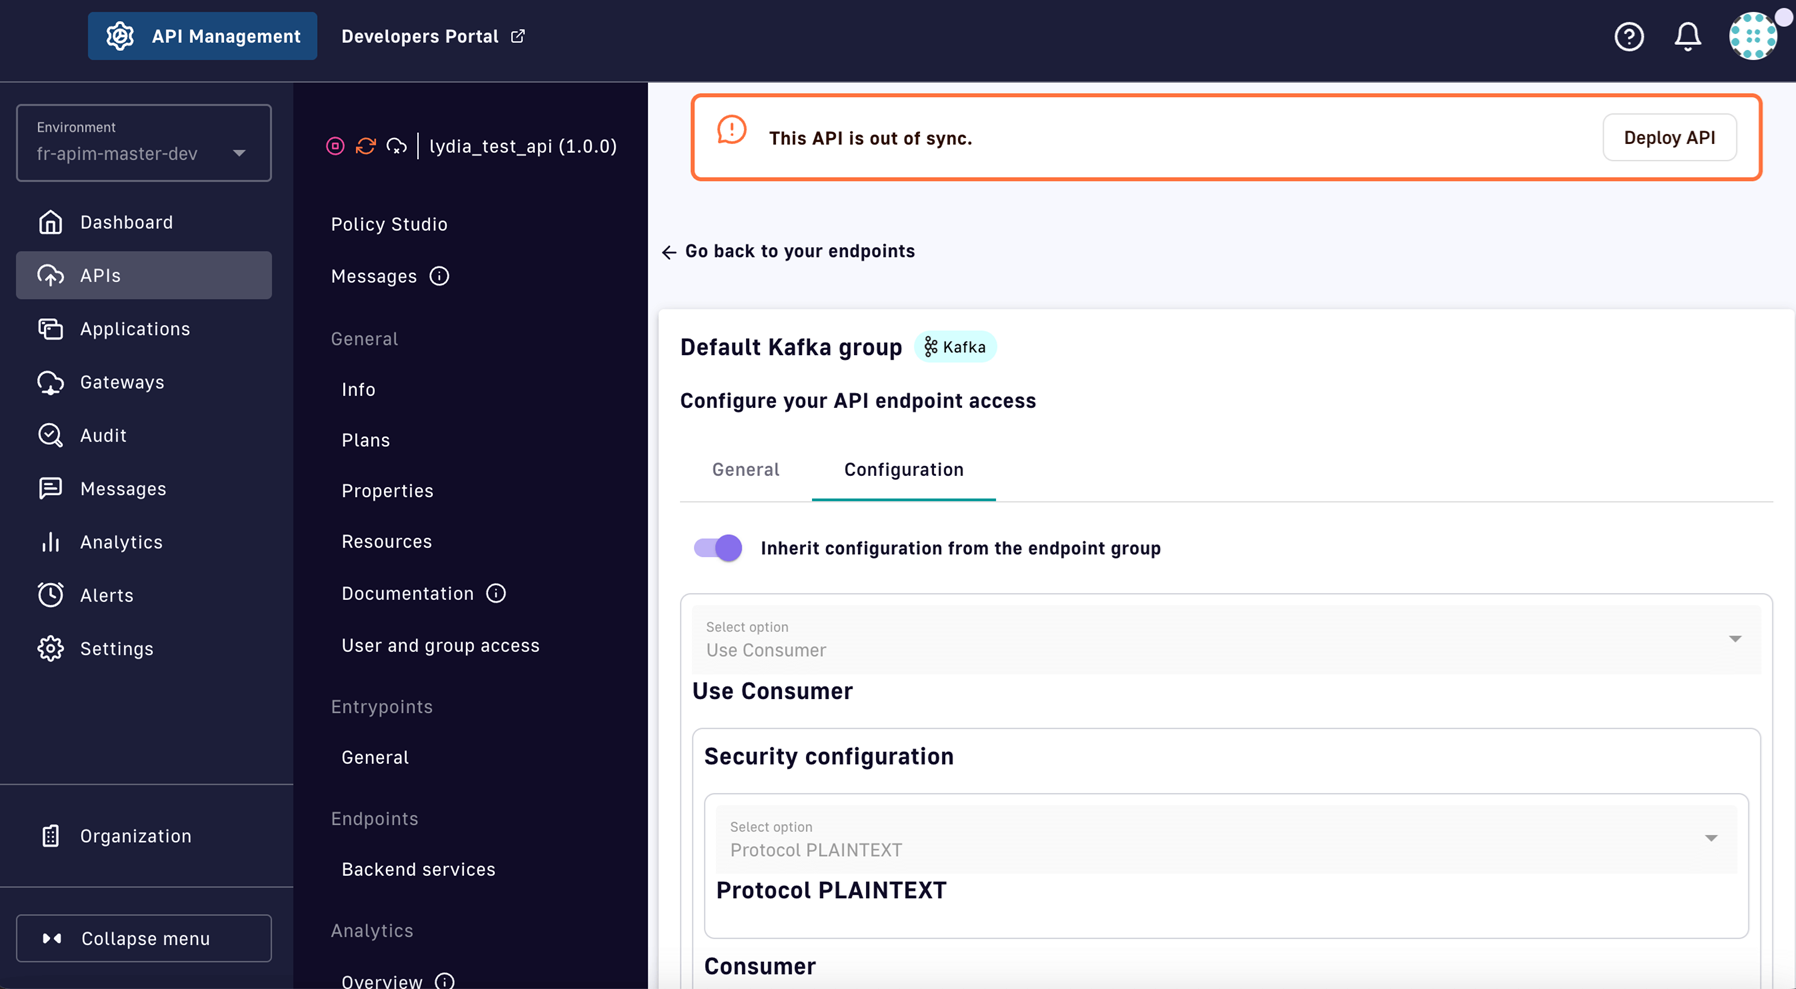
Toggle to inherit endpoint configuration
If an endpoint is added to the endpoint group, it will inherit the group's configuration by default. This allows an API publisher to quickly add new endpoints with the same settings and behavior as other endpoints in the group.
If Inherit configuration from the endpoint group is toggled OFF, changes can be made to the new endpoint's configuration. When these changes are saved, the configuration is updated.
If Inherit configuration from the endpoint group remains OFF, the updated values will persist. Subsequent updates to the group’s default configuration will not override this endpoint's configuration once it has been modified to no longer inherit from the group.
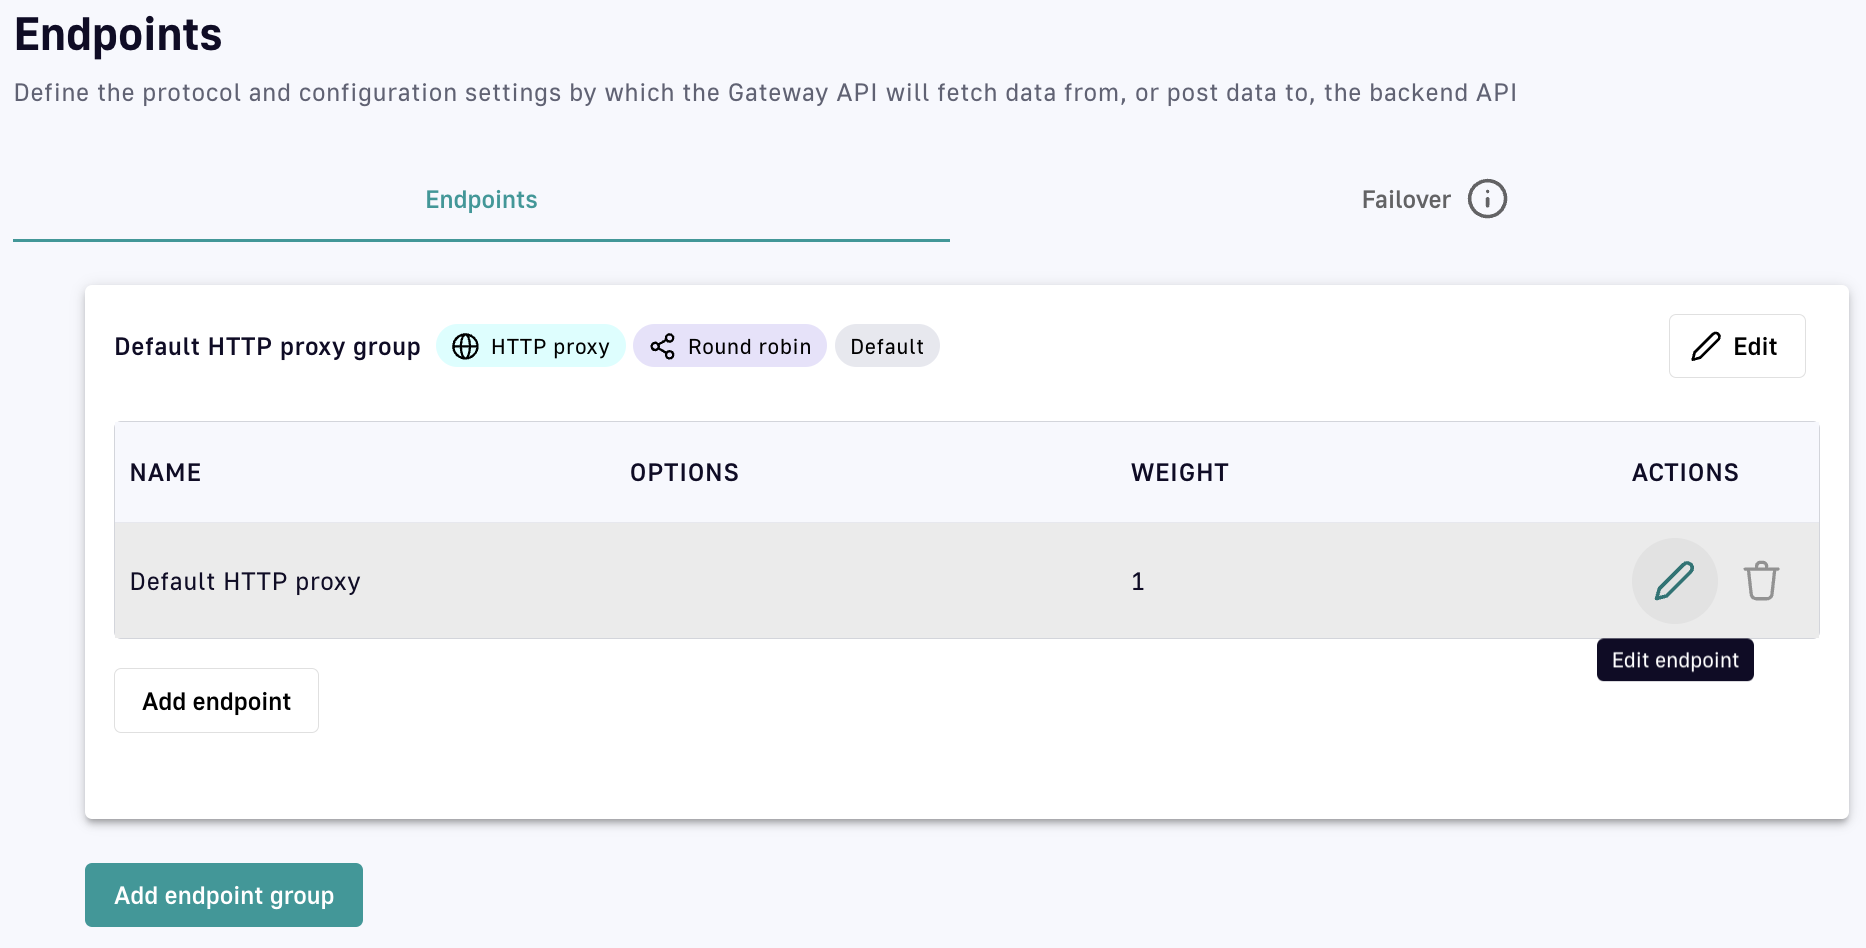
Endpoint group
- During the API creation workflow, the endpoint configuration determines the endpoint group’s default configuration. The endpoint then inherits this configuration from the group by default.
- If the configuration of an endpoint group is updated, all the endpoints with
Inherit configuration from the endpoint groupenabled will be similarly updated and remain static. - By default, the API will use the first endpoint group listed. This is indicated by the Default badge next to the group name. You can click the up/down arrow keys to reorder the endpoint groups and assign a different default:
.png)
Default endpoint group
v4 Proxy API Endpoints
Configuration
To configure v4 proxy API endpoints:
- Select APIs from the left nav
- Select your API
- Select Endpoints from the inner left nav
- Click the pencil icon of the endpoint you want to edit:
Configure the Default HTTP proxy endpoint in the Default HTTP proxy group
You can also create additional endpoints in the existing group or in new endpoint groups. Refer to the following sections for step-by-step configuration details per proxy type.
HTTP proxy APIs
Edit the endpoint's settings under the General and Configuration tabs.
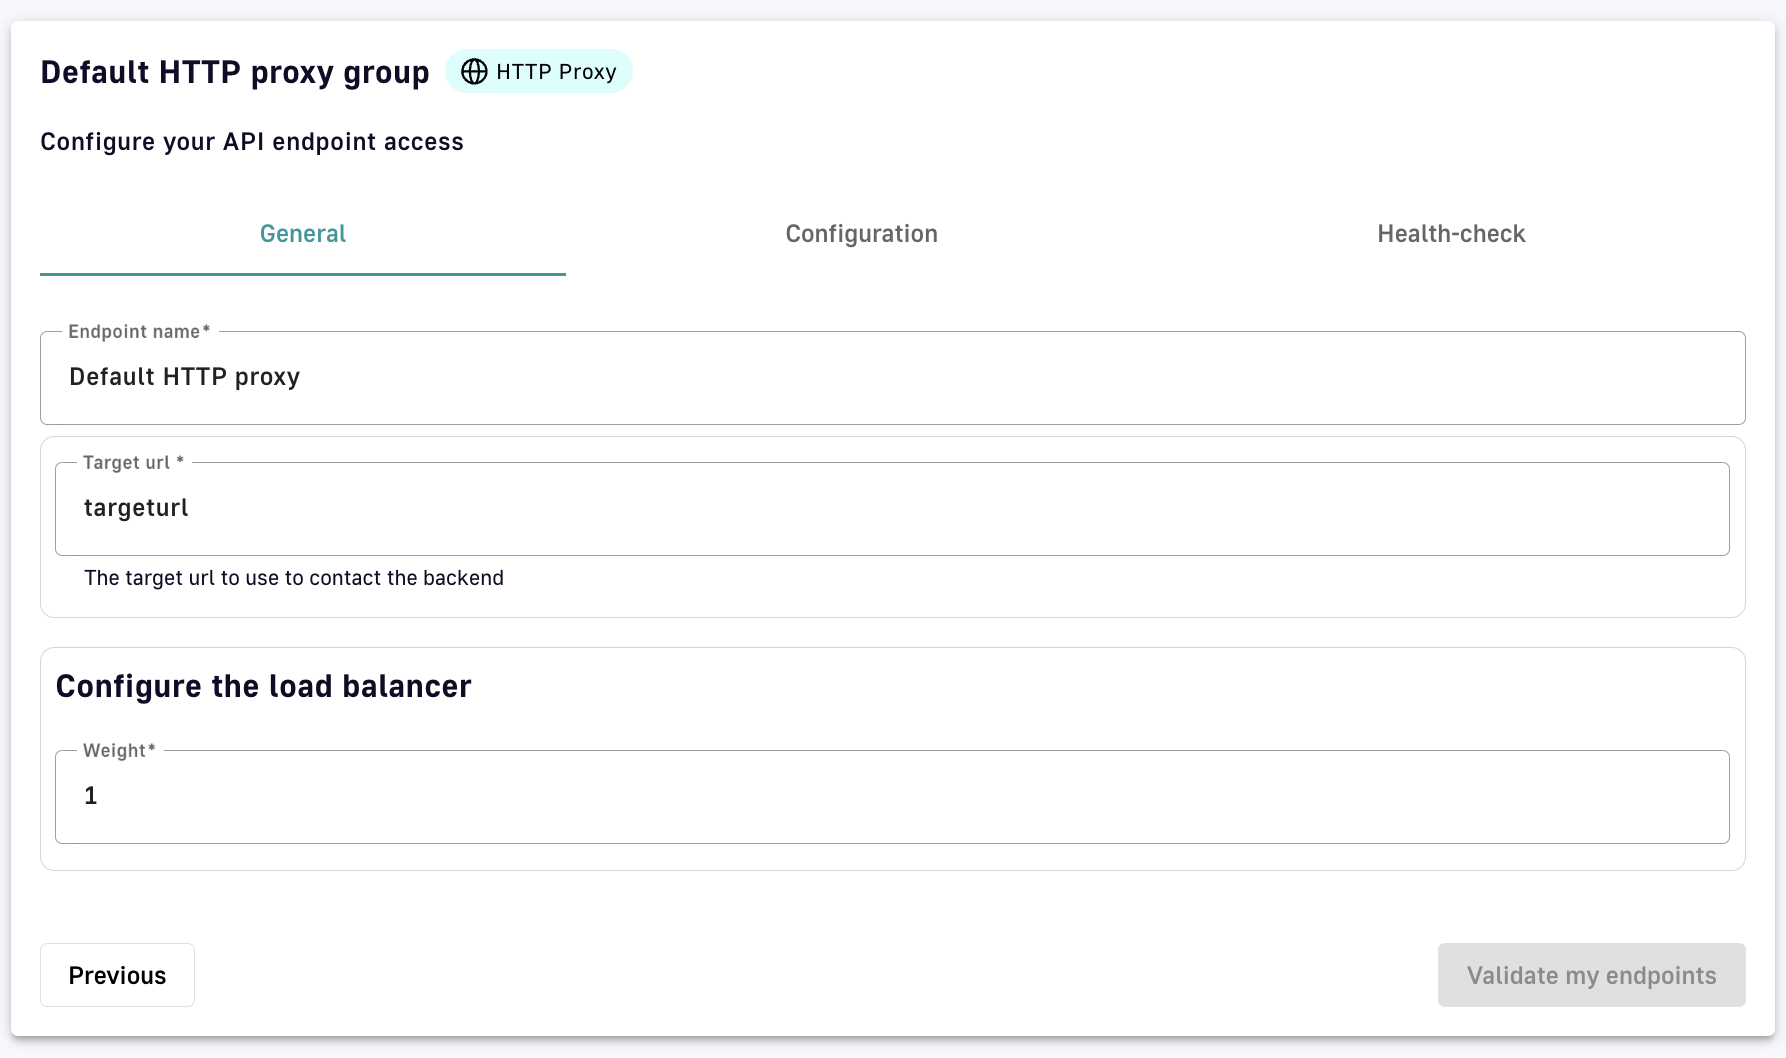
Define the endpoint's General and Configuration settings
General
1. Define your endpoint name
Enter your endpoint name in the Endpoint name text field.
2. Define your target URL
Enter your target URL in the Target URL text field.
3. Configure the load balancer
Use the arrow keys to select a value for the weight.
Configuration
1. Inherit configuration from the endpoint group
Toggle to ON for the endpoint to inherit its configuration settings from the endpoint group to which it belongs.
2. Security configuration
- Select the HTTP protocol version to use. HTTP/1.1 and HTTP/2 are supported.
- Choose to either enable or disable keep-alive by toggling Enable keep-alive ON or OFF.
- If enabled, you'll need to define a numeric timeout value in the Connect timeout text field by either entering a numerical value or using the arrow keys.
- Choose to either enable or disable HTTP pipelining by toggling Enable HTTP pipelining ON or OFF.
- If enabled, you'll need to define a numeric timeout value in the Read timeout text field by either entering a numerical value or using the arrow keys.
- Choose to either enable or disable compression by toggling Enable compression (gzip, deflate) ON or OFF.
- Idle timeout: Define, in milliseconds, the maximum time a connection will stay in the pool without being used by entering a numeric value or using the arrow keys in the text field. Once the specified time has elapsed, the unused connection will be closed, freeing the associated resources.
- Choose whether to follow HTTP redirects by toggling Follow HTTP redirects ON or OFF.
- Define the number of max concurrent connections by entering a numeric value or using the arrow keys in the text field.
- Enter the KEY and VALUE of HTTP headers that should be added or overridden by the Gateway before proxying the request to the backend API.
3. Proxy options
Select from the following options.
- No proxy
- Use proxy configured at system level
- Use proxy for client connections: Enter the proxy type (SOCKS4 or SOCKS5), the proxy host and port to connect to, and the proxy username and password (both optional).
4. SSL options
- Verify Host: Toggle to enable host name verification
- Trust all: Toggle ON for the Gateway to trust any origin certificates. Use with caution over the Internet. The connection will be encrypted, but this mode is vulnerable to "man in the middle" attacks.
- Truststore: Select from the following options. PEM format does not support truststore password.
- None
- JKS with path: Enter the truststore password and path to the truststore file
- JKS with content: Enter the truststore password and binary content as base64
- PKCS#12 / PFX with path: Enter the truststore password and path to the truststore file
- PKCS#12 / PFX with content: Enter the truststore password and binary content as base64
- PEM with path: Enter the truststore password and path to the truststore file
- PEM with content: Enter the truststore password and binary content as base64
- Key store: Select from the following options.
- None
- JKS with path: Enter the key store password, key alias, key password, and path to the key store file
- JKS with content: Enter the key store password, key alias, key password, and binary content as base64
- PKCS#12 / PFX with path: Enter the key store password, key alias, key password, and path to the key store file
- PKCS#12 / PFX with content: Enter the key store password, key alias, key password, and binary content as base64
- PEM with path: Enter the paths to the certificate and private key files
- PEM with content: Enter the certificate and private key
TCP proxy APIs
Edit the endpoint's settings under the General and Configuration tabs.
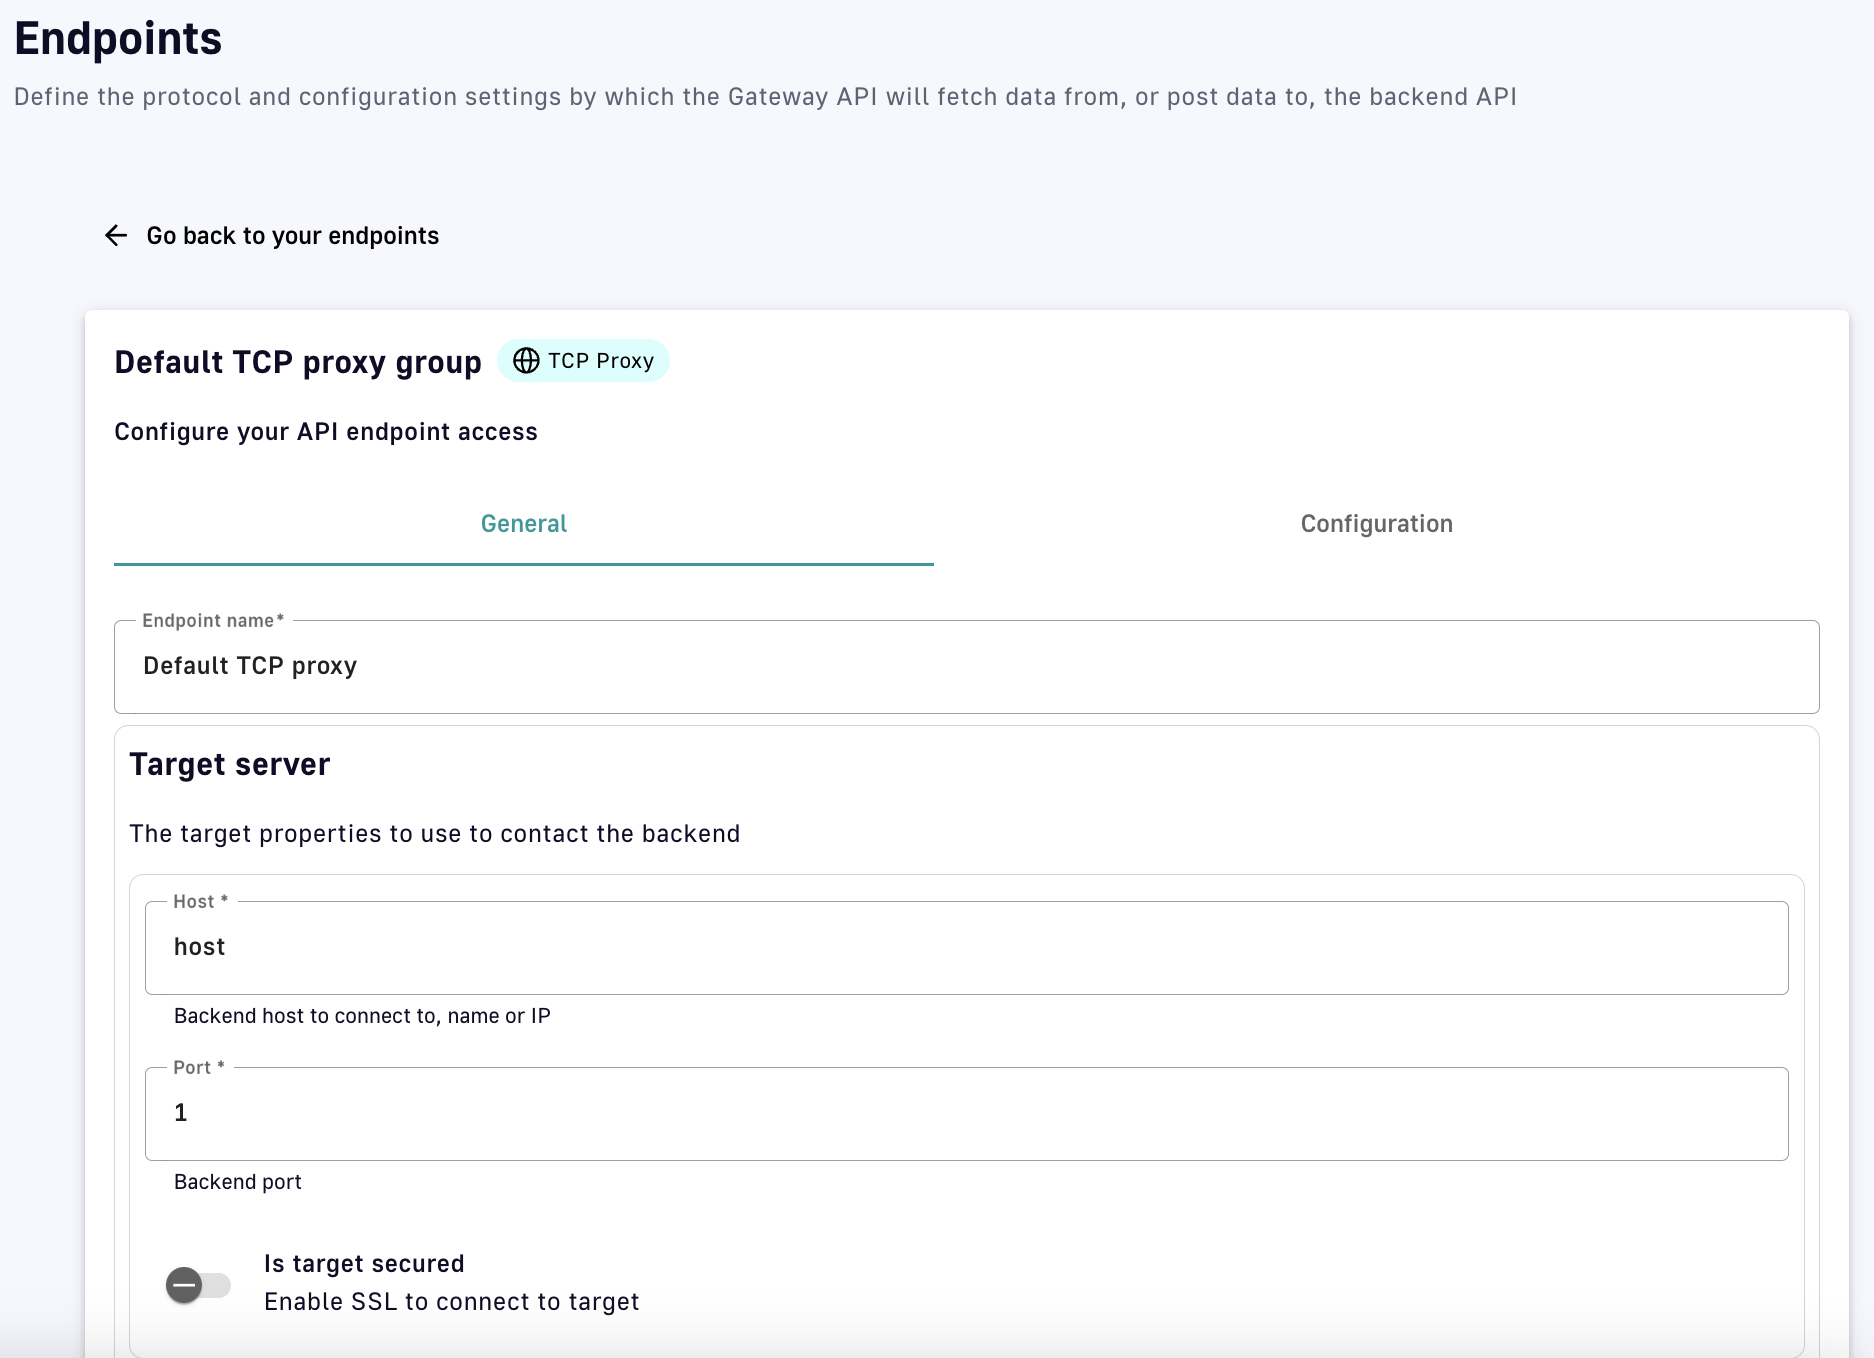
Define the endpoint's General and Configuration settings
General
1. Define your endpoint name
Enter your endpoint name in the Endpoint name text field.
2. Target server
- Host : Enter the name or IP of the backend host to connect to
- Port: Enter the number of the backend port
- Is target secured: Toggle to enable SSL to connect to target
3. Configure the load balancer
Use the arrow keys to select a value for the weight.
Configuration
1. Inherit configuration from the endpoint group
Toggle to ON for the endpoint to inherit its configuration settings from the endpoint group to which it belongs.
2. SSL options
- Verify Host: Toggle to enable host name verification
- Trust all: Toggle ON for the Gateway to trust any origin certificates. Use with caution over the Internet. The connection will be encrypted, but this mode is vulnerable to "man in the middle" attacks.
- Truststore: Select from the following options. PEM format does not support truststore password.
- None
- JKS with path: Enter the truststore password and path to the truststore file
- JKS with content: Enter the truststore password and binary content as base64
- PKCS#12 / PFX with path: Enter the truststore password and path to the truststore file
- PKCS#12 / PFX with content: Enter the truststore password and binary content as base64
- PEM with path: Enter the truststore password and path to the truststore file
- PEM with content: Enter the truststore password and binary content as base64
- Key store: Select from the following options.
- None
- JKS with path: Enter the key store password, key alias, key password, and path to the key store file
- JKS with content: Enter the key store password, key alias, key password, and binary content as base64
- PKCS#12 / PFX with path: Enter the key store password, key alias, key password, and path to the key store file
- PKCS#12 / PFX with content: Enter the key store password, key alias, key password, and binary content as base64
- PEM with path: Enter the paths to the certificate and private key files
- PEM with content: Enter the certificate and private key
3. TCP client options
- Connection timeout: Enter the timeout in ms to connect to the target
- Reconnect attempts: Enter the number of times to try connecting to the target. 0 means no retry.
- Reconnect interval: Enter the interval in ms between connection retries
- Idle timeout (ms): Enter the maximum time a TCP connection will stay active if no data is received or sent. Once the timeout period has elapsed, the unused connection will be closed and the associated resources freed. Zero means no timeout.
- Read idle timeout (ms): The connection will timeout and be closed if no data is received within the timeout period.
- Write idle timeout (ms): The connection will timeout and be closed if no data is sent within the timeout period.
4. Proxy options
Select from the following options.
- No proxy
- Use proxy configured at system level
- Use proxy for client connections: Enter the proxy type (SOCKS4 or SOCKS5), the proxy host and port to connect to, and the proxy username and password (both optional).
Health-check
Overview
The health-check feature can be used for v4 HTTP proxy APIs to monitor the availability and health of your endpoints and/or your API Gateways.
Health-check is not yet available for v4 TCP proxy APIs or v4 message APIs.
Configuration
To access the health-check feature:
-
Log in to your APIM Management Console
-
Select APIs from the left nav
-
Select your API from the list
-
Select Endpoints from the inner left nav
-
Click on the Health-check header
-
Customize the Health-check configuration settings
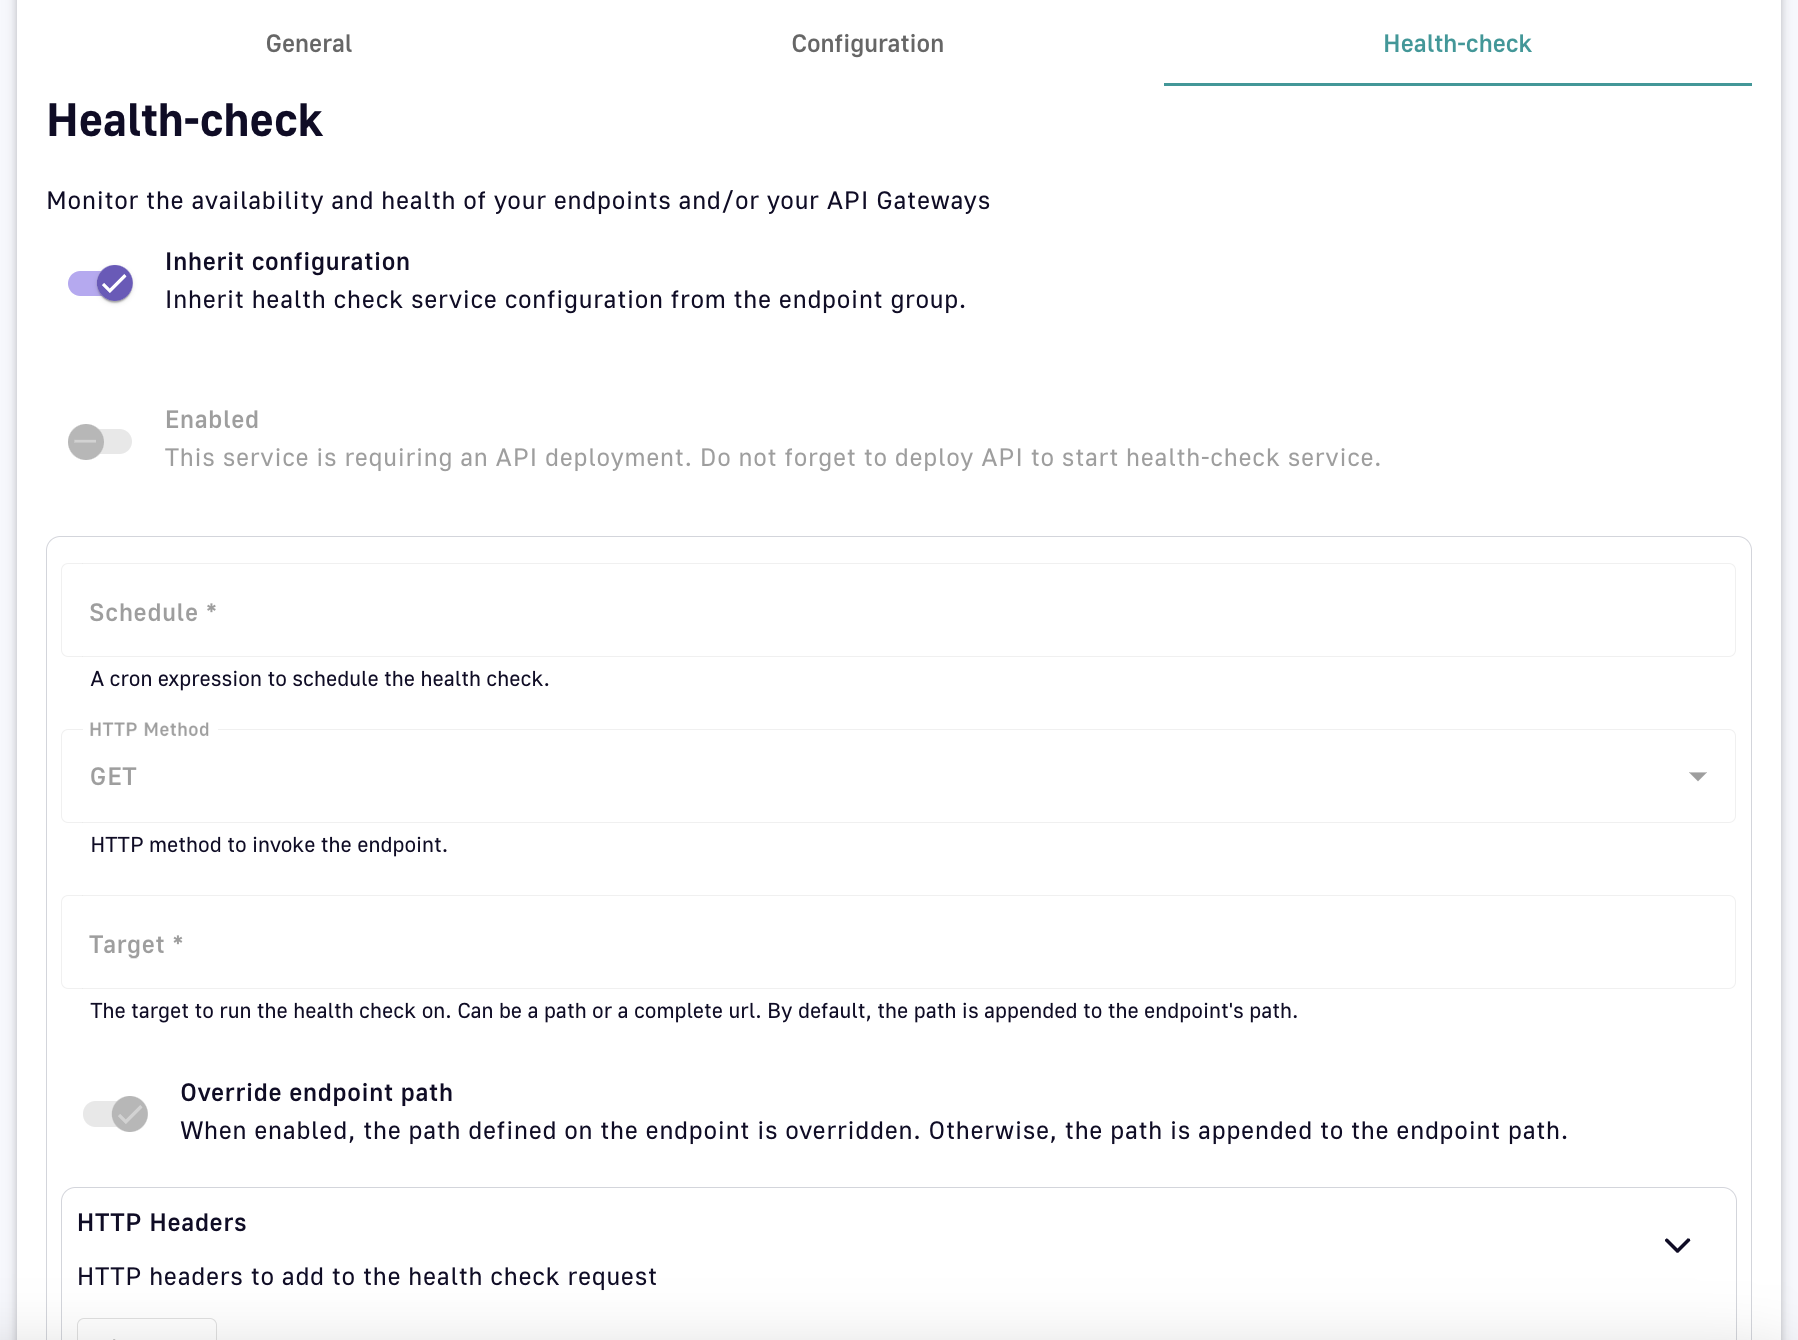
Health-check configuration settings for v4 HTTP proxy APIs
- Inherit configuration: Choose whether to inherit the health-check service configuration from the endpoint group.
- Toggle Enabled to ON to enable the health-check service, which requires that the API has been deployed.
- Schedule: Use a CRON expression to schedule the health-check.
- HTTP Method: Specify the HTTP method to invoke the request.
- Target: Specify the path or complete URL on which to run the health-check. By default, the path is appended to the endpoint's path.
- Toggle Override endpoint path to ON to override the path defined on the endpoint. If toggled OFF, the path will be appended to the endpoint path.
- HTTP Headers: Use the Add button to specify the HTTP headers to add to the health-check request.
- Assertion: Specify the Expression Language expression that will be evaluated by the health-check.
- Success threshold: Specify the number of consecutive positive assertions that will identify the backend service as available.
- Failure threshold: Specify the number of consecutive negative assertions that will identify the backend service as unavailable.
-
Click Validate my endpoints
Quality of Service
Introduction
Quality of Service (QoS) defines the guaranteed level of message delivery of an asynchronous APIs or event broker. While higher Quality of Service corresponds to more reliable message delivery, this could lead to lower system performance. Different QoS are available for every entrypoint/endpoint combination.
QoS levels
The different levels of QoS are defined below:
| Level | Description |
|---|---|
| None |
|
| Auto (0 or N) |
|
| At-Most-Once (0 or 1) |
|
| At-Least-Once (1 or N) |
|
Entrypoint/endpoint compatibility
Quality of Service is set on the entrypoints. A given QoS may or may not be supported by a given endpoint. Support also depends on the protocol used for the entrypoint. The following table outlines QoS compatibility:
| MQTT5 | Kafka | Solace | RabbitMQ | |
|---|---|---|---|---|
| HTTP POST | None Auto | None Auto | None Auto | None Auto |
| HTTP GET | Auto | Auto At-Least-Once At-Most-Once | Auto | Auto At-Least-Once At-Most-Once |
| SSE | None Auto | None Auto At-Least-Once At-Most-Once | None Auto | None Auto At-Least-Once At-Most-Once |
| WebSocket | None Auto | None Auto | None Auto | None Auto |
| Webhook | None Auto At-Least-Once At-Most-Once | None Auto At-Least-Once At-Most-Once | None Auto At-Least-Once At-Most-Once | None Auto At-Least-Once At-Most-Once |
Setting QoS for DSAPI v4 APIs
You can set QoS levels with the qos object of the entrypoints object, as shown in the following example. openapi.json.
"entrypoints": [
                {
                    "type": "sse",
                    "qos": "none",
                    "configuration": {
                        "heartbeatIntervalInMs": 5000,
                        "metadataAsComment": false,
                        "headersAsComment": false
                    }
                }
            ]
General Info Settings
Introduction
Every v4 API in DSAPI has general settings that can be viewed and altered on the Configuration page.
{% hint style="info" %} The settings configuration is the same for both v2 and v4 APIs, with the exception of the API Quality section. As of DSAPI APIM 4.3, only v2 APIs support the API Quality feature. {% endhint %}
General settings
To access your API's general settings:
- Log in to your APIM Console
- Click on APIs in the left nav
- Select your API
- Click on Configuration in the inner left nav
- Click on the General tab, which is split into two main sections:
The Configuration page shows two main areas under the General tab:
General details
- Name
- Version
- Description
- Labels
- Categories
- API picture
- API background
- Owner, creation, and connection information
- The ability to export your API definition, import a new API definition to update your API, duplicate your API, and promote your API
Danger zone
This section includes access to mission-critical (and potentially dangerous) actions:
- Start the API: Deploy the API to all Gateways, or the Gateways specified using Sharding tags
- Publish the API: Publish the API to the Developer Portal
- Make Public: Make the API public so that everybody can see it
- Deprecate: Unpublish the API from the Developer Portal
- Delete: Delete the API
Any time you make a change to your API, click the Save icon at the bottom of the screen.
User Permissions
Introduction
The sections below detail how to manage user and group access to individual APIs:
See User Management and Permissions to learn more about user and group creation and administration.
Configure API user and group access
To configure user and group access for an API:
- Log in to your APIM Console
- Click on APIs in the left nav
- Select your API
- Click on Configuration in the inner left nav
- Select the User Permissions tab
Add members to an API
Click + Add members to add members to your API or alter member roles, which grant specific permissions. For more information on roles, please refer to the roles documentation.
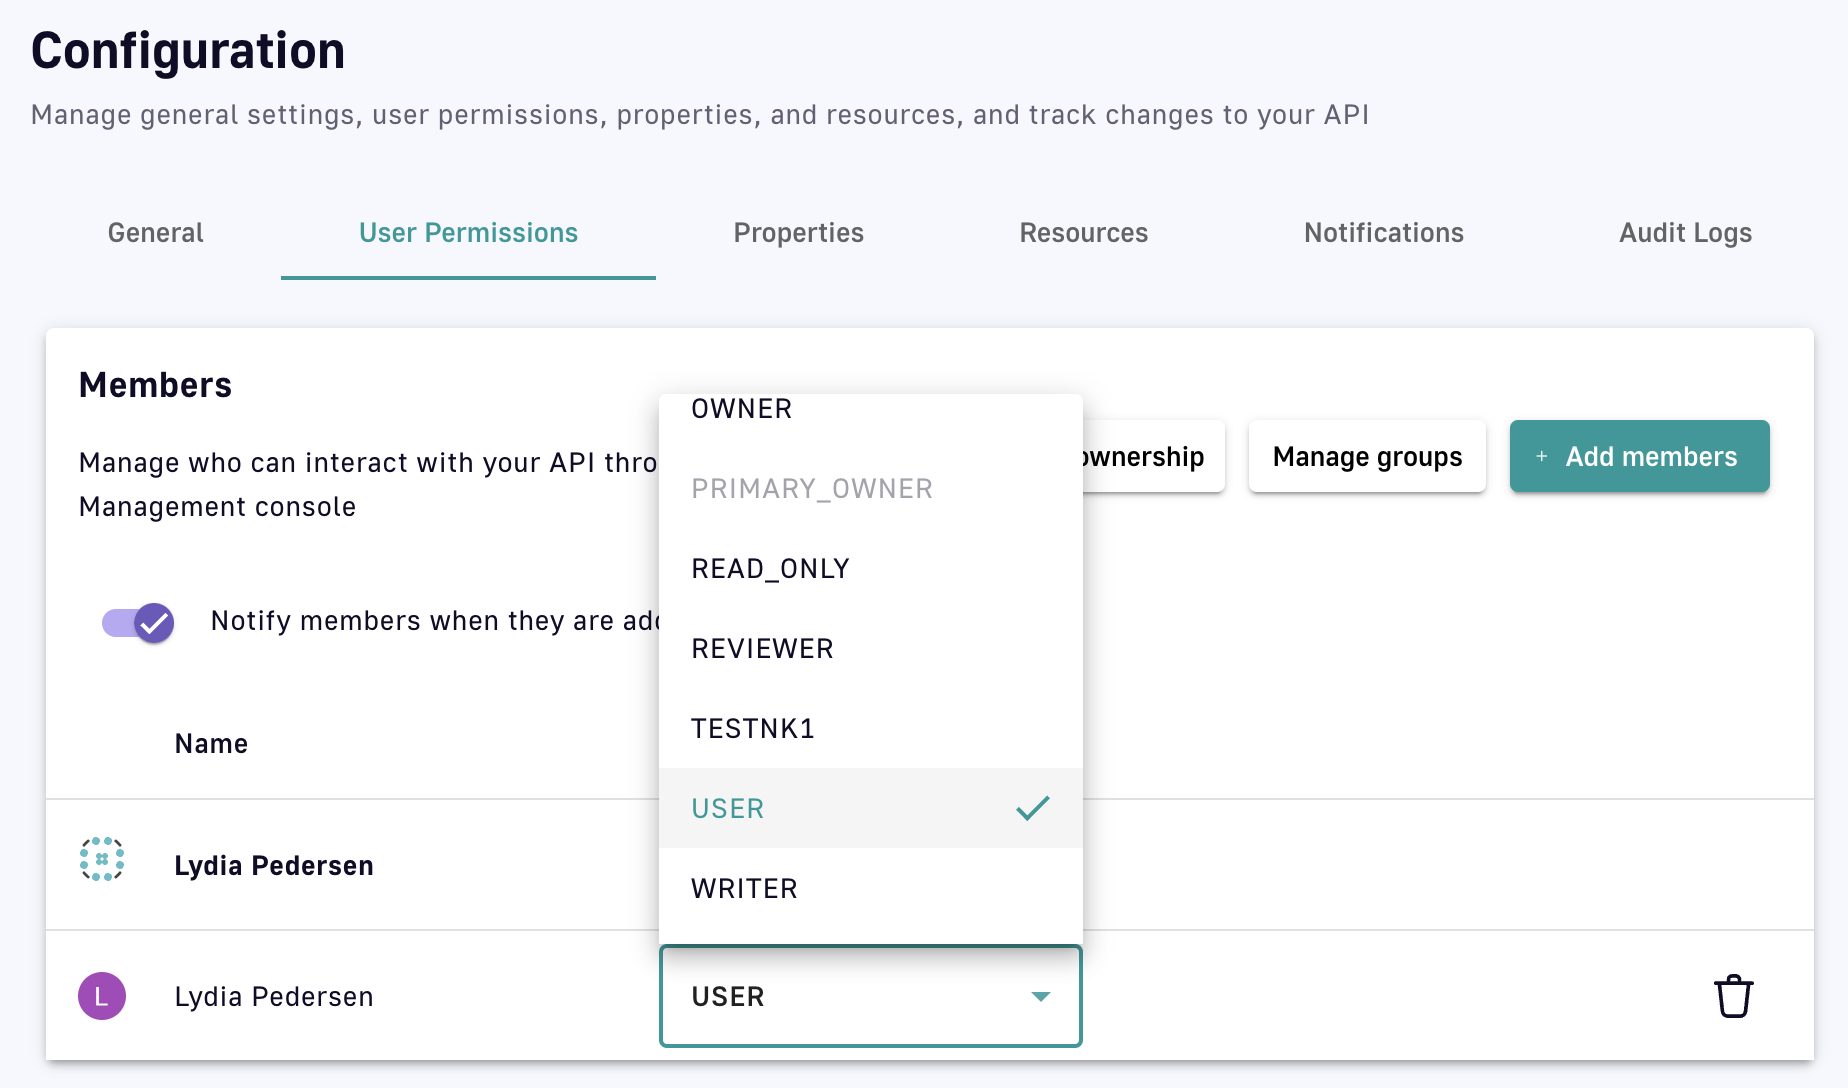
Add members and alter roles
Add groups to an API
To give groups access to your API, click Manage groups and select the desired group(s) from the drop-down menu. This will give all members of that group access to your API.
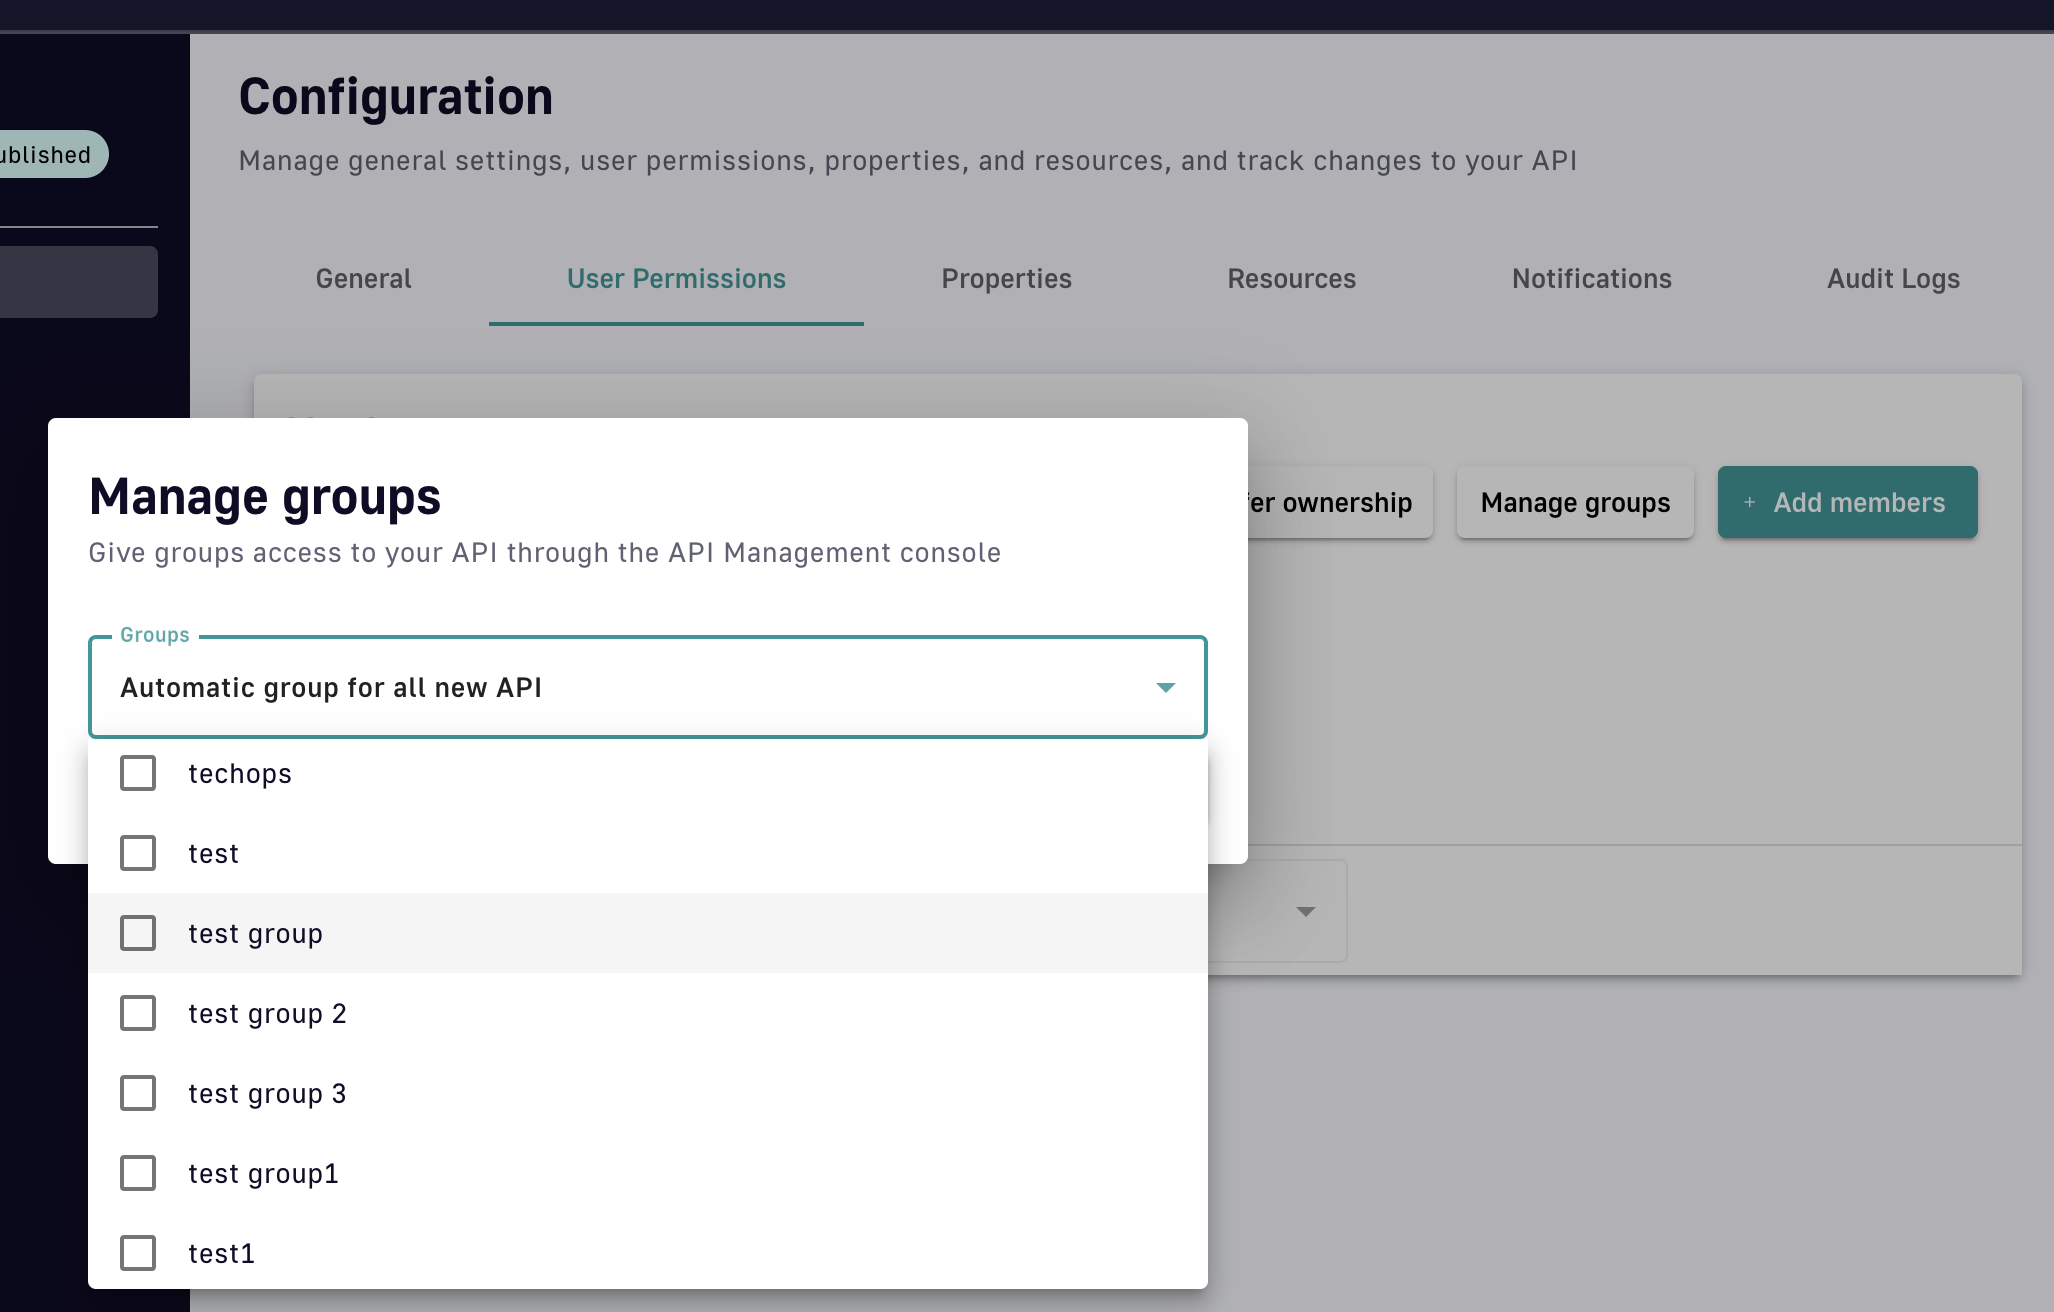
Give groups access to your API
Transfer API ownership
If you are the owner of the API, you can transfer ownership to another member, user, or group. Click Transfer ownership, then select API member, Other user, or Primary owner group. Next, define the stakeholder to which you want to transfer API ownership and assign that stakeholder a role.
Transfer API ownership
Audit Logs
Overview
Users can view and filter the audit logs and events for v4 APIs, which are summarized in table format.
Access audit logs
To view and filter v4 API audit logs:
- Log in to your APIM Console
- Select APIs from the left nav
- Select your API
- Click Configuration in the inner left nav
- Select Audit Logs from the tab headers
.png)
Access audit logs for a v4 API
This page captures API-level events and audit entries, which can be filtered by event type and date range.
Version History
Overview
The Version History feature allows you to view a v4 API's deployment history and the JSON definition of each API version.
Access history and view versions
To access the version history:
- Log in to your APIM Management Console
- Select APIs from the left nav
- Select your API from the list
- Select Deployment from the inner left nav
- Click on the Version History header
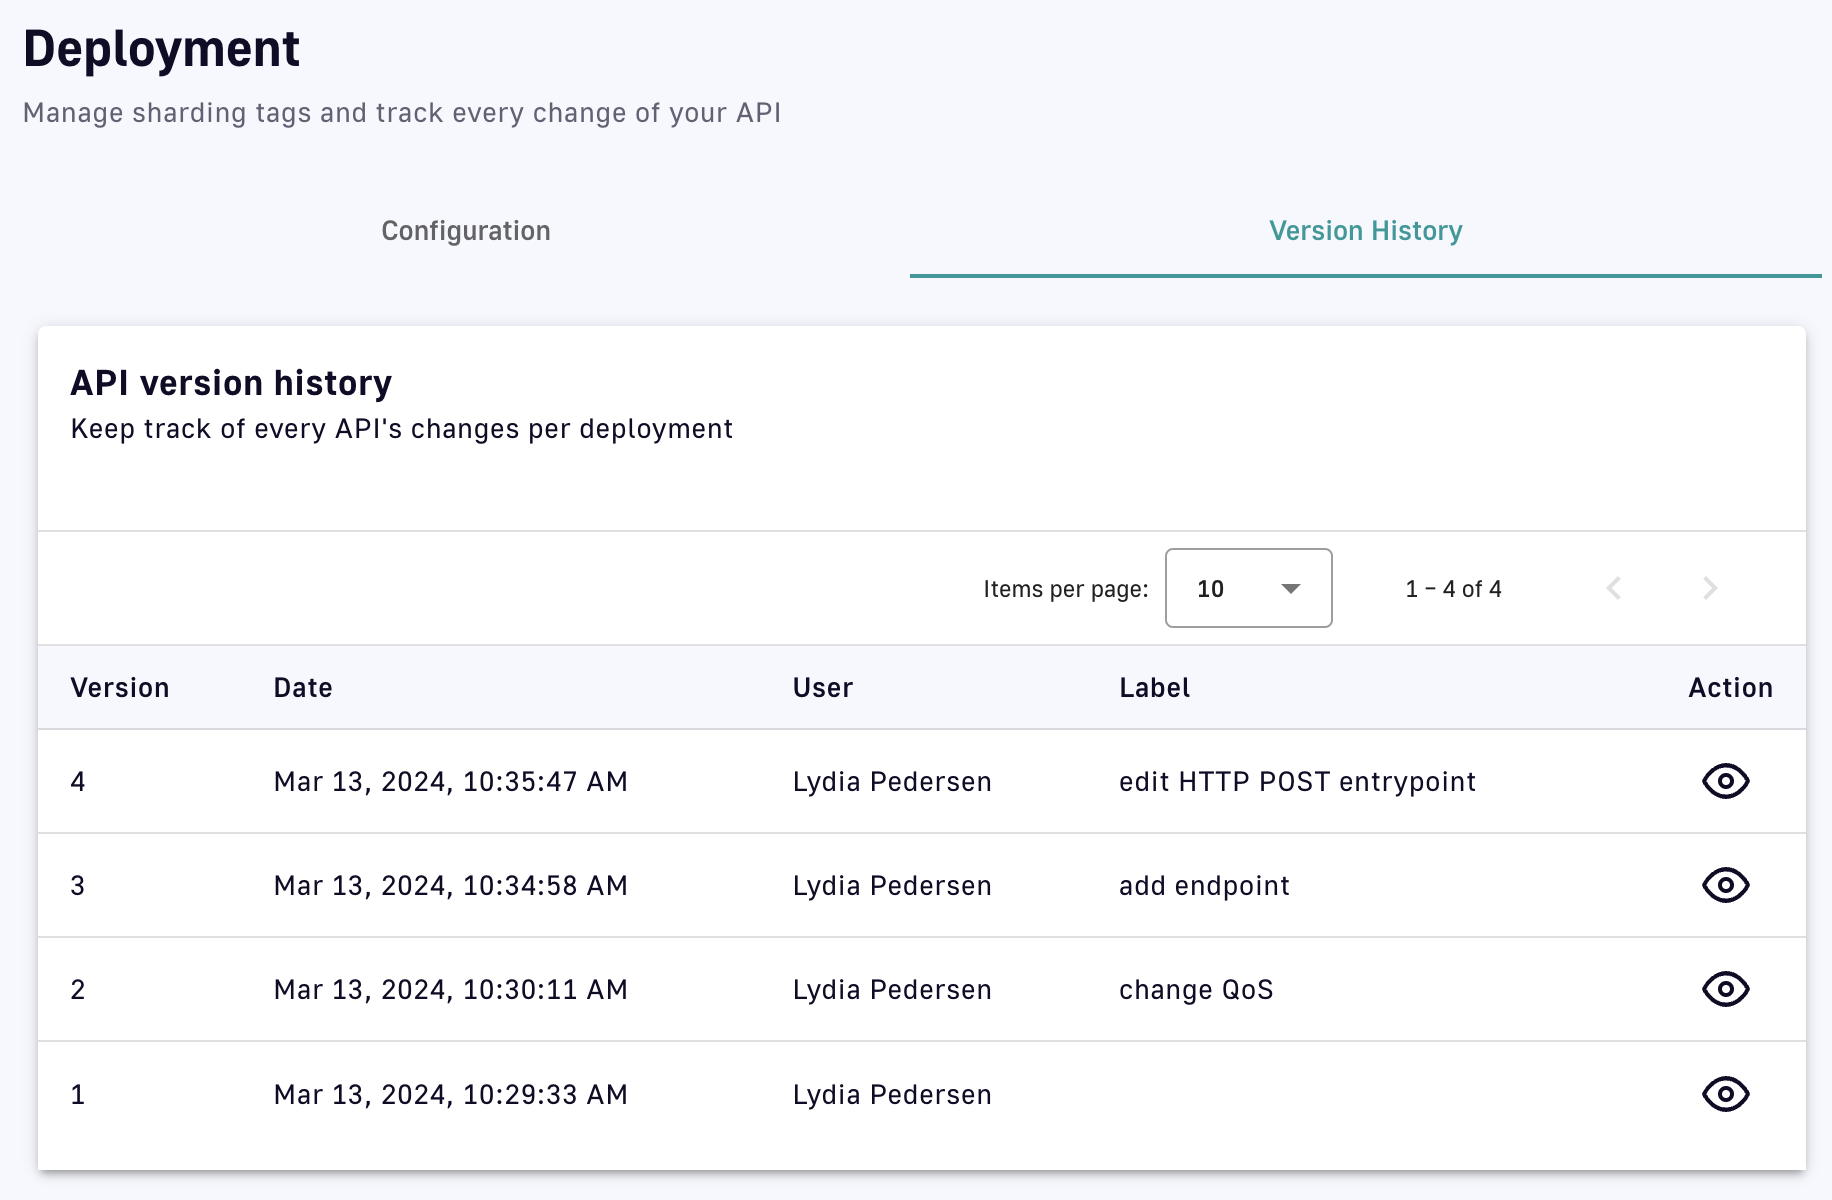
View the API version history
To view the JSON definition of a specific API version, click the eye icon under the Action header to Show version:
.png)
JSON API definition
Documentation
As of DSAPI 4.3, the APIM Documentation feature is only available for v4 APIs.
Overview
Documentation can be added via the APIM Management Console to inform API consumers how to use an API. If the API and documentation are both published to the Developer Portal, the documentation will appear in the Portal for consumers to discover.
The sections below describe how to:
Add documentation
To add documentation to an API:
- Select APIs from the left sidebar of the Management Console
- Select the API you want to document
- Select Documentation from the inner left sidebar
- Select the Pages header tab
- Click on Add new page or Add new folder to start structuring your documentation content
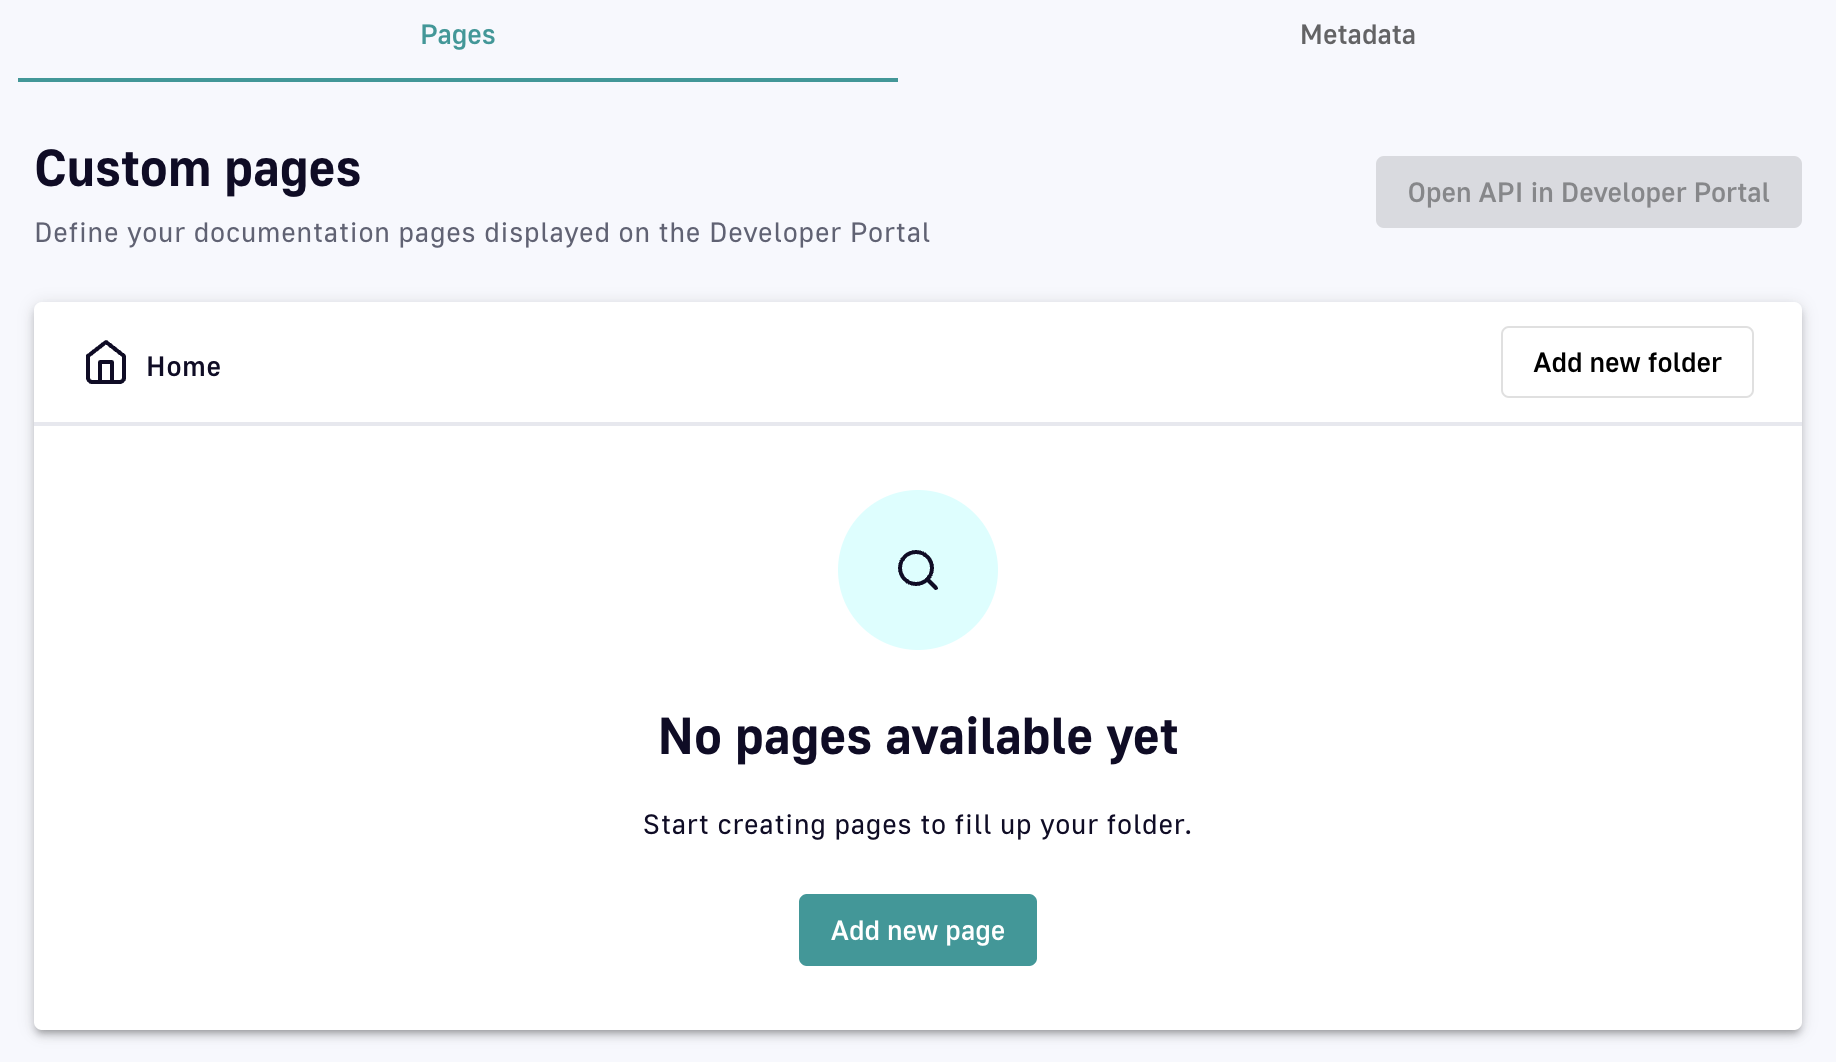
Add pages and/or folders to your API documentation
Add folders
Folders allow you to organize your documentation by grouping pages. To configure your first folder:
- From the top-level Home directory, click Add new folder
- Specify the following:
- Name: This field is required
- Visibility: Select whether the folder visibility is Public or Private
- Public: This is the default visibility. The contents of the folder can be viewed in the Developer Portal by anonymous users.
- Private: Users must be authenticated to view the contents of the folder in the Developer Portal
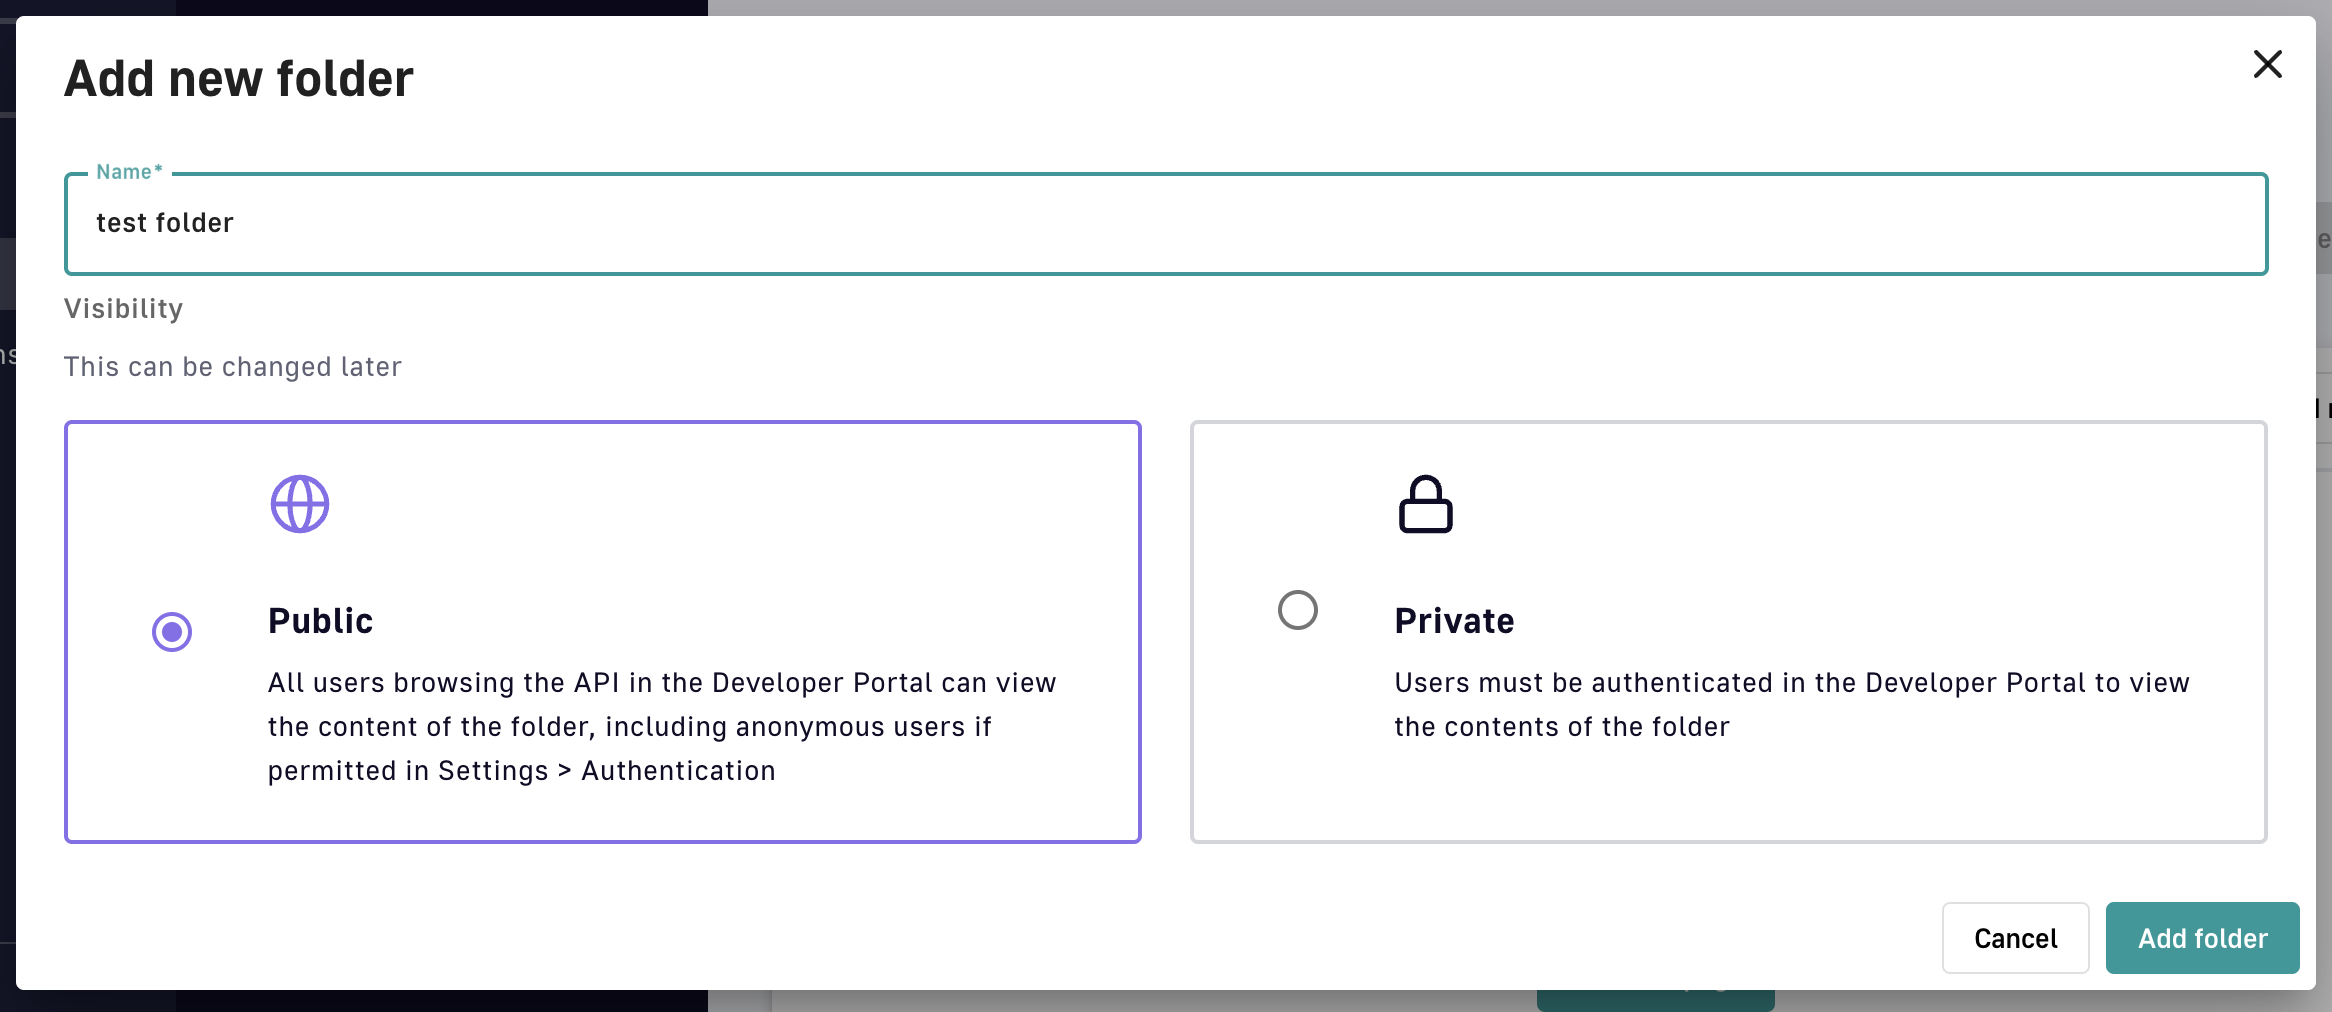
Add a folder
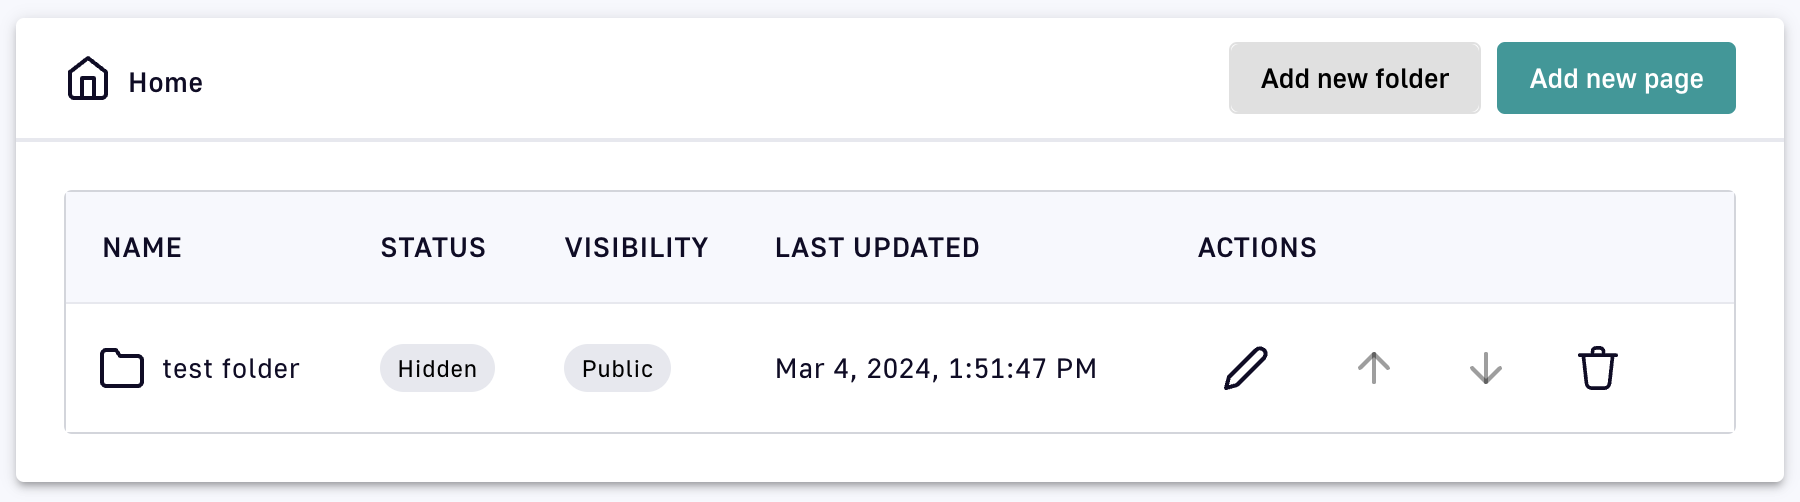
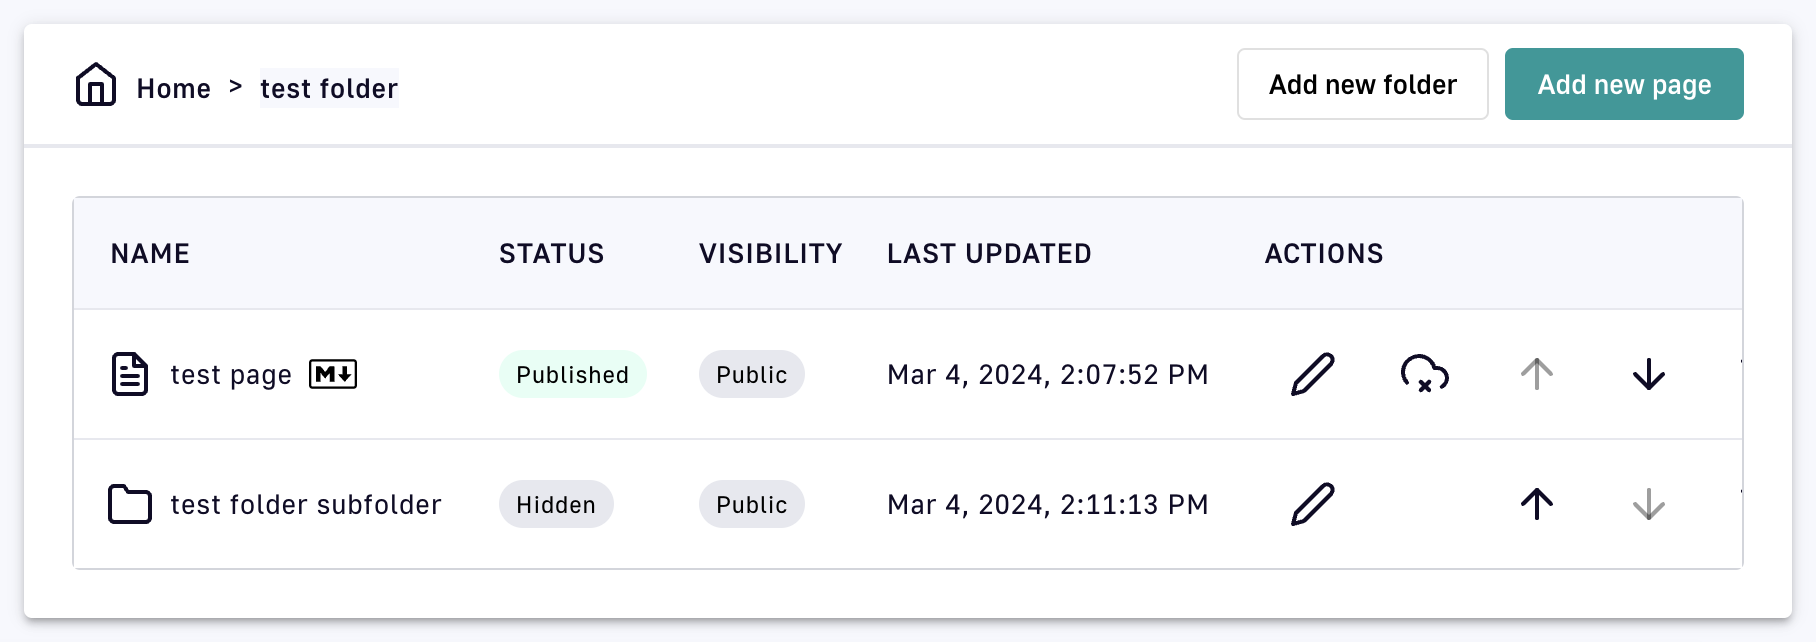
Once you click Add folder, the folder will appear at the top-level Home directory in Documentation. The directory will show the folder's status, visibility, the time the folder was last updated, and a badge indicating that the entry is a folder.
A folder will be Hidden, or not visible in the Developer Portal, until it contains published pages.
Documentation supports a nested structure. Once you've added a folder to the Home directory, you can click into it to create additional folders or pages.
Add pages
Pages allow you to document your API using Markdown. The process of adding a page consists of the following steps:
Step 1: Configure a page
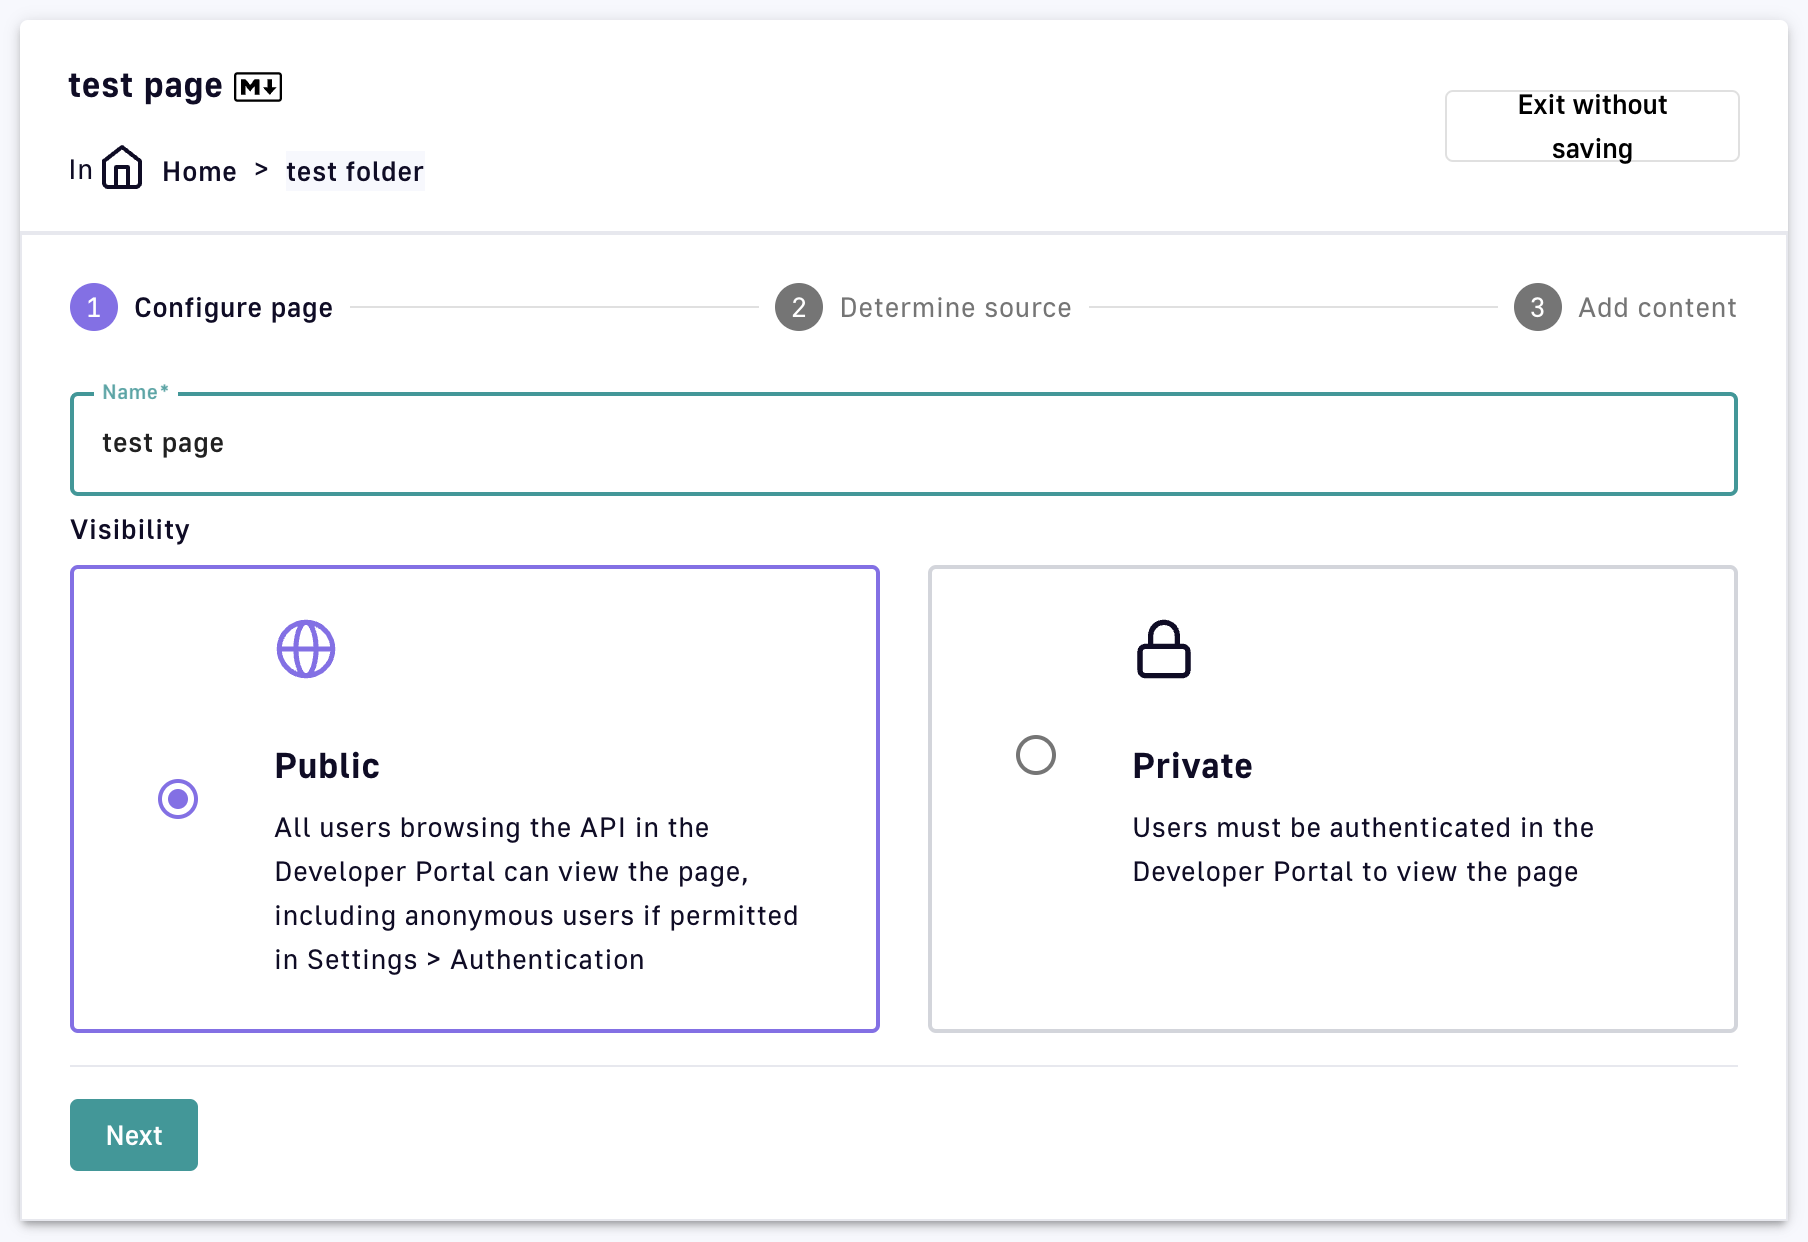
When you click Add new page, a drop-down menu will appear. Choose between Markdown, OpenAPI, and AsyncAPI as the page type.
After selecting the page type, name the page and select whether the page is Public or Private:
- Name: This field is required
- Visibility: Select whether the folder visibility is Public or Private
- Public: This is the default visibility. The page can be viewed in the Developer Portal by anonymous users.
- Private: Users must be authenticated to view the page in the Developer Portal
Markdown page configuration
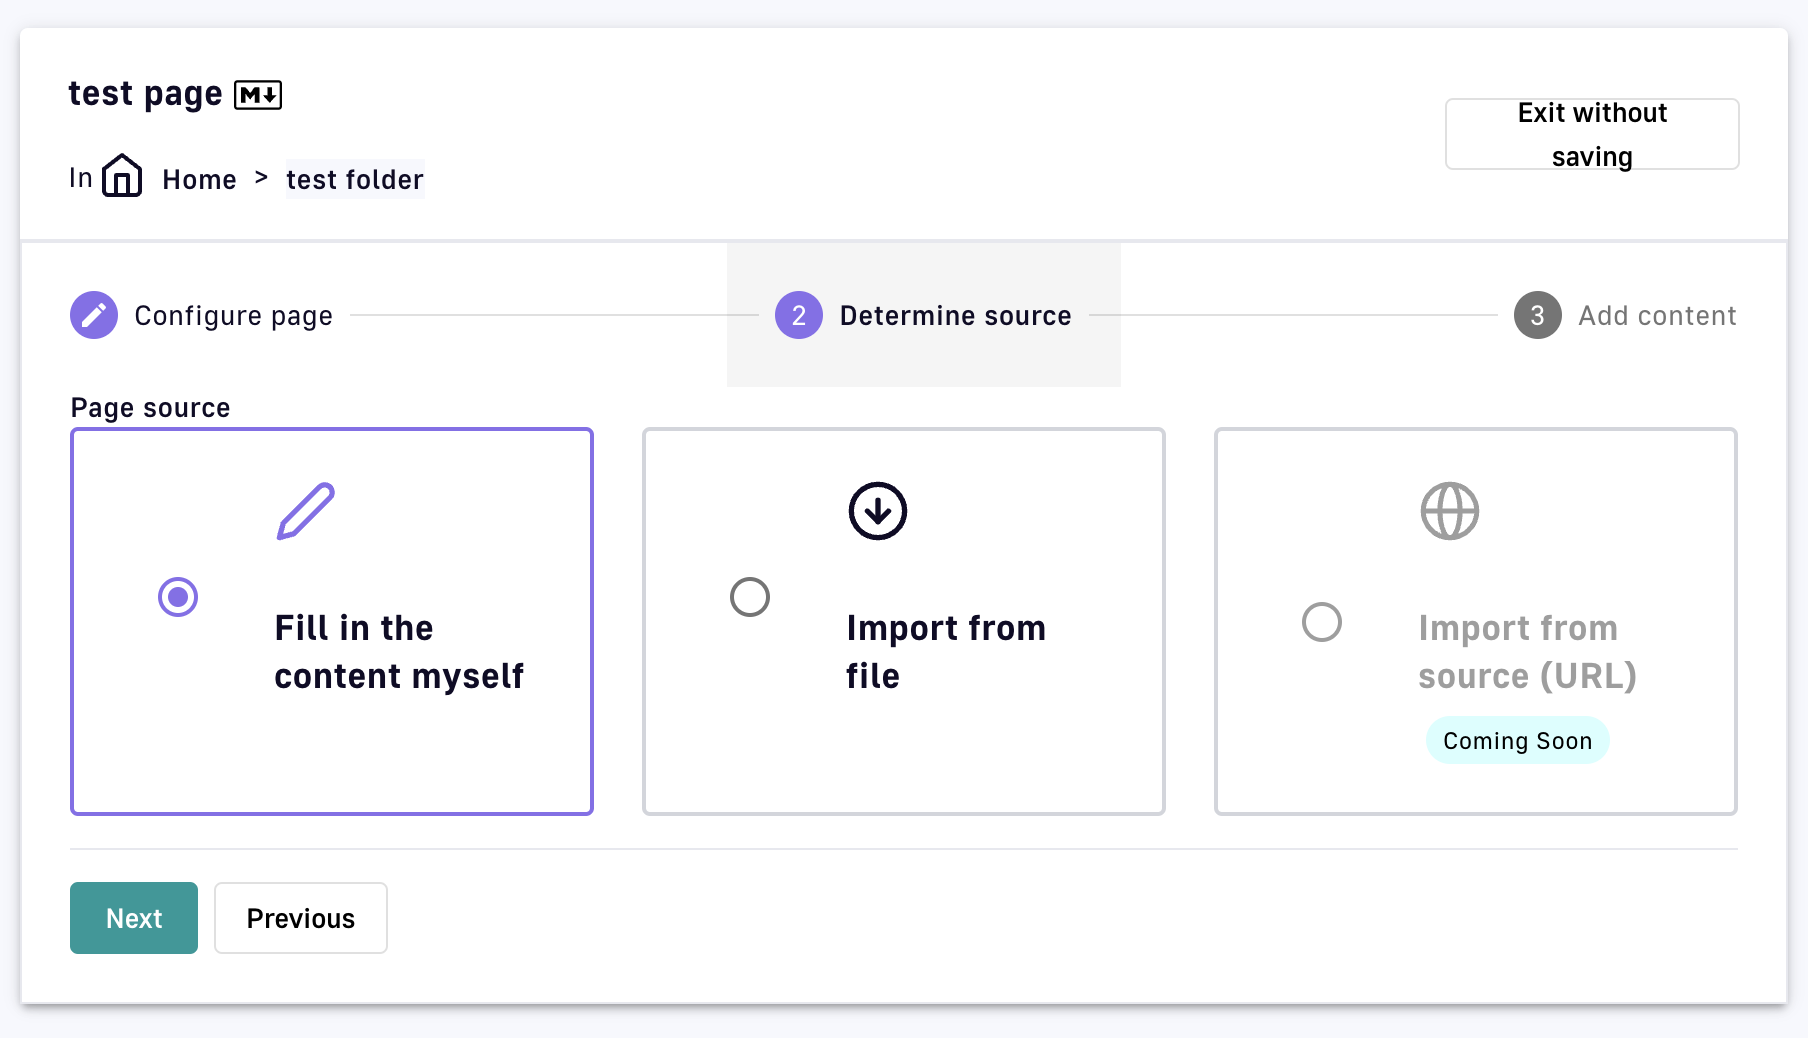
Step 2: Add content
Choose how you want to add content: Fill in the content myself or Import from file
Choose how to add content to a Markdown page
Fill in the content myself
This method uses the text editor to generate content based on your selected documentation type. In addition, APIM supports templating with API properties.Direct text entry
Enter the page content in the text editor as Markdown, or enter YAML or JSON to create an API docs page from either an OpenAPI or AsyncAPI spec.
To automate the process of creating OpenAPI or AsyncAPI docs pages for v4 APIs, you can make a Management API endpoint REST call to create a docs page from an OpenAPI or AsyncAPI spec.
Toggle preview enables a side-by-side view of the content you enter and the rendered page.
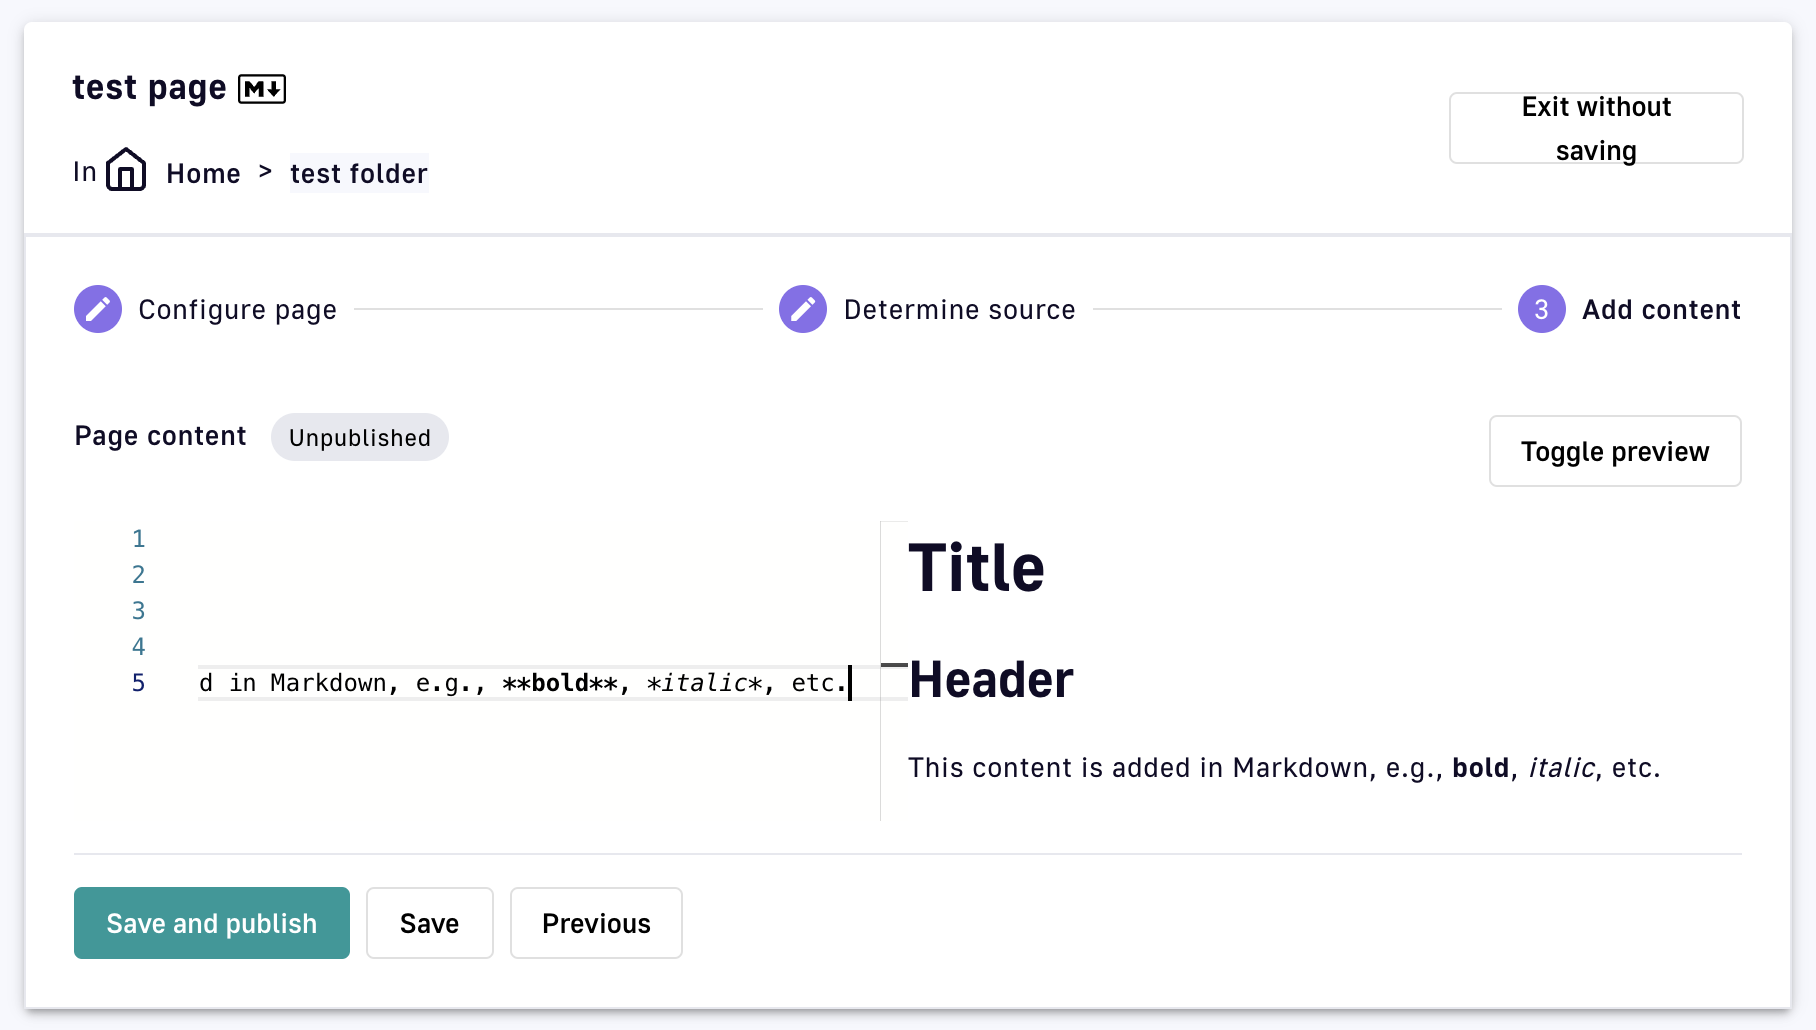
Add content to a Markdown page
Templating with API properties
Use the following syntax to access the API data in your API documentation: ${api.name} or ${api.metadata['foo-bar']}.
The sample script below creates a documentation template based on the Apache FreeMarker template engine:
<#if api.picture??>
    <img src="${api.picture}" style="float: right;max-width: 60px;"/>
    </#if>

    # Welcome to the API ${api.name}(${api.version})!

    The API is <span style="text-transform: lowercase;color: <#if api.state=='STARTED'>green<#else>red</#if>">${api.state}</span>.

    This API has been created on ${api.createdAt?datetime} and updated on ${api.updatedAt?datetime}.

    <#if api.deployedAt??>
    This API has been deployed on ${api.deployedAt?datetime}.
    <#else>
    This API has not yet been deployed.
    </#if>

    <#if api.visibility=='PUBLIC'>
    This API is publicly exposed.
    <#else>
    This API is not publicly exposed.
    </#if>

    <#if api.tags?has_content>
    Sharding tags: ${api.tags?join(", ")}
    </#if>

    ## Description

    ${api.description}

    ## Rating

    You can rate and put a comment for this API <a href='/#!/apis/${api.id}/ratings'>here</a>.

    ## Contact

    <#if api.metadata['email-support']??>
    The support contact is <a href="mailto:${api.metadata['email-support']}">${api.metadata['email-support']}</a>.
    </#if>

    The API owner is <#if api.primaryOwner.email??><a href="mailto:${api.primaryOwner.email}">${api.primaryOwner.displayName}</a><#else>${api.primaryOwner.displayName}</#if>.
The available API properties are listed in the following table:
| Field name | Field type | Example |
|---|---|---|
| id | String | 70e72a24-59ac-4bad-a72a-2459acbbad39 |
| name | String | My first API |
| description | String | My first API |
| version | String | 1 |
| metadata | Map | {"email-support": "support.contact@company.com"} |
| createdAt | Date | Jul 14, 2018 2:44:00 PM |
| updatedAt | Date | Jul 14, 2018 2:46:00 PM |
| deployedAt | Date | Jul 14, 2018 2:49:00 PM |
| picture | String | data:image/png;base64,iVBO… |
| state | String | STARTED/STOPPED |
| visibility | String | PUBLIC/PRIVATE |
| tags | Array | ["internal", "sales"] |
| primaryOwner.displayName | String | Firstname Lastname |
| primaryOwner.email | String | firstname.lastname@company.com |
Import from file
Upload a Markdown, OpenAPI, or AsyncAPI file as a documentation page. Only one file can be uploaded at a time..png)
Import a Markdown file
You have the option to save the page with or without publishing it to the Developer Portal. Once the content is saved, the page can be viewed from whichever directory it was added to. The directory will show the page's status, visibility, the time the page was last updated, a badge indicating that the entry is a page, and a badge indicating the page type.
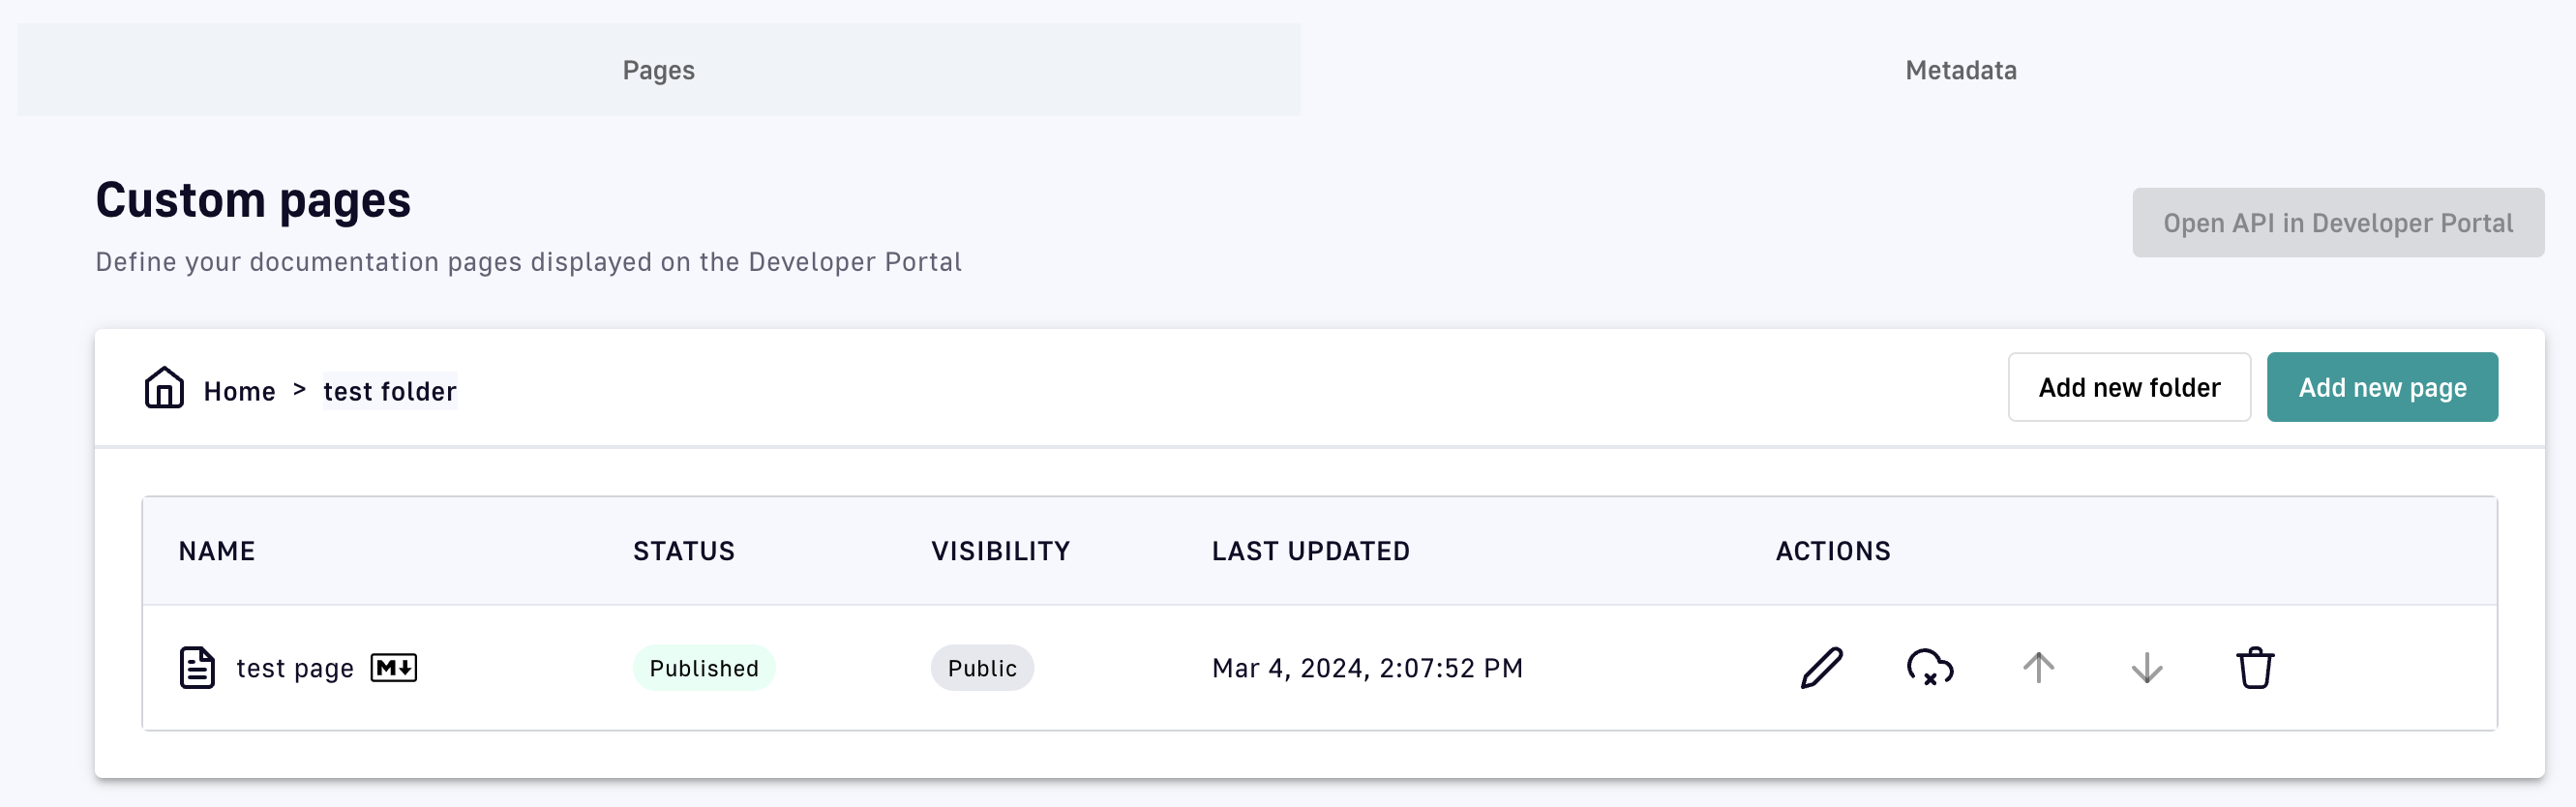
Test page added to test folder
Add metadata
Dynamic v4 API documentation pages can be created by adding metadata. To view metadata keys and values for v4 API documentation, select the Metadata header.
.png)
View API metadata
To view metadata keys and values for v4 API documentation, click Add API Metadata and specify the following:
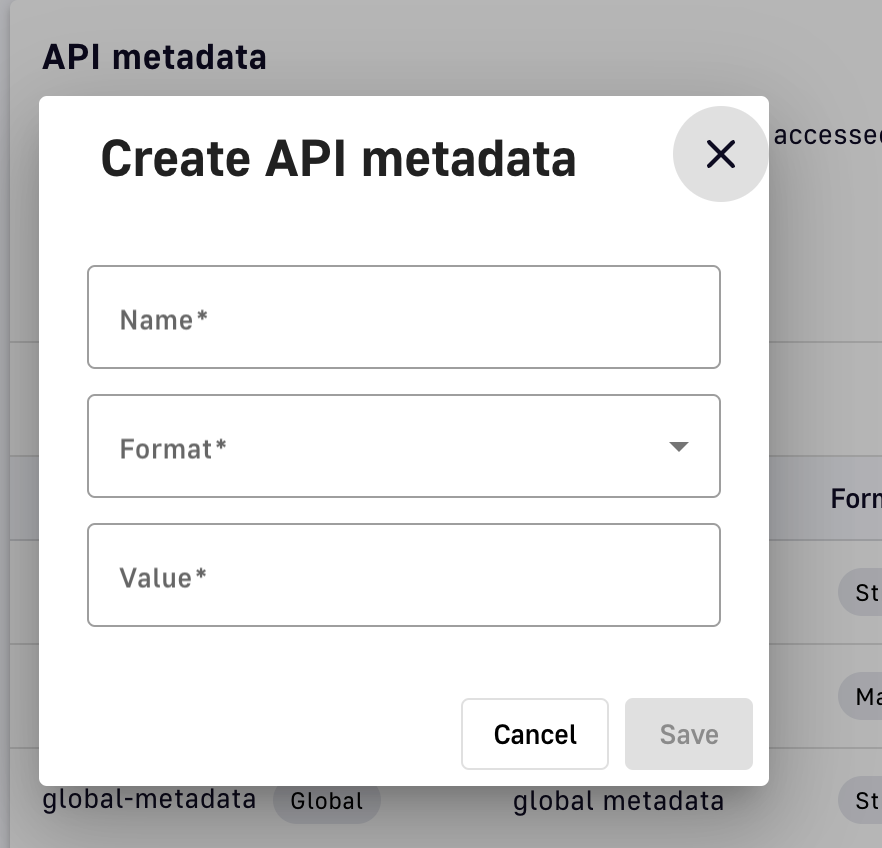
Add API metadata
- Name: Enter a name for the metadata
- Format: Select a metadata format from the drop-down menu. Available options are string, numeric, boolean, date, mail, or url.
- Value: Enter a value for the metadata
Changes to metadata values are reflected on the portal.
Referencing Metadata
To reference metadata in the markdown entry, use the following syntax:
${api.metadata['<value>']}
- Replace <value> with the metadata entry that you want to reference.
Here is an example that references a metadata entry named custom:
${api.metadata['custom']}
Editing
To edit or delete folders or pages, or to change the documentation structure, select the Pages header and use the icons in the Actions section of an entry. All edits are immediately shown in the Developer Portal.
Select from Actions to edit a page
Edit folders: To edit a folder's name or visibility, click on the pencil icon in the folder's entry, change the name and/or visibility, then click Save. The changes made to a folder's visibility will impact who can see it in the Developer Portal.
Edit pages: To edit an existing page, click on the pencil icon in the page's entry, and change the name, visibility, and/or content, where both user-created and imported content can be edited via the Markdown editor. By enabling Toggle preview, you can view the content you enter and the rendered page side-by-side. Next, if the page is already published, click Publish changes. If the page is not published, you will have the option to Save or Save and publish your changes.
Publish/unpublish: To publish or unpublish a page, click the cloud icon.
Reorder: To change the order of pages and folders in a directory, use the up and down arrows.
Delete: To delete a page or folder, click the associated trash icon. Only empty folders can be deleted.
Link pages
Page referencing allows documentation to be reused and easily exported between environments. Within an API's documentation, you can link to one page from another via special syntax.
If the referenced page is private, the user will see a 404 after clicking on the link.
Pages cannot be shared across APIs.
Page references are passed to the target folder relative to the root directory of the API documentation using the syntax [link](/#!/documentation/api/path/to%20a/document/document%20name#MARKDOWN).
Syntax requirements:
- For the API-scoped path to an API's documentation page, the link must start with
/#!/documentation/api/. - Guides, or environment-level documentation pages, also support this syntax, but are prefixed by
/#!/documentation/environment. You can reference an environment-level Guide page in a Guide page itself, or within a regular API page. - The user needs to provide the names of the folders in the path and the name of the document with the correct extension (MARKDOWN, ASCIIDOC, ASYNCAPI, SWAGGER).
- All spaces in folder or page names must be replaced with
%20, as is done in a navigator. This is the only symbol/character that needs to be encoded by the user. - The names of the folder or page are not case-sensitive. No two folders or no two pages with the same extension can have the same spelling, regardless of capitalization.
View documentation
Markdown, OpenAPI spec, and AsyncAPI spec documentation pages will be rendered in the Developer Portal if both the API and documentation have been published. In order for a folder to be visible in the Portal, it must contain at least one published page. Otherwise, the folder will be tagged as Hidden.
To view the documentation in the Developer Portal:
-
Click Open API in Developer Portal
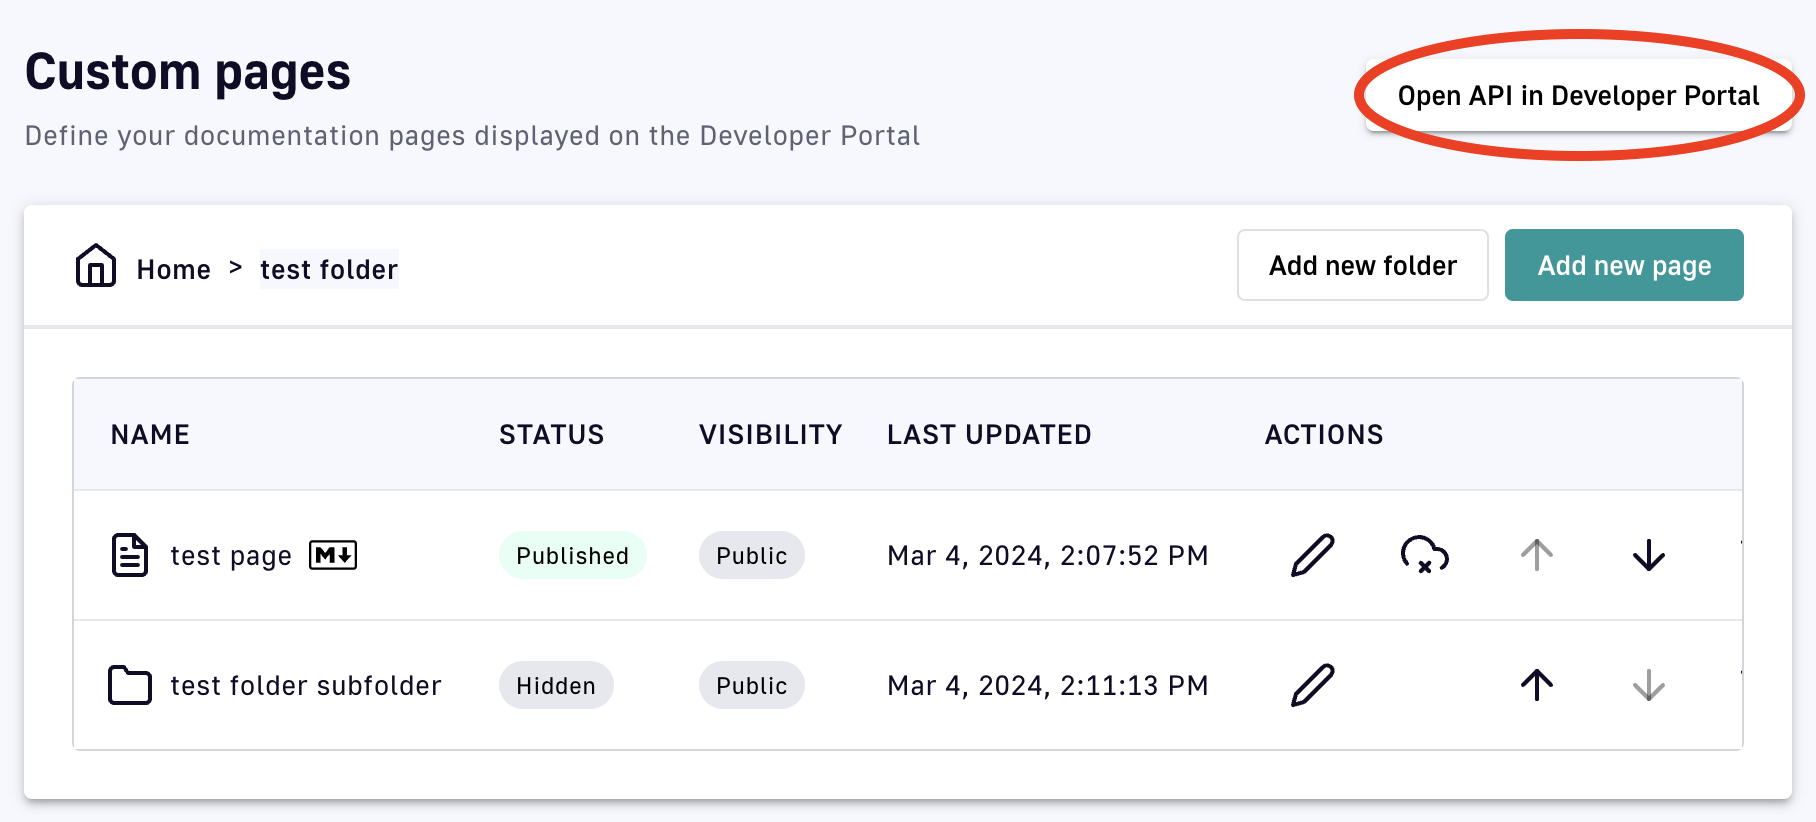
Open API in Developer Portal
-
Click on Documentation in the header options
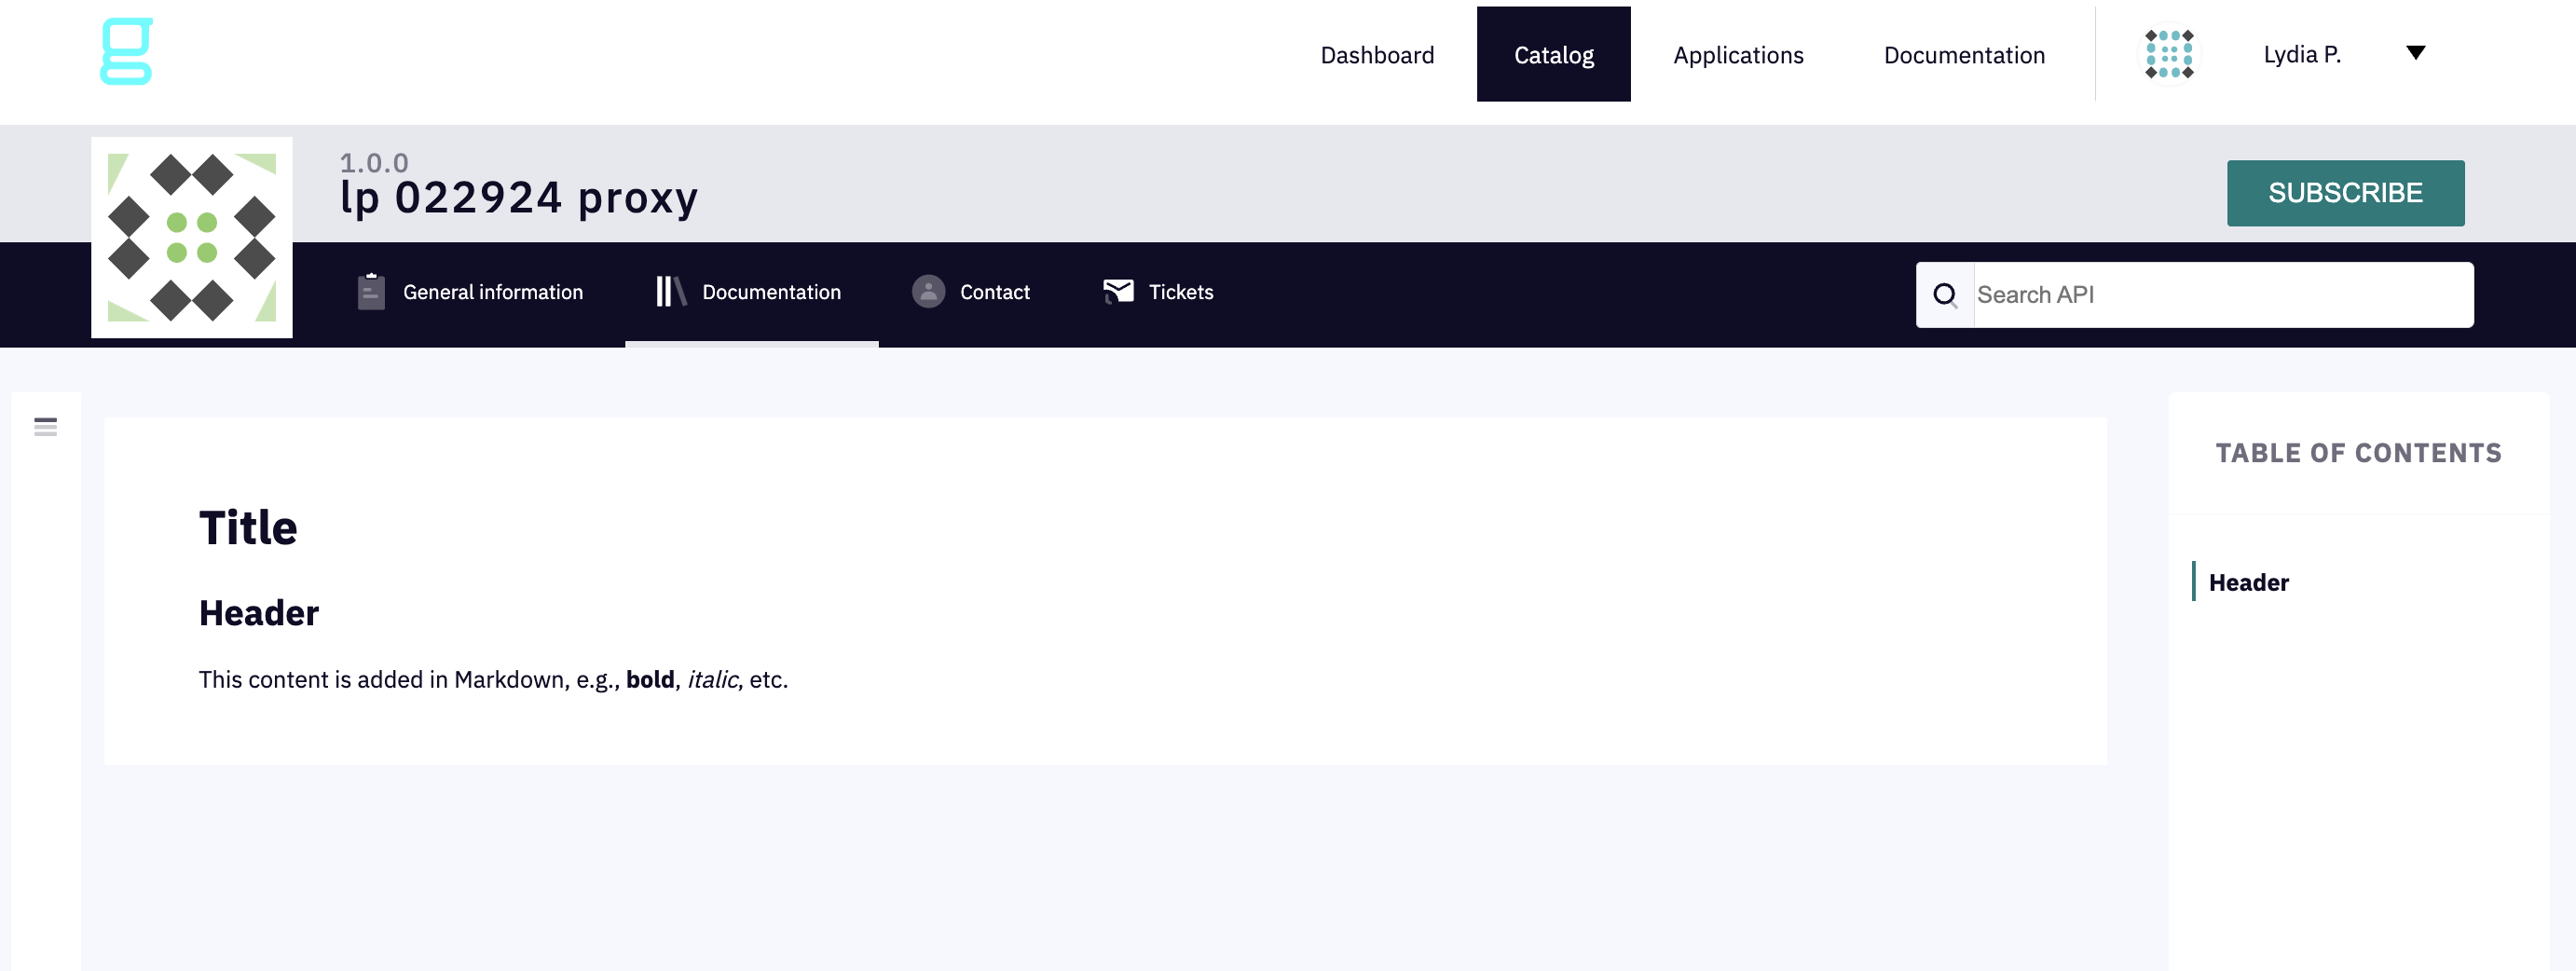
API documentation
Send messages
In addition to making API documentation available via the Developer Portal, you can send messages to parties interested in your API to advertise updates, warn of upcoming changes, etc.
To configure message delivery mechanism, recipients, and content:
-
Select APIs from the left sidebar of the Management Console
-
Select the API you want to send a message about
-
Select Consumers from the inner left sidebar
-
Select the Broadcasts tab
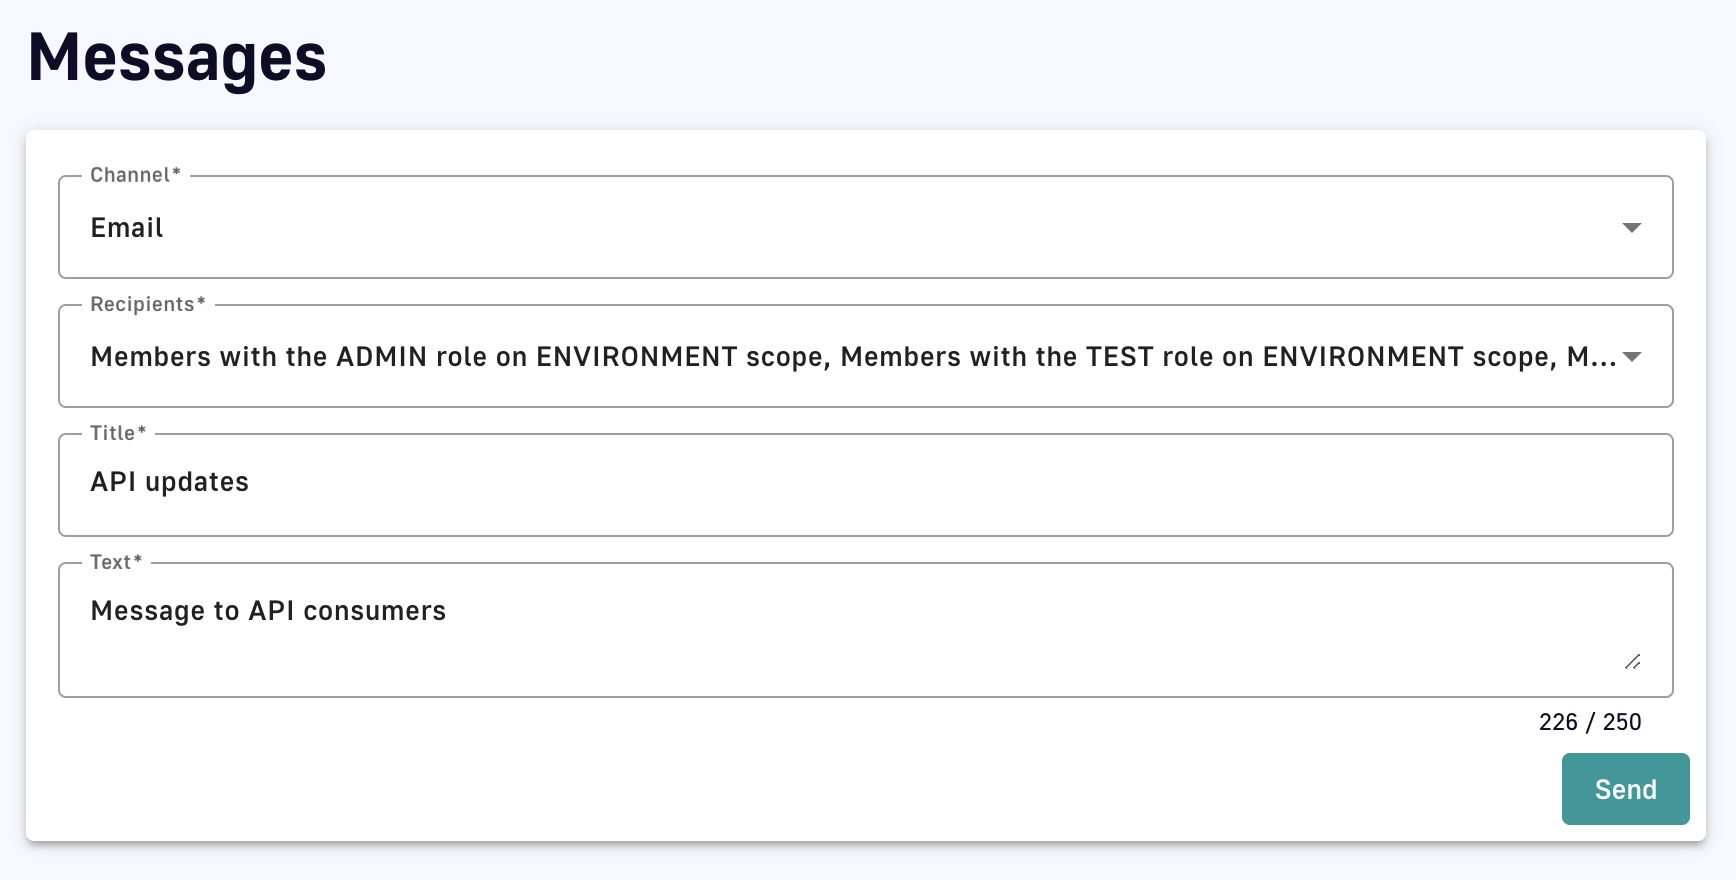
Configure messages
-
Specify the following:
- Channel: Choose to send your message via Email, Portal notifications, or POST HTTP message
- Recipients: From the drop-down menu, select message recipients based on member role and scope
- Title: Enter a title for your message
- Text: Enter the text of your message
-
Click Send